Our friend John Sowash from Chromebook Classroom was kind enough to share with us this article. Take a look and do not forget to give him a follow: https://www.facebook.com/chromebookclassroom
As a high school science teacher, I spent a lot of time in front of the whiteboard and the overhead projector, diagraming cells, punnett squares, and the Krebs cycle (it’s complicated, trust me!).
As classrooms ha
ve become digital, drawing and sketching things by hand has become less common.
That is starting to change.
The availability of low-cost touch screen devices and the ability to purchase low-cost pen tablets makes digital doodling possible!
The One by Wacom is a great example.
It’s compatible with all platforms, including Chromebooks, and it instantly adds touch capabilities to any device.
Even if you have a touch screen Chromebook, writing on a vertical screen gets old pretty quick. If you plan on slinging a lot of digital ink, get a One by Wacom!
Here are the top five apps that I use with my One by Wacom
Annotate with Chrome Canvas
Chrome Canvas is a simple drawing tool that I use to quickly annotate images.
Teachers can use these images for presentations, quizzes, or to improve worksheets and student activities.
For example, this Google Classroom quiz is filled with images that I created using Chrome Canvas.
Best of all, Chrome Canvas is 100% free and integrates into your Google account so you can move between devices and still have access to all your drawings.
Give feedback with Google Classroom
The Google Classroom mobile app for Android and iOS has a “hidden” annotation feature that you can use to annotate student assignment submissions.
That’s exactly what Jennifer Kipfmiller and her fellow english teachers at Bangor high school in Michigan discovered.
Your corrections are saved as a new PDF and automatically attached to the student’s assignment. The student can look at your revisions and apply them to their Google doc, slide presentation or spreadsheet.
This annotation feature is ONLY available on the Google Classroom iOS or Android app.
But wait!
Most Chromebooks can access the Android version of Google Classroom as well!
I use this feature all the time on my Chromebook using my One by Wacom.
[https://youtu.be/FWaEgZNKu8Y]
Collaborate with Jamboard

Jamboard is my go-to app for getting my students involved in the doodling.
Up to 50 collaborators can doodle at the same time, so there is plenty of room for your entire class!
Jamboard is available through your web browser or through mobile apps for iOS and Android.
My favorite Jamboard activity is called “sorting wall,” an activity that requires students to show the relationships between ideas.
Want to give Jamboard a try? Check out these five Jamboard lesson templates you can use in your classroom!
Whiteboards for all (Whiteboard.fi)
Jamboard is great for messy, group doodling, but it doesn’t provide students with their own, independent workspace.
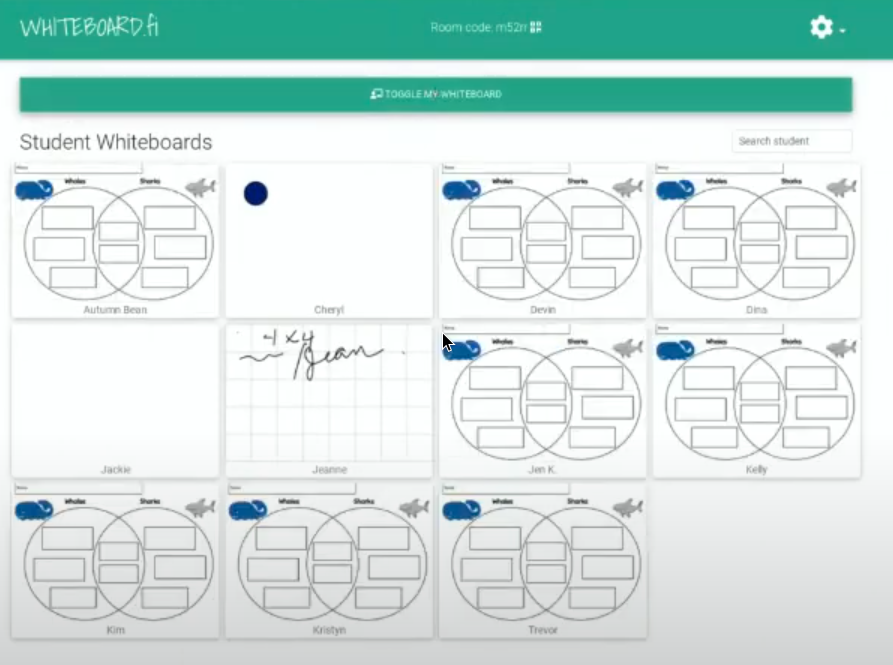
That’s why you need Whiteboard.fi!
Whiteboard.fi provides every student with a private, virtual whiteboard on which they can solve a math problem, write a musical measure, or annotate a map.
You, the teacher, can see everyone’s whiteboard and push new pages to students.
Whiteboard.fi is a simple solution to real-time practice problems for math, geography, music, and science.
Worksheet with Kami

There are a LOT of teaching resources that were designed for printing.
Due to COVID, running off copies for your entire class isn’t as easy as it once was.
Kami is a wonderful free tool that teachers can use to bridge the gap between print resources and digital activities.
With Kami, you can draw, write, and annotate on top of a PDF file.
Kami is integrated with Google Classroom which makes it easy to assign and receive student work.
I also use Kami to sign and fill out administrative forms and documents that require a “real” signature.
Sketch, draw, and doodle!
Handwritten instructions and feedback adds a uniquely human touch to digital assignments.
This list of drawing tools for teachers is far from exhaustive. What are your favorites? Leave a comment with a drawing app that should be on this list.
]]>You’ve probably spent a lot of time looking at ways to support struggling learners in your online classes. But what about the ones that need challenging and stretching? It’s easy to fall into a one-size-fits-all approach that doesn’t cater for their needs.
Even if your online classes are set into ability groups, you still need to differentiate. High-achieving students need just as much support as those working below academic expectations.
We’ve thought of a range of strategies you can use when teaching online to ensure those able students get the challenge they need in every lesson.
Problems more able learners face in online lessons
It’s difficult to pick up the subtle (and not so subtle) clues showing that your class are stuck, confused, or ready to move on to something new in online lessons. You work to keep every student focused. It’s even more difficult to find students who are coasting along or disengaged because they can already do what the rest of the class is learning.
In lots of schools, lesson pace slows whilst students and staff acclimatise to online classes. You might repeat things they already know to find and fill gaps in learning. That’s frustrating for more able students who are working at a higher level.
Often, we assume that able and higher achieving students are unaffected by digital poverty. But there are likely to be students in your school who lack access to the technology they need to engage with the amazing activities, resources, and live lessons you’re offering.
Who are the more able students in your class?
Before you plan for the needs of higher-achieving students, are you sure you know who they are? Look at the ways you monitor and assess progress in assessments and during lessons. How can you tell if a student is capable of more?
You also teach students who have the potential to achieve highly but are not currently doing so. Does the way you assess progress allow you to spot these students and plan ways to meet their needs?
Analyse the data you have and improve it so you can spot students coasting, find potential for acceleration, and see where more able students could go further. That lets you target the provision you offer them.

Strategies you can use with your online class
So, what can you do to support these more able learners once you’ve found them? We’ve got five strategies you can use to better identify and support these students.
1: Planning activities for able students
Instead of blanket worksheets for the entire class to do, add developmental challenge into the resources you use. We’re all guilty of sometimes giving early finishers more of the same work to do whilst the others catch up. Instead, look for enrichment opportunities for them to take their learning further and deeper, applying it to different problems and contexts.
That doesn’t mean you always need a lot of different activities for every ability group. Everyone can complete tasks that are ‘low threshold-high ceiling’. These activities are simple to access but are open-ended to offer rich opportunities for students to take the learning further. Use scaffolding and questioning to structure the cognitive challenge and encourage them to work at a higher level.
You probably have a selection of go-to resources, websites, and activities you rely on. Perhaps you have a subscription to download ready-made resources? Thinking about cognitive challenge doesn’t mean throwing those resources away and starting again. You can easily adapt many of them. A Wacom pen tablet is perfect for this, letting you edit, highlight, and draw directly onto PowerPoints, Word documents, and PDFs with no need to waste time retyping.
2: Developing language and communication
High-achieving students often struggle to communicate their ideas clearly. They know what they’re thinking and can often present the correct answer but find it difficult to verbalise their thinking process. You need them to describe, define, explain, and evaluate their ideas.
Think of vocabulary in three different tiers.
- Tier 1: Everyday language we use when talking
- Tier 2: Words heavily used in written text but far less common in speech
- Tier 3: Subject specific academic vocabulary
You know the subject specific vocabulary your students need to learn in a lesson. For example, in a science class you might expect them to use language like osmosis, photosynthesis, and cytoplasm. Plan systematic ways to teach, revise, and apply this vocabulary in online lessons. Insist that students use correct terminology and encourage them to repeat a sentence using the target vocabulary you want to see.
To be excellent communicators, your highly achieving students also need to develop their understanding and use of tier two vocabulary. Listen when your students share their thoughts to understand their conceptualisations and descriptive skills.
To develop their responses and teach them how to formulate ideas clearly, analyse their written and verbal answers. Use screen sharing to display a student’s work and edit it collaboratively to improve clarity. A pen tablet is perfect for doing this during live lessons. Move them from concrete and specific examples to abstract thinking.
3: Questioning
Good questioning is nothing new. Plan the questions you will ask specific students during the lesson that will take them to a deeper level of understanding. Use open-ended questioning wherever possible to let them expand on their ideas and practice using tier two vocabulary.
Avoid teacher led ‘basketball questioning’ where you ask students questions and they reply just to you. Create a dialogue between students instead. Record the key points of discussion and display them on the screen visually. These make a great resource to save and send out as a revision tool at the end of a lesson.
4: Student participation
Create a culture of aspiration in your class. How can you encourage your students to look beyond simply finishing tasks? Giving learning a purpose and including their interests will improve their overall engagement in all lessons. Look for ways to offer choice of task and plan longer research projects they can complete independently.
Get your students involved in planning and evaluating lessons. Encourage metacognitive strategies where they learn about the process of learning. Can they reflect and analyse where they are, the progress they’ve made, and next steps?
5: Organising learning opportunities
Every school organises learners in different ways. You may teach in a fully mixed ability class. Perhaps your students are in ability streams for some or all of their lessons? However your online classes are arranged, you’re still likely to have wide variation in abilities.
Blended and online learning gives you an opportunity to do something different and not just replicate the same classroom experience.
Why not try:
- Teaching students into smaller groups in short, highly focused live lessons
- Splitting the class into groups rotating between live and asynchronous classes
- Selecting microlearning tasks and signposting the choices for different students to complete independently
Grouping students by task allows them to work at a level suited to them whilst keeping everyone focused on achieving same learning objectives. Students could self-select the activity most appropriate to them to prevent you putting a ceiling on their abilities with fixed groupings.
Final thoughts
High-achieving students deserve a tailored curriculum that meets their needs, just like every other student you teach. Don’t forget them whilst you’re getting confident with technology and spotting gaps and misconceptions when teaching online.
Also, think about your academically able disadvantaged students. Don’t assume higher ability always means affluent. Carefully choose ways to support their particular needs, for example running small study groups and coaching opportunities rather than inviting them to a general homework club.
With the right support carefully planned into your online lessons, these cognitively able students will have the opportunities to stretch themselves, stay engaged with their learning, and achieve their full potential.
Learn more about promotions and Wacom Deals here: https://estore.wacom.com/de-DE/
]]>Graphic organisers are nothing new. You might know them as concept maps, relationship charts, or mind maps. They’re essential visual thinking tools you can use to help your students learn more effectively and retain that learning for longer.
Wacom pen tablets are the perfect resource for making effective graphic organisers whether you’re face-to-face in the classroom or teaching online. They let you handwrite, edit, highlight, and erase straight onto electronic templates using a comfortable pen rather than an awkward computer mouse.
What is a graphic organiser?
Graphic organisers are usually a one-page visual map for displaying pieces of information to see the connections between them. They can show information structures (like cause and effect) or support planning and goal setting. It’s a visual alternative to long paragraphs and lists.
Graphic organisers can be used to:
- Summarise information
- Record and organise key vocabulary
- Structure writing tasks
- Problem solving and decision making
- Generating ideas and planning
Some graphic organisers are very specific, rigid templates, others are more flexible. You can design them to work with the needs of your learners. Normally, you record information in shorter sentences or bullet points with a range of colours and boxes to highlight the links. This makes them particularly useful for struggling students.
Choosing a graphic organiser template
There are a huge range of templates you can use to organise information visually. Many will be familiar to you already.
Common templates include:
- Hierarchy charts
- Flow charts
- Venn diagrams
- Idea wheel
- Planning chart
- Word web
Whatever you need, you’ll find plenty of templates freely available online. Use your pen tablet to annotate and edit them, with no wasted time retyping.
How to use your Wacom pen tablet as a graphic organiser
Graphic organisers are simple, but you still need to teach your students how to use them effectively. With online live lessons, you’re forced to type awkwardly into boxes whilst trying to talk. It isn’t an effective way to model the process. Alternatively, you can handwrite on paper under a visualiser, but this leaves you the hassle of typing up the notes.
With Wacom, you get the ability to handwrite straight into a graphic organiser and can save an electronic copy for further use. That lets you clearly model the process with your students so they can see how to create their own. It feels more natural than typing into boxes.
By using a pen tablet, you’re creating a visually appealing organiser that you can copy, store, edit, and print easily. They make a great resource to stick in students’ books or display in the classroom. Add them to collaborative online pages for distance learning and use them as handy revision tools.

How to choose your template
How complex is the information you need to present to your students? That will help you decide which type of model will suit you. Think about the relationship between the pieces of information.
Types of organisation include:
- Spider: A single topic with details around it
- Cluster: Ideas arranged around different smaller themes
- Venn: Similarities and differences
- Fishbone: Cause and effect model
- Cyclical: A cycle that keeps moving without a beginning or end
- Continuum: A process with a fixed start and finish
Once you’ve chosen a suitable template for the information, save it as a Word document, PowerPoint, or PDF, or add it to a whiteboard space like Windows Ink Workspace or Wacom’s Bamboo Paper. Wacom pen tablets are compatible with all your favourite programs, making it incredibly flexible to use.
Modelling the process with your students
Show your students how to create their own graphic organisers using an ‘I Do-We Do- You Do’ approach. First, give them a completed organiser to analyse and discuss. Then create one collaboratively. Verbalise your thought process so they can see how it is done. Finally, they can create their own version.
Use a range of colours and highlighters to make clear connections between ideas. Pen tablet writing can be erased and edited easily, letting you respond to the suggestions made by your students. They need to see the emphasis is on the organisation, not on making it look pretty.
Don’t just use words with graphic organisers. Add images and diagrams drawn with your pen tool and insert pictures found online. You can highlight and write directly over text and images to emphasise, edit, and annotate.
Creating graphic organisers in online lessons
It’s easy to capture ideas on a whiteboard in your classroom, but harder when teaching online. Using a pen tablet makes process clear.
When you’re teaching live online lessons, use screen sharing to show your students the graphic organiser and complete it together. You could send them a completed version to study before the lesson begins. After the class, save a copy of your graphic organiser for students to use as a revision tool and revisit in later lessons.
For asynchronous classes, try using free video software like Loom or Microsoft Stream to make a short video of yourself adding information to the graphic organiser template. Talk whilst you write so your video captures your thought process and organisational decisions. Add a blank copy to a collaborative area or email it out for students to use independently.
What are the benefits of using a graphic organiser?
Graphic organisers are flexible. Make them as simple or complex as you like, used independently or collaboratively. You’re not tied down to a specific design, and it’s easy to teach students how to use them. They can apply this approach to their own work improving note taking, revision, and critical thinking skills.
By using visual models you’re supporting dual coding. Information is processed using words and images together which reduces cognitive load. Struggling students find graphic organisers user-friendly with information feeling less overwhelming. You can add sentence starters, picture prompts, and vocabulary banks to help them.
Final thoughts
Using graphic organisers teaches your students to be critical thinkers. It provides a ‘big picture’. They can see specific links and must work out the relationships between items. They need to prioritise information and be strategic about where they place it on the map.
Graphic organisers are not a rigid final product. Think of them as a working document you can add to and edit over time. Wacom’s pen tablets are the perfect tool to use with them.
Learn more about promotions and Wacom Deals here: https://estore.wacom.com/de-DE/
]]>After all your efforts to get confident with online learning, don’t forget to look after your own health. Along with mental wellbeing, make your physical health a top priority.
Teaching is usually a highly active job. You spend your day running around, standing up to teach, and moving between students. But teaching online is a far more sedentary experience.
Now you’re sitting at a computer for longer periods of time than you’ve ever done before. That can cause a range of health problems. But don’t worry. Find out about the common problems you may experience and use our tips to do something about it.
Health problems caused when working online
Let’s look at some common health complaints people have when working for long periods at a computer. We’ve got a range of simple suggestions you can use to keep healthy.
1: Wrist Strain
A common cause of pain, repetitive strain injury (RSI) in your wrists is caused by making the same movements over a long period combined with poor posture. Having hunched shoulders whilst you type reduces the blood flow downwards giving you tingling and a numb feeling in your fingers. Over time, this can cause a constant pain in your wrists.
Tips for wrist support
Your wrists shouldn’t be up in the air or lying on the desk as you type. Make them hover horizontally and keep them flexible rather than stiff. Buy a wrist rest if you find this is a problem for you and take regular breaks.
If have a mouse or pen tablet, keep them away from your keyboard so you have to move your whole arm rather than twist your wrist to reach it. Try handwriting rather than typing. Using a pen tablet will give a break from typing and still allow you to save notes electronically.
2: Back Pain
Caused by poor posture and sitting down for long periods of time, you may experience pain in your back (the most common work-place health problem) or shooting pains down your leg (sciatica) from sitting down at your computer all day.
Tips for reducing back strain
Good posture is essential for reducing back pain. Don’t try to work on the sofa or bed; always sit at a desk or table with a supportive chair and keep your legs uncrossed.
Check the height of your chair so your legs are bent at a 90-degree angle and your feet sit flat of the floor. Use a foot stool if your feet dangle and try putting a pillow behind the small of your back for stability.
Take regular movement breaks throughout the day and try incorporating core strengthening activities into your rest periods. Alternatively, ditch the desk altogether and experiment with working standing up.

3: Eye Strain
Headaches and tired eyes are caused by looking at a computer screen all day. Your eyes may feel dry because you blink less often when looking at a screen. Eyes struggle to focus on a screen that’s too close or strain to read a monitor that’s too far away.
Tips to reduce eye strain
Take a regular break from screens rather than flicking through your phone when you’re not working. Try looking around and focusing on things in the distance. It’s the perfect excuse for a walk outside.
When you’re working on a computer, position your screen 50-100cm away, with the top of the screen in line with your eyes. Have good lighting in the room you’re working in. That lets you reduce the brightness of your monitor screen. Don’t forget regular eye checks to make sure you can see clearly.
4: Neck and Shoulder Pain
Sharp twinges, burning pains, or dull aches and tightness are all signs that your body is unhappy with working at a desk all day.
Tips to prevent neck and shoulder pain
As with caring for your back, good posture is essential for reducing neck and shoulder pain. Position your monitor in front of you so you don’t have to look at it at an angle. Use arm rests on your chair to help keep them at a 90-degree angle to reduce the strain on your shoulders.
There are a huge range of exercises you can use to release tension and relax the muscles in your upper body. Try the Posture Zone app or check out a short Yoga routine to use in breaks throughout the day.
5: Headaches
Headaches are a common complaint caused by eye strain and tension in your body when you sit for long periods of time. Instead of reaching for common painkillers, making small changes can reduce the amount of headaches you experience.
Tips to reduce headaches
Drink lots of water rather than relying on caffeinated, sugary drinks. Try filling up a large sports bottle to keep at your desk and refill it when you take a lunch break.
It’s easy to spend all day and evening working when you’re at home. Take proper breaks away from your desk and try to get outside for a short walk or exercise routine. Avoid working in the evenings and make time for hobbies and relaxing.
Whilst it’s natural to experience the odd headache, persistent problems should never be ignored. Seek medical assistance to check there’s not something else causing them.
6: Obesity
Being overweight is a common problem caused by an increased sedentary lifestyle. It’s easy when you’re working at home to eat unhealthily, snack more than usual, and miss regular exercise opportunities.
Tips for a healthy body weight
Pack a lunch box like you would at school and have it ready in the fridge full of healthy snacks to enjoy. Avoid stocking up on unhealthy foods. If they’re in the house, you’ll be tempted to eat them.
Make time for exercise. Normally at school you’re rushing around, but at home you can easily sit down all day and then spend the evening sitting on a sofa. Find quick exercise routines to complete during rest breaks or get outside to walk, garden, or cycle.
7: Sleeping Problems
Struggling to get to sleep or waking in the night? You might associate sleeping problems with stress and other mental health concerns, but it can also be caused by working indoors at a computer screen all day. Artificial lighting suppresses your brain releasing melatonin that supports sleeping patterns.
Tips to improve sleep
Have a long break between working on a screen and going to bed. Create an unwinding bedtime routine such as a bath, reading a book, meditating, or listening to the radio. Avoid watching TV in bed, using your phone, or reading on a device in the hour before you want to sleep.
Key takeaways
Offices are becoming more ergonomically designed, but in the shift to eLearning you may well be improvising at home, working on a dining table or makeshift desk. If you’re going to be teaching regularly online, it’s worth prioritising your physical health now before any problems arise.
Learning online is here to stay, so it’s time to take your health seriously. Laptops are really designed for short periods of work because it’s impossible to arrange them to suit your posture, eyes, and wrists without causing strains. If you don’t have any choice, try alternating between sitting and standing to work and take regular exercise breaks to reduce the strain on your body.
Don’t ignore any pains or problems you experience. Your body is telling you that something isn’t right. Always seek medical advice if you experience a persistent pain or feel concerned in any way about your physical health.
]]>When you prepare for online lessons, you focus on what your students will learn. But what about their physical needs? It feels like your class are stuck to their screens–but do they have to be?
Children get bored sitting at a desk all day. At school, they move around the classroom and spend break times running outside. When they learn from home, exercise can be more limited. They lose focus and motivation.
Concerns about online learning and health
We’re not built to sit down for long. Children are naturally active and learn by engaging all their senses. Younger children need to build essential fine and gross motor skills. They can’t do that if they’re sitting at a desk all day.
There are hosts of health concerns about children sitting at a computer too long including eye strain, back and neck pain, and repetitive strain injury (RSI). We also have increased numbers of children diagnosed with childhood obesity. Building in opportunities to get active is essential to combat the risks to young people’s physical health.
With a little creativity, we think there are lots of different ways to get your students moving whilst they’re learning. We’ve got five great ideas to get you started.
1: Plan interactive activities
Live online lessons shouldn’t be spent passively listening to your presentations. Build in fun ways for them to get active.
Try:
- ‘Show me’ games where students hold up their answers to the camera
- Miming games and actions
- Standing up/ down to show your answer
- Creating physical actions to link with new vocabulary
There are plenty of ways to get your students active in the lessons they access in their own time, too. Encourage them to find alternative equipment using things around the home, or get out into nature, and start learning in a practical way.
2: Add in movement opportunities
Treat your lesson as a series of small chunks of time rather than a traditional hour long lesson. The younger the students, the shorter each section needs to be. This creates the perfect opportunity for short movement breaks between each task.
You could use:
- Mini-exercise routines
- Yoga for kids
- Dancing time- take requests of popular songs
- Desk exercises
Why not link your activity breaks to the current learning? You can provide students with a different way to remember key information. It’s a great way to use cognitive load theory to maximise learning.

3: Timed challenges
Just using a simple timer can add a sense of excitement and motivation to a task. Give your students a short countdown for them to complete an activity, find something in their house, or display the correct answer. Use house points and other classroom rewards to celebrate their success.
Scavenger hunts around the home are an excellent way to get your class out of their chairs and moving around the house. Adding a timer means you won’t lose the pace of your lesson and guarantees the students will return a lot quicker.
4: Photograph work
Do you find you always set work that requires typed answers? You force your students to stay sat at their desks to complete the work. Have you considered using photographs as evidence instead?
Most students have access to a smartphone and will easily be able to take photos. Set them a practical challenge and ask them to upload photographs of them completing it. They could add their images to a shared platform or send them by email. It’s a lovely opportunity to get them outside and learning from nature.
Remember to check your school’s safeguarding and visual image policies before asking students to send photos to you.
Think about:
- Are students allowed to take photos of themselves?
- Do they know to only take photos in communal areas, never bedrooms?
- Are they uploading images to a secure area?
- Could other students or parents make copies of the images?
You’ll have to train your class to take effective photographs so you can see the work they’ve done. Talk to them about zooming in, framing their subject, and making sure images aren’t blurry. You could even record a short how-to video for them to watch.
5: Blended learning
Consider the balance you’re creating between live and asynchronous lessons that students access in their own time. Live lessons need to be as short as possible, engaging, and collaborative. Self-directed learning can be longer, more active, and practical.
Instead of treating these different types of lessons as separate to each other, think of ways to blend the learning experience. Try flipped learning where students come to a live class ready to talk about the studying they’ve done in their own time. Alternatively, launch a new concept in a video lesson and ask them to take it further in independent learning time.
Final thoughts
Are you worried your class aren’t getting the physical activity they need? Just making a few simple adjustments to your lessons is all it takes to get them moving.
- Add in movement breaks between sections of the lesson
- Make live video lessons short and to the point
- Use photographs as an alternative to typing answers
- Plan active tasks for students to complete
It’s been a challenge to adjust to virtual teaching. You’ve had to learn new technology and adjust your usual lessons to take them online. Getting your students moving easily slips down your to-do list. But now’s the time to make it a priority. Let’s get children learning in a fun and active way.
At Wacom we support all teachers as you move to online teaching. Our pen tablets let you draw, annotate, and highlight using all your favourite programs. Find out which Wacom product is right for you.
]]>Maths teachers across Europe have been in touch with us here at Wacom with the same concern. How can you recreate the first experiential stage of maths when you’re teaching online?
For years, teachers have debated the use of virtual resources compared to concrete classroom objects (known as manipulatives). Most teachers use a combination of both. But the rise of distance teaching means we must embrace online manipulatives for all students.
We’re sharing three different approaches you can use in your virtual classroom and show how Wacom can help you bridge the gap between concrete and abstract understanding.
The importance of manipulatives in maths teaching
Most teachers agree that a solid understanding of mathematical concepts begins with practical experience. It’s a way for children to ‘see’ maths. They are active participants rather than passive learners. Classrooms are full of resources for them to use.
Common manipulatives include:
- Counters and cubes
- Bead strings
- Number lines and squares
- Base 10 resources
- Clocks
- Shapes
- Peg boards
- Algebra tiles
This first-hand experience allows children to use their senses, engage in role-play situations, and manipulate objects. For example, a child who shares counters into groups will clearly understand the operation of division before encountering it in an equation.
Using practical maths to support abstract understanding, first proposed by psychologist Jerome Bruner, is often referred to as Concrete-Pictorial-Abstract (CPA) and is a fundamental part of the maths mastery approach.
Creating a concrete experience with virtual manipulatives
The move to distance teaching creates a problem. How can we give students this experiential experience when they’re not in the classroom? Sending a set of physical resources home for each student is impossible.
Embracing online manipulatives and using technology to show students practical experiences lets you create the important ‘concrete’ stage of maths learning.
We’ve got three ideas to help you make it work.
1: Computer simulated manipulatives
Give your students the experience of manipulating and moving objects using the wide range of resources online. Students will enjoy the gamification of maths, making it fun for them to learn.
There are plenty of quality resources to choose from. Just remember to check they work on different devices as many require Flash. These are just a few of our favourites:
- Toy Theater: More than 50 manipulatives to choose from
- Math Playground: A variety of games and virtual manipulatives
- Mathigon: Good for older students with a range of free self-guided courses on common maths topics
Use virtual manipulatives as a teaching tool. They’re great in live lessons or for creating videos. Alternatively, students can use them to demonstrate their thinking and explain ideas to you.
2: Use a visualiser
Visualisers have become a popular resource for maths teachers. As prices drop, many educators are purchasing their own to use at home for virtual lessons.
Visualisers are often used to display students’ work on the screen, but they also offer great potential for modelling using concrete resources. Simply pop your manipulatives under the visualiser whilst you’re talking to the class.
If you’re interested in using this with Microsoft Teams, check out this excellent YouTube demonstration by Elementary Technology to see how you can use screen sharing in online lessons.
3: Videos of you using manipulatives
If you don’t have access to a visualiser, record yourself using manipulatives on a phone or webcam.
How to get right:
- Keep your camera steady or use a holder
- Think about the angle and how close you are to the screen
- Consider lighting and avoid being in front of a window
- Talk whilst filming to let them see exactly what you’re doing
Working from home offers an opportunity to show students how maths isn’t just found in the classroom. Make use of items around the house to bring maths to life.

The benefits of virtual manipulatives
Thinking practically, virtual manipulatives aren’t expensive. You don’t have to find space to store them or replace them when they inevitably break. Best of all, there’s no tidying up at the end of a lesson. COVID-19 has raised concerns about the safety of students sharing resources. Virtual manipulatives don’t need sharing or cleaning after use.
Students enjoy online resources. They can explore and experiment without feeling judged by mistakes. It’s easy to grasp new concepts and they get immediate feedback.
Perhaps most importantly, virtual manipulatives let students go far further than they could in the classroom. They can represent concepts in ways that would be impossible in real life, building structures, changing scale, turning and inverting with the click of a button.
From concrete to abstract, with Wacom
Using virtual manipulatives lets you create a first-hand experience. But what then? How do they move from concrete to abstract understanding?
That’s where Wacom can help. Our range of pen tablets let you draw and annotate in real time. You can create a live diagrams and images to bridge the gap between concrete and abstract representations. No more confusion when you try to apply practical learning to a new situation.
In summary
Distance teaching doesn’t mean saying goodbye to concrete manipulatives. We can still create a physical experience when working online. Using the range of virtual resources available allows students to work in a way that would be impossible in the classroom.
Instead of worrying about what we’re missing, embrace the opportunities that virtual manipulatives bring. They’re a great way to make maths visual and demonstrate concepts and processes students often struggle with. With a vast range available online, there is something to suit everyone.
Learn more about promotions and Wacom Deals here: https://estore.wacom.com/de-DE/
]]>The lesson that looked perfect on paper is far too short or overruns. You’re left quickly thinking of filler activities or ditching the task you spent ages preparing. This is one of the top difficulties Wacom users tell us about.
So how can you get it right?
Here are five common timing problems and our easy solutions for you to use.
Problem 1: Running out of activities
In the classroom, you plan the perfect amount of tasks to fill the lesson. Now you’re online, you’ve finished everything in half the time. Where are you going wrong?
Are you rushing through new concepts? It’s easy to look around a classroom and measure the confused faces. Because you have less student interaction online, it can be difficult to see when to slow down and repeat.
Or are you not planning enough? Online games and activities rarely hold their interest for as long as you’d thought.
Solutions:
- Use formative assessment after each task to measure student understanding. Try using red, amber, green (RAG) rating or a simple thumbs up/ thumbs down to measure confidence levels.
- Allow time at the end for a plenary. Ask students for feedback and co-create the next steps of learning.
- Look at planning documents before you teach and note down the next steps. You can move onto this if the students seem ready.
- Plan double lessons. Mark where you get at the end of one lesson and pick up from the same point next time.
Or perhaps you don’t have a problem at all. No one’s waiting for you to deal with low-level disruption or distracted by their neighbour. You’re teaching right in front of them with engaging activities and games. This might be why you feel you’re racing through the usual content.
Virtual lessons don’t have to be the same length as classroom teaching. Try adjusting a typical hour’s lesson down to 30 minutes and provide an over-learning task for them to complete before the next lesson.
Problem 2: Finishing on time
You planned this great activity, but now there’s only five minutes left. You’re tempted to squeeze it in and risk finishing a little late.
It’s frustrating not using an activity you’ve planned. But it’s time to stop being precious about your lessons.
Solutions:
- Be picky about the activities you use. Avoid ones that duplicate learning.
- Put activities in priority order. Start with the essentials and keep others in reserve in case you have time.
- Set leftover activities as homework or add them to a student resource bank.
- Allow time for demonstrating a new activity.
- Send out login details and website addresses before the lesson.
- Run the class you planned over two sessions.
- Time limit student discussions and give them a clear focus.
When you plan, drill down to the essentials. What must the students understand? Be ruthless. Cut anything that doesn’t deliver. It will streamline your lesson and improve learning.
Problem 3: Activities that don’t match time estimates
The game you planned took 20 minutes rather than 10. Or an activity you were sure would keep them busy finished in minutes. It’s annoying when our estimates are out.
Solutions:
- Test activities you’ll use before the lesson begins.
- Create a list of go-to website and games you know well.
- Model how to do an activity so they can start quickly.
- Have an extension task/ reflection ready for early finishers.
Games with different challenges and levels are likely to keep them engaged for longer than a blanket activity for everyone.
Problem 4: Losing pace
You planned a quick, lively debate, but it’s dragged on. You’ve barely covered half of your lesson plan.
Work out what is derailing the pace of the lesson. Are you talking too long or allowing a few students to dominate conversation? Finding the problem will help you apply the best solution.
Solutions:
- Write predicted timings against your lesson and record the actual timings to see any discrepancies.
- Set a time limit on discussions.
- Use key questions to keep everyone on track.
- Tackle low-level disruptions.
- Think of creative ways to boost student engagement.
- Avoid talking for long blocks of time- never more minutes than the age of the students.
- Draw visuals and diagrams using a pen tablet.
Keeping a good pace is difficult in the classroom. Online, it’s even harder. Everything slows down as you navigate websites, explain tasks, and encourage students to engage.

Problem 5: Waiting for students to join live lessons
There’s a trickle of students joining your lesson late, needing you to explain what to do. It’s easy for the start of the lesson to drag on.
You could keep everyone in a waiting room with a task in the chat bar. But you want to get students learning as quickly as possible, rather than hanging on for someone who might never arrive.
Solutions:
- Have a holding task that learners start immediately as they join.
- Send out time reminders before the lesson.
- Plan protocols to follow if they are late.
If certain students are always late, talk to them about it. Find out if there’s a valid reason. You could try shifting your timings to accommodate their needs.
Final thoughts
Timing might be something you’ve always struggled with. Even experienced teachers often feel lessons run away from them.
Streamlining classes will help you stay focussed. You can keep activities in reserve if you need them. If you finish early, build in opportunities for formative assessment to gauge student understanding. This will show you where you need to slow down and explain again.
Learn more about promotions and Wacom Deals here: https://estore.wacom.com/de-DE/
]]>Alternative titles:
- No Camera, No Problem: 7 Ways to Delivery Audio-Only Live Lessons
- 7 Engagement Strategies for Live Online Lessons Without a Camera
Description: Great live lessons don’t require a camera. We share 7 strategies to help you engage students with audio-only live lessons.
Images:
- Microphone
- TeacherSpeakingToMic
How to Create Engaging Camera-Free Live Lessons
At Wacom we want to help teachers feel confident about moving to distance teaching. That’s why we’re creating useful resources for educators to use Wacom in their virtual classrooms.
When we talk to teachers, we hear a common problem many of you are facing. Teaching live lessons without a camera. It can be difficult enough engaging students when they’re in front of you, so how can you keep them learning when they can’t see your face?
Don’t panic. We’ve got seven suggestions to help you create live virtual lessons that keep your class engaged and enjoying learning without needing to see your face.
Why are some teachers doing no-camera live lessons?
There’s no single reason why many teachers have turned their cameras off. You might not have a high-quality video camera at home. Or maybe you just feel uncomfortable showing your face online? You’re not alone if you worry that students could inappropriately use your image.
Perhaps you have concerns around security after hearing of lessons ruined by ‘zoom-bombing’? Or are you following your school’s safeguarding guidance? Schools want to reduce any risk to students or staff so many stop you using your webcam.
Whatever your reason for not using a camera during live lessons, there are plenty of ways you can still make them engaging. Here’s how.
1: Use visual images
Turning off your camera doesn’t mean students staring at a blank screen. Think about what you can show your learners.
Don’t just read out text displayed on the screen. Reduce cognitive load by adding visuals that support rather than duplicate what you’re saying. Use countdown clocks to show the time to complete tasks and share useful resources and vocabulary they might need.
Use images and presentations to keep your lesson visually interesting. Choose pictures and diagrams that support learning. Using a pen tablet lets you draw, annotate and highlight easily in real time.
2: Use your voice
Plenty of children enjoy listening to podcasts and radio shows. Think about what makes these engaging when there’s nothing to watch. Make it enjoyable to listen to you.
Be positive and welcoming and take charge of the lesson immediately. Use student names and refer to their favourite things like hobbies and sports teams.
Avoid boring, monotone lectures. Children will stop listening within six minutes. Break up long speech with activities and games and encourage them to contribute their ideas.
Add interest to your voice by varying pitch, volume, speed, and tone. Imagine you’re on a stage and speak slowly and clearly. Over-exaggerate everything, subtlety is lost online. That doesn’t mean being fake. Simply be the most lively and excited version of yourself possible.
3: Plan lessons well
This is not the time to teach off the cuff. You’ll end up rambling on for too long and losing the interest of your class. Use a script or story board to plan each section of your lesson carefully.
Think about the key point of the class. What is the one thing students should learn? How can you make sure they learn it? Use recaps and formative assessment to check their understanding throughout.

4: Create strong routines
Students learn best when there’s a familiar structure to follow. Dedicate time at the start of each lesson to remind them of how to use features like the ‘hands up’ button and chat bar. Email before class to remind them of your expectations and any equipment they must have ready.
Set a routine for starting each lesson and stick to it. Students should join with their cameras and microphones off and raise hands rather than shouting out. Minimising these disruptions will help your lessons run smoothly and keep everyone engaged.
5: Plan your timings
Don’t replicate a traditional full lesson. Live classes should be much shorter with good pace and an obvious purpose to the learning. Students lose interest within just a few minutes of speech, so break your lesson up with active learning opportunities.
Learning can go beyond the live part of your lesson. You can set tasks for them to complete in their own time. Experiment with flipped learning so students come ready to share ideas about a concept and practise with you.
6: Be prepared
Have everything you need ready to hand. Preparing well for the lesson means you won’t have to dash off to find something and leave the students waiting. It’s also essential to test any programs or websites you’ll be using before the lesson begins.
If the students can’t see you, you must explain any pauses, or they’ll get bored. Talk through what you’re doing with a live commentary. You can still be human, so it’s fine to have a drink of water or pick up something you’ve dropped.
7: Invest in good audio
Students put up with poor video quality, but they’ll soon switch off if they can’t hear you properly.
Most modern laptops have good quality microphones built in. Try a few test recordings to see if your voice is clear and smooth. Interference or stuttering may mean you have a poor internet connection.
If you have a noisy background at home or a poor-quality microphone, you might consider buying an inexpensive external mic to boost your speech.
Final thoughts
Good live learning doesn’t rely on cameras. You can create high-quality lessons using just your voice, well-chosen images, and presentations.
The key comes down to preparation. Consider the structure of the lesson to create pacey, enjoyable learning that keeps your students engaged.
Learn more about promotions and Wacom Deals here: https://estore.wacom.com/de-DE/
]]>Are you confident teaching at school but struggle with online live lessons? Teaching virtually can feel very different to presenting in the classroom. Your usual strategies don’t have the same impact.
Having an engaging presence on screen helps you keep students focused and maximises the learning. Getting it right can feel challenging but just a few simple changes can transform your presentation skills.
Here’s seven tips you can use to perfect your online presence.
1: Consider your webcam
It’s easy to forget that your learners are watching you whilst you’re teaching. Position your body so your head and shoulders are framed. Often with laptop webcams, the angle you type at is not right for presenting. Check your entire head is in shot.
Build a connection with your students using eye contact. Look directly at the lens rather than down at your screen. You might need to prop your device up to raise it up to your eye level. Look at your notes whilst teaching but avoid reading them out as this breaks eye contact with your students.
2: Get the lighting right for live teaching
Poor lighting stops your students from focusing and makes it harder for them to learn. There are a few tricks for getting it right:
- Avoid sitting with your back to a light source (like a window or bright lamp)
- Keep your background plain and professional, not too busy
- Put a desk lamp in front of you to illuminate your face
Before your first live lesson, call a colleague to spot any potential problems. Try moving around your house to find the perfect spot for lighting. Just remember to consider your internet connection by staying close to your router.
3: Check your tech can cope with virtual lessons
We’ve all been on video calls where the quality’s so poor it’s hard to concentrate. Do you struggle with limited internet connection or an outdated machine? Some computers just can’t cope with the demands of live teaching.
First see what you can do to boost your signal:
- Use an Ethernet cable to connect to your router rather than wi-fi
- Put your router on a table and away from baby monitors
- Update your browser
- Password protect your wi-fi connection
- Avoid extension leads
- Use a microfilter to split your phone and broadband signals
If you’re struggling with video or audio quality, consider investing in a functional external camera or microphone. There’s lots of choice available to suit every budget, and it’s a good investment if you’ll be teaching lots of lessons online.

4: Get familiar with your online platform
All the major video call programs, such as Zoom and Microsoft Teams, work in a similar way. But there are some differences to get used to. Look for easy user guides online to help you get started.
Practise before your live lesson with a few test calls to check you know where everything is. Practise sharing your screen, muting the microphone, and navigating the site. It will help you feel more confident in front of your students.
5: Use your voice effectively
Students may hang on your words in the classroom but struggle to stay engaged online. Some subtle presentation skills you use are lost on camera.
You need to slightly over-present. Still be yourself but magnify your actions, facial expressions, and voice. Smile and be friendly, sound excited about what you’re teaching.
Enthusiasm about your lesson shouldn’t mean talking fast. Keep your voice slow and easy to understand. Repeat key information and vocabulary back for those struggling to understand. Use expression rather than a monotone voice. Stop dramatically, change pitch, and alter your volume for effect.
6: Don’t sit still
You may feel trapped in one place when teaching online, but you’re not. Move around, use gestures and facial expressions to show how interested you are. Over-act so it’s seen through the screen. Lean closer to the camera or move back and stand up. Just make sure your students can still see and hear you clearly.
Props and teaching tools, like mini-whiteboards, are useful for holding up to your screen. Add in role play and demonstrations to keep their attention.
7: Create variety in your live lesson
Teaching lessons online doesn’t mean students sat watching you the entire time. You don’t always have to be on camera. Mix it up with screen sharing to show them different websites and presentations. Use a Wacom pen tablet to draw and edit directly on your screen.
Students can only pay attention for a few minutes, so create changes. Break up sections where they watch your face with activities, quizzes, and online polls. Switching what’s on your screen will grab their attention and keep them focused.
Moving forward with online teaching
In the classroom, you’d expect regular lesson observations to help you improve your teaching. When you’re working online, you need to make these opportunities for yourself. Regular reflection will help you make minor changes to improve your online presence.
Try recording a live lesson and watching it back. Once you’re past the first few moments of embarrassment, consider your presentation skills and critique your performance.
Ask yourself:
- Can the students see me clearly?
- Do I need to adjust the lighting?
- Are there sound issues to address?
- How long do I talk for?
- What can I do to improve my presence?
If you struggle to watch yourself, ask a trusted colleague to help. Pairs or small working groups help everyone improve. You’ll find many colleagues struggling with the same things as you.
Don’t forget to ask your students about lessons too. Survey them after every class to spot tech issues and sound or lighting problems. Make your feedback anonymous so they won’t feel embarrassed to tell you about problems they’re having.
Key takeaways
Presenting to your class online can feel very different to teaching in the classroom. Even experienced teachers can struggle as you get to grips with new technology.
Use your voice to capture and keep students engaged. Break up long sections of teacher talk with visuals, activities, and polls. Working with a colleague will help you identify and correct any problems you’re having in your lessons.
Whilst online teaching feels different, it can still be fun. Be your natural self. Smile and show your students how much you’re enjoying teaching them. Teaching confidently is essential when talking to the camera.
Take a look at our promotions and special offers here:
https://estore.wacom.com/en-DE/special-offers.html
Programs like Zoom and Microsoft Teams let you show learners your screen rather than your face and switch between the two. Screen sharing keeps students interested and engaged in their learning. It makes for easier demonstrations and feels more like a traditional classroom experience.
So, what can you use screen sharing for in your live lessons? Here’s six creative ideas to try with your class.
1: Class demonstrations
If students just listen to you speak, they’ll quickly lose focus and struggle to understand. Screen sharing is great for showing them new concepts, much like writing on the board in your classroom. It explains the process rather than a static, finished project.
Using a Wacom pen tablet, it’s easy to draw, annotate, and write directly onto your screen. You can work straight onto your usual PowerPoints and Word documents, or try a using Windows Ink Workspace if you’d like a blank whiteboard to write on.
Yes, there’ are plenty of online videos you can play to your class, but live teaching lets you work with the abilities of your learners. You know your students best. Tailor your content to their needs, speed up, or go back as needed.
2: Keeping students on task
Screen sharing is helpful if students arrive to your live lesson at different times. Display a starter activity and the learning intention, so they don’t have to interrupt to find out what they’re doing.
Have you ever attended a training event where you’re asked to complete a task but can’t remember exactly what to do? Normally you’d just ask the person next to you. When teaching online, this isn’t possible. Display the success criteria and instructions to keep everyone on task.
Let your students know how long they have left by screen sharing a countdown timer. This helps them understand how long they should spend on activities and gets them motivated when they see the seconds ticking away.

3: Scaffolded support
Students will require different amounts of help to be successful in your lesson. Use screen sharing to display resources that will support struggling learners.
Key scaffolds include:
- Vocabulary banks
- Writing frames
- Example answers
- Diagrams
- Marking criteria
- Checklists
- Subject specific resources
Often, you won’t want all students doing the same work. Share your screen to show them different task choices and ability levels. Direct students to the appropriate work or let them self-select their level of challenge.
4: Challenging students
Don’t just use screen sharing for students who are struggling with learning. Use it to display a follow-up task or new challenge for early finishers or those in need of stretching further.
Show them alternative methods and ways to apply the learning whilst the rest of the class are completing activities.
5: Class marking and assessment
Screen sharing is a simple way to show students exemplar work and modelled examples. Display a piece of work and ask students to mark against the success criteria, then edit and improve it.
Get students actively learning by screen sharing editable Google Docs or collaborative pages on Microsoft Teams. Remember to send the link to your students before the lesson begins. They can take turns adding their ideas to the live document. Screen sharing lets everyone see what they’re doing in real time whilst you’re teaching.
6: Student responses
Did you realise you can let your students share their screens too? Rather than reading out their work, let them show everyone their screen. It’s useful for students who might not feel confident talking in front of the entire class.
Pose a question and ask learners to take turns to show their responses. Keep a class list handy and mark off which students have contributed. Aim for everyone to have a chance over the course of your lesson.
Whilst most platforms only allow one participant at a time to share their screen, a paid Zoom account lets lots of students screen share simultaneously. It offers great potential for ‘show me’ activities, where everyone shares their ideas at the same time. Just check out the limitations before trying it yourself.
Safety with screen sharing
Many teachers are reluctant to let students screen share in live lessons. It gives over a lot of control and raises safeguarding concerns as you don’t know what they might share with the class. Check your school’s internet safety policies to see your institution’s position.
If you don’t want students sharing their screen, check your settings before the lesson to make sure only you (the host) can do so.
If you think students screen sharing would work with your class, make time to go through ground rules before they try it out. Explain what is and is not appropriate and remind them of internet safety. Recording your live lessons is a good way to make sure everyone adheres to your rules.
Plan time for them to practise to avoid tech issues slowing down your lesson. Consider creating a quick video or how-to guide to help them learn how to use screen sharing and check which devices are compatible.

Summary
Screen sharing is an effective way of increasing engagement in live lessons. It gives the feeling of a ‘normal lesson’ with students watching and listening to your demonstrations. They can see the process rather than a final product and actively take part.
Using screen sharing lets you differentiate without having to run different lessons. It’s helpful for keeping all students on task and gives them the resources they need to be successful in your lesson.
Video call programs are all slightly different, although they share common features. Search for simple guides online to show you how to use screen sharing with the one you’re using. Practise before your live lesson so you feel confident to teach your students how to use it effectively.
To find out more about how you can use Wacom pen tablets as a teacher, look at our useful articles to support you in the classroom.
]]>Many students struggle with online learning. But what about their mental health? It’s hard to tell how learners feel when you only see them through a computer screen.
The number of mental health disorders seen in children is on the rise. Around half of all lifetime mental health problems start by the mid-teens. It’s vital we support students’ wellbeing, as well as academic outcomes.
Whilst they feel more distant when you’re teaching from home, your students need you more than ever.
What causes mental health problems?
There’s never one answer to what causes mental health concerns. Your learners come with a variety of home experiences and situations that can impact on their wellbeing.
Students may struggle with:
- Digital poverty: Learners without reliable internet and technology at home feel left behind and isolated. They are frustrated they can’t keep up with their peers.
- Isolation: It’s hard as an adult to get motivated to work. Students can struggle to self-regulate and feel unable to manage schoolwork.
- Financial difficulties: Financial insecurity and debt put a tremendous burden on families.
- Caring responsibilities: Many children are home carers supporting parents or younger siblings.
- Unsafe home environment: For students who are victims of domestic violence or abuse, online learning means spending more time at home.
Students with pre-existing mental health needs often have support structures in place. Whilst there are challenges, it’s possible to move from face-to-face to virtual support.
But what about other learners who have not shown previous issues? Many of your students are likely to need increased pastoral support whilst they learn remotely.
Here’s seven ideas to help you support their mental health and wellbeing needs in your school.
1: Signpost wellbeing support
You may never spot the students struggling with mental health. They often hide problems and never ask for help. Signposting support to all students, not just the ones you’ve flagged as a concern, means everyone can access the help they need.
Make time in each lesson to talk about where they can find support. Add helpline numbers and useful websites to the last slide in your presentations. Create a page on a collaborative platform like Microsoft Teams and Google Classroom. Regularly email wellbeing tips home or share them on social media.
2: Create opportunities to talk about mental health
Your live virtual lessons don’t need to be just about learning. Add a little time for them to chat together. Home learning can feel isolating. Talking time lets them keep those class bonds strong.
Create virtual drop-in sessions students can choose to attend. Many young people message rather than phone their friends. Promote virtual coffee shop events where the purpose is to talk.
But remember, vulnerable students are unlikely to share worries with a large group. Make sure they know how to talk to you alone. Remember students with limited access to technology. How will you reach out to them? Many schools have created rotas to call all students to see how they are.
3: Make wellbeing buddies
Some learners won’t want to talk to you, but they might open up to a peer. Pair students up using their school email addresses and show them how they can support each other. Share regular topics for discussion and give them a chance to talk about worries.
Remember to follow your school’s online safeguarding procedures and think about how you can monitor communications. Remind them to talk on your school’s chosen platform, or cc you into their emails to let you monitor and keep them safe.
4: Look for mental health warning signs
A perfect student suddenly not meeting deadlines? The reliable learner who’s missing your live lessons? There are often signs that a student is struggling. Instead of going zero-tolerance, talk to them about what the problem is and let them share their worries.
Use regular surveys or digital wellbeing trackers to gauge wellbeing across your school and spot pockets of problems to address. Include a space for students to add in their own concerns rather than making them entirely tick boxes.

5: Promote health and wellbeing
Make healthy living the top of your teaching agenda. Encourage healthy eating, exercise, and hobbies to keep your students active and happy.
Create virtual clubs that can run on video calls, like online yoga or exercise classes. Create positive competitions, such as how many miles a year group can walk in a month. Make it collaborative rather than competitive to encourage everyone to take part.
6: Educate parents about mental health
The vast majority of parents care deeply about wellbeing and will be supportive of your efforts. They often spot problems before you do. Just don’t assume they’ll know how to help.
Offer advice using your school’s social media accounts and share tips for them to use at home. Tell parents about warning signs to watch out for and what they can do to help.
Run online meetings to discuss wellbeing with parents and offer them 1:1 calls to discuss their child. Check there’s a robust process in place. Who do parents call? What happens then? It’s important that no one gets lost in the system.
7: Make wellbeing a school priority
With the pressure of moving to home learning, mental health might not feel like your top priority. But failing to meet the wellbeing needs of students now will just cause bigger problems later.
Try:
- Adding wellbeing to the agenda for staff meetings
- Looking at tracking procedures for flagged students
- Checking how staff can raise new concerns
- Running wellbeing events, lessons, and classes
Reach out to local mental health charities in your area to see if they have useful resources you can use. Many will run sessions by trained professionals you can access.
Don’t forget your own mental health
It’s easy to worry about student wellbeing and forget your own mental health needs. You need to prioritise looking after yourself if you’re going to support your students when they’re working remotely.
Your work-life balance is important. Make opportunities for exercise in your day. Include time for hobbies and check out useful apps for relieving stress.
Final thoughts
Student mental health is a worry in all schools, but the rise of distance learning makes it harder to spot young people who are struggling. Working online can make your students feel more distant, but they still need your personal support for their wellbeing.
Working at home can feel isolating for everyone. Build opportunities to talk as a class and school community. Let your students, and staff, share how they’re feeling. You can help every member of your class access the support they need.
]]>Whether you teach in a classroom or online, Wacom pen tablets are a useful tool for modelled writing.
How often do you expect students to write something wonderful and feel downhearted by the results? You forget that learners aren’t mind readers. They don’t know what successful work looks like unless they’ve seen it being produced.
That’s where modelled writing comes in. Students watch you create an example of the outcome, and contribute ideas, before they’re expected to make their own. The result is a better piece of writing. It’s a win for everyone.
Here’s how you can use your Wacom pen tablet to support the process.
1: Build a piece of writing with students
If you’re using an overhead projector, or teaching live virtual lessons, you’ll know how tiresome it is to type student’s suggestions whilst teaching. There’s lots of deleting and retyping, and it seems disconnected from editing. Your students can’t relate this to creating their own work.
Using your pen tablet to handwrite models the process they’ll use in their exercise books. Show grammar and spelling corrections as you go. Change pen colour to show levels of editing or to keep track of different student contributions.
Take regular screen shots of the work in progress to add to lesson slides or print off copies for their books. Enlarge them to make wall displays as a useful support for struggling learners.
2: Observing you write
Have you heard of the ‘I do, We do, You do’ approach to writing? Students benefit from seeing a proficient writer build a piece of text before having to create one themselves. Verbalise your ideas. Let them see and hear you explain how to make changes to improve it.
Recording yourself using your pen tablet to create modelled writing makes for a perfect video to share. Use it as homework support, for virtual lessons, or to show non-specialist colleagues. Create a video for each genre or skill they must practise over the year. Add them to a shared resource bank and use them for years to come.
3: Break down the process
Students can feel overwhelmed by writing tasks. Where do they begin? They struggle with fear of the blank page and fail to see the structure underneath the writing.
Show them how they should organise sections using your pen tablet. Draw boxes around segments and highlight transitions to make them clear. Underline common paragraph starters and add annotations.
When modelling a task, there’s no need to do the complete piece in one sitting. Try creating one section, then asking students to write theirs. Then model the next section, and so on, until you have modelled the entire piece.

4: Edit an example text
Wacom makes it easy to edit texts because your pen tablet is compatible with all your favourite programs. You can write directly onto PowerPoints, Word documents and even PDFs.
Choose an example text to share with the class. Either find one online, write your own version, or use an example from a previous student. You don’t have to use a complete text unless it’s helpful. Select an extract to focus on a particular element of writing such as character and setting descriptions.
Use your pen tablet to underline words and sentences. The highlighting tool is particularly useful for bringing attention to repeated sentence starters. Write the edits directly onto the screen so students can see exactly where they can make changes.
Editing example texts with your pen tablet works particularly well for live or pre-recorded online lessons where students might struggle to see how to improve a piece of work.
5: Marking and feedback
Don’t just use modelled writing to show students example texts, it’s great for modelling marking and feedback too. Students often feel their first draft is a finished piece. Use your pen tablet to demonstrate how they can make improvements.
Traditionally feedback is written at the bottom of the page. But learners can’t see what part of their work you’re referring to. Writing onto the screen means you can draw their attention to the exact section you want them to improve. Write questions and comments close to the typed text to reduce cognitive load.
Use your pen tablet to highlight success and identify areas that need improving. Underline effective word choices and apply your school’s marking codes. Use red, amber, and green (RAG) rating to show them the extent to which they achieved the criteria.
6: Spelling and grammar checking
Adding purposeful errors to your modelled writing is a useful tool for teaching spelling patterns and grammar rules. Pick something you’ve noticed the entire class needs to improve and see if they spot your mistakes. They love catching their teacher getting things wrong!
Your students won’t automatically know how to check spelling and grammar. Use your modelled example to teach them how. Highlight words and sentences for them to check and show them how to proofread their work.
7: Confidence building
Using a pen tablet for writing lets your students see the editing that goes into a final piece. That’s useful for less confident writers who feel their work isn’t good enough. Showing them how you make changes will encourage them to be braver with their own writing.
Your modelled example provides a structure for less confident students to work from. At first, they’ll copy you. But with encouragement, they’ll use it as inspiration for their own ideas.

Final thoughts
Often teachers are disappointed by the quality of work students produce. Modelled writing is an effective way to show them what you expect. It gives them something to refer to and leads to better outcomes.
Using a Wacom pen tablet lets you capture examples you lose when writing on paper or a whiteboard. It’s easy to save and add them to planning documents and shared resources. They make great learner guides and can be printed for student books or wall displays.
Take a look at Wacom’s promotions and special offers here:
]]>Does online teaching feel like a return to ‘chalk and talk’? Many teachers have told us here at Wacom that they’re missing student collaboration.
Instead of the lively debates and discussion, learners sit with muted microphones, passively listening. Or you set lessons for students to access in their own time, with no interaction required.
So, is collaboration possible in virtual teaching? We think you can achieve it. It just requires creativity and perseverance.
Challenges and benefits of online collaboration
It’s wonderful when students learn from each other. It encourages independence, fosters resilience, and builds communication skills. Best of all, it takes the pressure off you to be the single voice of wisdom. Collaboration is great for flipping the learning process.
But it’s hard to get it right online. Issues around access to technology, digital poverty, and data protection make it difficult to set up effective ways for virtual collaboration. Younger students need help to use the technology which adds to your workload.
Finding methods for collaboration means expecting challenges and carefully managing the setup for your class. Here’s five ideas you can use to get it right.
1: Set up email groups
Often, we assume virtual learning must involve live videos. But there’s no reason why collaboration must be face-to-face. Just setting up simple email groups can be an effective method of student collaboration.
Decide who’s in each group and email them prompt questions, essay examples, and areas to research independently as a team. Make it simple for them to complete tasks without needing further support.
Things to consider:
- Data protection: Only use school email addresses and remind them to stick to these when contacting each other.
- Keep watch: Add yourself to each email group and teach them to ‘reply all’ when responding. That way you can monitor emails from a distance.
- Choose groups wisely: Think about ability levels and student dynamics when choosing groups. Ensure everyone has at least one good friend in their group.
- Set ground rules: Remind them of your school’s online safety policies and share your expectations.
Regularly read through the email chains. Consider giving each group a sensible leader with the power to allocate awards (like house points) and flag concerns to you.
2: Use collaborative boards
Instead of sending messages back and forth, students can add contributions to a collaborative board on a virtual platform like Microsoft Teams, Google Classroom, or Padlet. These platforms offer flexibility, letting them add text, images, and videos. Unlike long emails, they are easy to read.
Virtual boards allow students to work together without needing to be online at the same time. This is useful for learners with limited internet access. Most platforms are accessible on a wide range of devices, which is great for students relying on mobile phones.
Setting up collaborative spaces:
- If your institution doesn’t have a go-to platform, choose one you feel confident using.
- Create a demo video or use screen shots to make a walk-though to help them use it effectively.
- Set ground rules and pin these to the top of every collaborative page.
- Regularly monitor contributions. Most boards let you change the setting to pin the student’s name to their comments.

No collaborative platform at school? Explore a cloud-based option like Google Drive or Dropbox. Save your templates and show students how to find the work. They can add and save contributions onto the same document.
3: Breakout rooms in live lessons
Rather than keeping the entire class together in live lessons, use breakout rooms in Teams or Zoom video calls to encourage group work.
Zoom, for example, lets you split the meeting into lots of separate sessions. You set the group members and move between them to offer support and monitor progress. Decide how long breakout sessions last and return everyone back to the class easily.
Breakout rooms aren’t for everyone. For some students it’s the equivalent of their teacher leaving them unsupervised in the classroom. Ground rules, specific tasks, and adding accountability will help keep them on track when you’re off working with another team.
4: Paired working
Collaboration doesn’t require groups. Paired students can work together on a task and benefit from each other’s ideas.
Whether you choose to use an online platform or email, paired collaborations have the benefit of being easier to manage and less likely to be affected by the personalities in the class.
Choosing the best partners for paired work:
- Keep ability levels similar. Avoid putting students who need a challenge with those requiring extra support.
- Think about personality matches, but don’t automatically put students with their best friends.
- Keep the partnership together for at least a few months to let them get used to working together.
Use success criteria, prompt questions, and tasks to help them stay on track. Make them accountable for the work they submit and regularly monitor progress to see if they need extra support.
5: Video group sessions
If you’re not required to teach everyone simultaneously, why not experiment with live video lessons for smaller groups of learners? You host the sessions and use questions and challenges to get them talking amongst each other, with no need to keep microphones muted.
Small group live lessons need to be short and focused. If you put students into teams of six, it wouldn’t take much longer than a traditional hour in the classroom to get through a class of 30.
Experiment with a mix and match approach to organising your lessons. There’s no right way to do it. Some students could learn from pre-recorded lessons whilst you meet live with other groups. It’s a great opportunity to personalise learning.
In summary
Student collaboration is challenging online. Problems with access to technology and data privacy can make it hard to offer opportunities for students to work together.
But the benefits of collaboration make it worth the effort. Experimenting with different formats will let you find the methods that work best for your class, whether that’s collaborative boards, group emails, breakout groups, or small teams in live lessons.
]]>Wacom pen tablets are a popular choice for teachers looking for an effective tool to support teaching and learning. But did you know your pen tablet isn’t just for presentations? It’s great for assessment too.
Formative assessment easily becomes a burden. It’s something you know you should do, but have limited time available. Other priorities bump it down your to-do list.
That’s where your Wacom pen tablet can help. We’ve found five ways you can use it to embed formative assessment effectively in your teaching.
What is formative assessment?
Formative assessment has had several name changes over the years. You might know it as ‘assessment for learning’ or ‘ongoing assessment’. First suggested in the 1960s it became popular in the 1980s and has become a central part of teaching through the work of Dylan Wiliam and others.
Formative assessment covers all the ways you evaluate what your students have understood, any barriers or misconceptions, and what they need to learn next. This assessment is ongoing and informal compared to structured summative assessments which give you quantifiable data.
There’s no one correct way to use formative assessment. Some of the most popular methods include:
- Entrance/ exit tickets: Start or finish a lesson with questions to check progress
- Targeted questioning: Ask specific students questions to check understanding
- Limited word summary: Learners explain a key concept in a few sentences
- One-minute paper: Students record the key concept, next steps, and areas of confusion
- Think, pair, share: Learners work with a partner before sharing ideas with the class
So how can you use Wacom to help you with ongoing assessment? Check out these simple ways to simplify the process and reduce your workload.
1: Supporting self-assessment
We know feedback is more effective when it comes from the student rather than you. But learners find it hard to improve their work. Often, they stare at a finished piece, unable to see what to do to make it better.
That’s where Wacom comes in. Use your pen tablet to underline, highlight or circle the exact area you want them to improve. You can even handwrite questions to help them identify problems.
Your pen tablet can show effective work too. Change colour with one click to point out what they’ve done well.
2: Capturing class responses
Questioning is a straightforward way to find out how individuals or groups of learners are doing. In a few minutes, you can see what they’ve learnt and where misconceptions lie.
But isn’t it irritating trying to capture those responses? You can type as you talk, but it makes the conversation slow and stilted. The alternative is handwriting and typing up notes. But you’re too busy to waste time doing work twice.

Use your pen tablet to eliminate the need to type responses. Create effortless mind maps and other visual thinking tools directly on the screen. Use your sniping tool to add them to planning or print to stick in exercise books and display on classroom walls.
3: Annotating planning
You’ll frantically scribble down notes about student progress during the lesson. But, to be honest, how often do you take the time to type it up and add these reflections to your longer-term planning? When you teach the unit the following year, you’ve forgotten the useful insights and make the same mistakes again.
Capturing ongoing assessment on your planning lets you:
- Flag misconceptions made
- Change the teaching sequence
- Alter timings to teach unfamiliar concepts
- Identify where smaller group work is needed
- Plan for revisiting key concepts
- Note down useful strategies and resources used
Using Wacom, you can write and draw directly onto lesson planning documents. It’s compatible with all the common programs you’ll use, like Word and PDFs. This makes it quick to capture your formative assessment notes and keep them for the future with no need to retype your planning.
4: Marking work
Marking essays takes ages and often doesn’t impact learning. Students struggle to understand your comments and apply them to their work. What a waste of your time.
Using a pen tablet makes it simple to write, highlight and edit directly onto student’s work with no need for awkward comment boxes. Colour coding makes it easy for them to understand. Keeping feedback as close as possible to the work, reduces cognitive load and helps them identify exactly where they need to improve.
5: Reading essays
When you’re assessing a batch of essays, how do you mark them? Do you display the work on your PC and handwrite notes to type up later? It adds considerable time to the process.
Or maybe you keep different tabs open and flick between screens? Laptops have limited space to work with and it’s cumbersome to move between different documents.
You can use tablets like the Wacom One as a second screen. Open student essays on your tablet whilst typing notes on your PC or laptop with no need to flick between pages.
Why use formative assessment?
Summative assessments are excellent for tracking progress. What they don’t provide is the ongoing evidence you need to build a snapshot during the lesson. An end of term test is too late to uncover a shared misconception or gap in understanding. That’s why formative assessment is such a powerful teaching tool.
It lets you:
- Introduce timely interventions
- Work flexibly and alter planning quickly to address needs
- Spot misconceptions and tackle them immediately
- Build students’ understanding of how they learn
- Decide when to move on to a new concept
- Improve independence and responsibility about learning
Best of all, ongoing assessment helps you get to know your students. You can see their personal strengths and difficulties, uncover attitudes to learning, and develop resilience skills.
Final thoughts
Ongoing assessment provides you with heaps of useful data you can use to be a more effective teacher. Building formative assessment into your lesson structure lets you find and tackle problems as soon as they occur.
Every teacher wants to use evidence to inform planning. The problem always comes down to time. What Wacom offers are simple ways to make your ongoing assessments quick and effective.
To find out more about how you can use Wacom pen tablets as a teacher, look at our useful articles to support you in the classroom.
]]>Are you one of the many teachers faced with online lessons for the first time? At Wacom we’ve been talking to educators about issues they experience when creating successful virtual classes.
One of the top problems on the list? Feeling confident about online teaching.
Does this ring a bell for you? Are you the master of your classroom, but feel completely out of your comfort zone in front of a webcam?
Here’s how you can boost your confidence when teaching online.
Get familiar with new technology
If you weren’t using much technology before, it can feel daunting at first. You might think everyone else is fine, but there are many teachers struggling with exactly the same issues as you.
Good virtual teaching doesn’t mean having to use every new platform and program you’ve been told about. You can still create great lessons with little previous experience online.
Introduce new things slowly. Your students will thank you too. Practise before your lesson to build your confidence. Start creating a list of favourite websites and programs to use in your regular teaching sequence.

Don’t copy everyone else
Do you have to use this program or website, or do you feel that way because other staff are using it?
Every school is likely to have a few trailblazers who love learning about new technology. They’re called ‘early adopters.’ You don’t have to emulate them. Let them take the lead and listen to what they say. You can decide if it’s worth your time trying it yourself.
Online learning is here to stay. Focus on the essentials your school expects you to use. You can build on this knowledge at your own speed.
Thoroughly plan lessons
Online lessons require preparation, just like classroom teaching. If you’re feeling anxious, try creating a detailed lesson plan with a story board, bullet point notes, or partial script.
However, don’t script the lesson so much that you lose your natural delivery. Having notes does not mean reading out a speech. Organise your plan into headings, bullet points, and key explanations. Use different colours and images to make it easy to follow.
Choose how to deliver lessons
Some schools say how they want you to teach, others are leaving the choice to you. There are three principal ways to deliver online lessons:
- Pre-recorded videos
- Live video calls
- Typed lessons
Let’s see the pros and cons of each approach.
1: Pre-recorded lessons
This means recording a video in your own time and sending it out to your students. Programs like Loom have simple introductions to get you started and are easy to navigate.
Pros:
- Take your time to produce each lesson
- Re-record if things go wrong
- No pressure to perform in the moment
- Edit sections for a smooth lesson
- Record a block of lessons in advance
- Students can work at their own speed
- Use the lessons as a learning resource
Cons:
- Watching and listening to yourself on camera
- Easy to concentrate on your mistakes
- Can waste time aiming for ‘perfect’ lessons
- Takes time to edit, upload, and share the videos
2: Live lessons
This involves hosting a class using a platform like Zoom. You send students an access code and they sign in to join your lesson live.
Pros:
- Faster than pre-recorded lessons
- Chance to talk to students
- Increased engagement
- Feels more natural than talking to a camera
- Live formative assessment
- Record the lessons for absent students
Cons:
- Hard to manage when things go wrong
- Many students have limited access to devices
- Affected by poor internet connection
- Some students struggle to engage
- Low-level behaviour can impact
3: Typed lessons
Plenty of great lessons don’t use video. Use text and images on a familiar document such as Word or PowerPoint, or type directly onto a platform such as Microsoft Teams.
Pros:
- Easy to link websites using hyperlinks
- Reuse activities and resources
- Create templates using programs like Visme or Canva
- Students can access in their own time
- Doesn’t rely on a good internet connection
- Easy to email lessons
- Embed voice messages to explain tasks
Cons:
- Can be difficult for formative assessment
- You lose student interaction
- Struggling learners may need support
- Lots of text can put students off
- Hard to demonstrate new concepts
4: Use a combination
There’s no reason to limit yourself to one method of delivery. Try mixing and matching. This is great if you want to start something new but feel apprehensive.
Remember, there’s no ‘right way’ to deliver virtual lessons. You can find what works best for you and improve it over time.
Evaluate the positives of your lessons
With the benefit of hindsight, every lesson could be better. Instead, focus on the positives from each online class.
Spend a few minutes considering:
- What went well?
- Which activities worked best?
- Who made progress in the lesson?
Now think of one thing you’d like to try next time. Make it small and achievable rather than a huge challenge.
Embrace mindfulness
Don’t let anxiety about teaching online dominate your home life. Enjoy exercise, get outdoors, and check out our top mindfulness apps for teachers.
If you’re teaching from home, recreate a commute by making a transition. Going for a short walk, reading, or taking a shower can give you the feeling of finishing for the day.
If you have problems sleeping or eating, experience panic attacks, or feel very low, it’s time to seek help. Talk to your line manager, visit your doctor, or look for a teacher helpline to call.
In summary
Teaching online is new to everyone. Use ‘early adopters’ to train you on the basics you need.
Plan well and choose the delivery format that suits you best: live, pre-recorded, typed, or a combination of these. Focus on the positives and choose one small target to improve rather than trying to make every lesson perfect.
Confidence comes over time, with familiarity about what you’re doing. Take it slowly, learn the essentials first and choose when to try other things. Soon teaching online will feel like the usual routine.
]]>Teaching for all abilities is hard enough in the classroom. Working at a distance from your learners makes it hard to pitch lessons appropriately for everyone.
Let’s look at simple ways you can differentiate learning for your class. To offer support to students who struggle, whilst also stretching those in need of challenge.
Different ways of differentiating lessons
Differentiation no longer means sitting children on tables according to a fixed idea of ability. It’s now a far more flexible approach focused on personalising learning, to avoid putting a ceiling on achievement.
The principal ways of differentiating lessons are:
- By outcome: Students complete the same task, but there’s variation in the level of work they produce.
- By task: Groups of learners complete different activities.
- By support offered: Extra resources are used to support struggling learners.
- By lesson structure: Classes are planned for different groups of students.
There’s no right way to make differentiation work. Most teachers find a combination of approaches best to meet the needs of their students. Working online might mean embracing alternative ways to differentiate that you’ve not tried before.
1: Differentiation by outcome
Rather than organising lots of activities for the different abilities in your class, you can differentiate by outcome. This means setting everyone the same task but expecting different levels of success or complexity of response.
Use success criteria to show students your expectations. Organise this into challenge order to help them see next steps. Whilst everyone will complete the same task, the criteria show them ways to improve.
For example, when writing an English character description, you could organise your criteria by the complexity of their answer:
- Starter level: I include a range of adjectives to describe the character’s appearance.
- Intermediate level: I include details about their personality and interests.
- Mastery level: I use ‘show don’t’ tell’ sentences to reveal information about my character.
For differentiation by outcome to work effectively, you must ensure every student can access the task. This could mean adding online supports for struggling learners. But don’t forget students in need of challenge. Find tasks that allow them to go further using ‘low entry-high threshold’ activities.
2: Differentiated tasks
Another way of differentiating is to choose tasks to suit the needs of groups of students. Some learners practise key skills. Others go straight into challenges that require them to apply learning in a new context. Online learning makes this easy, with countless programs and websites you can direct your students to use.
You can decide which task each student should do based on your assessment or try letting them decide. Think about students who will over or under–assess their level. With a little training, most can choose an appropriate task.
Make the challenge level clear using a simple system like star rating, or traffic light colours. Keep tasks short, rather than pages of questions, with logical progression between activities. Students could try a task then move to an easier or harder challenge depending on their success.
Or instead, try choosing tasks that play to strengths. Students could choose from a range of options that let them work in the way they prefer. Imagine a History lesson for example. One student might complete a timeline, another could research a key event, whilst others make a presentation. Differentiation doesn’t always have to be on a linear scale.

3: Differentiation by support structures
If you set your students the same task, plan supports for those who’ll need help.
There are many ways to support struggling students including:
- Sentence starters
- Vocabulary banks
- Modelled examples
- Diagrams and images
- Key questions
- Writing frames
Add your supports as clickable links on emails or lessons on collaborative platforms like Microsoft Teams and Google Classroom. Students can choose whether they need to use them.
Don’t forget students who need a challenge. Writing frames and modelled examples are useful for them too. Use challenging questions and add in extra opportunities to let them go beyond the set task.
4: Differentiation by lesson structure
Teaching online offers enormous opportunities to personalise learning in ways you could never manage in the classroom. Instead of everyone studying the same thing at the same time, change the structure of lessons to cater for everyone.
Consider what would work best for different groups of learners. Does everyone have to do the same thing? Some students could complete an independent challenge whilst others receive direct teaching from you.
There are lots of ways you could organise your lessons:
- Small group live sessions: Some students access pre-recorded lessons whilst others have a live class with you. Use a rota/ carousel approach or select students based on ongoing assessment of their work.
- Choice of when to leave: Students choose when they feel ready to finish a live class and start a follow up challenge. You could use an exit quiz or other form of formative assessment for them to show they’re ready to leave.
- Flexible joining: Students choose whether they need to attend a live class or work independently. Carefully monitor outcomes to check they’re assessing accurately.
Deciding who attends live lessons needs careful organising. You don’t want to miss anyone out or let them cruise along without challenge. Use formative assessment and student reflection to make it effective.
Final thoughts
Differentiating online can feel like a tremendous challenge, but in many ways it’s easier than personalising learning in the classroom. Embrace the tools you’ll find online to help you make the process easier.
Involve your students in their own assessment. Some will need support to select the right challenge level, but many others will enjoy the responsibility of planning their own learning.
Adjusting to virtual teaching? Find out how Wacom can help you with every aspect of online learning with our useful blog posts, written for educators.
Do they understand or are they just nodding along? It’s hard to get an accurate impression of student understanding. Thumbs up, yes/no answers, or asking ‘Are there any questions?’ don’t get you anywhere. You need quick and easy ways to get accurate formative assessment whilst you’re teaching.
We’ve made a list of our favourite ways to assess progress for you to use during your virtual lessons. They’re split into ones best suited for live video lessons or asynchronous distance teaching. But many will work for either situation.
Formative assessment during live lessons
Keep them focused on learning. See at a glance which students need extra support with these simple assessment ideas.
1: Make a poll
Ask questions and measure anonymous student responses using a polling platform such as Poll Everywhere. Great for a snapshot of whole class progress.
2: Run a live quiz
Create quick multiple-choice quizzes. Ask students to email their results or use a free resource like Kahoot.
3: Rag rating
Use a traffic light (red, amber, green) system for students to rate their confidence and understanding against your success criteria for the lesson.
4: Short word summary
Challenge your learners to explain a concept concisely by giving them a strict word limit or make Twitter posts of less than 280 characters. Great for reluctant writers.
5: 2-minute summary
Perfect for keeping your live lesson fast paced. Set a timer on your shared screen and watch them frantically write their summary before the buzzer sounds.
6: Time travel
Ask your students to imagine travelling back in time to the start of this lesson. What would they change? Where did they get stuck? It’s useful for finding out where more practise is needed.
7: Whiteboards
Your distance learners might not have mini-whiteboards at home, but they can always write their ideas on paper and hold them up to the screen. Alternatively, ask them to type answers in the chat bar and click submit at the same time.
8: Write a question
Ask students to write a question to challenge the rest of the class. Choose a selection to read out. Better still ask them to email them you and use them to start your next lesson.
9: Test the teacher
Always a crowd-pleaser. What student doesn’t love tricking their teacher? Ask them to write on-topic questions and choose volunteers to catch you out.
10: Matching examples
Show statements and visual representations. Ask students to match them together and explain the connection. Perfect for assessing their use of key vocabulary.
11: Odd one out
Share three objects, pictures, or sentences and ask them to explain which one is different. Particularly useful for checking understanding of concepts.
12: Opposites
Assess student understanding by asking them to explain what the opposite would be, e.g. What is the opposite of melting? What is the opposite of a negative integer?
13: Give me another
Ask students to suggest synonyms or other examples to show how well they’ve understood a concept.
14: What’s the point?
Recap some activities you’ve used in the lesson and ask them to explain why they did them. Perfect for recapping the learning objective.

15: Have a debate
Students love a good argument. Share a statement and debate for or against the idea. See what evidence they can include to support their thinking.
16: Teach the class
Choose a student to become you, with a time limit to teach the class. Useful for assessing a particular student, just remember it won’t suit struggling or quieter learners.
17: Class mind mapping
Record student ideas on a concept map using a pen tablet. It makes a useful reference for future lessons.
18: Lifebelt
If a hypothetical student felt stuck, what advice would they offer? Particularly useful for maths lessons to get students explaining processes.
Asynchronous lessons
If your students are learning in their own time, you don’t have to worry about the speed of formative assessment activities. It’s easier to assess individual progress but whole class development is less obvious.
19: KWL grid
Give them three columns. The first is what they already know. The second is for questions they’d like to find the answer to. Use the third at the end of lessons to reflect on what they’ve learnt.
20: Write an argument
Instead of a live debate, ask students to write a brief argument for or against a statement. Provide sentence starters and vocabulary banks for struggling students.
21: 1-minute paper
Ask them to set a one-minute timer and write everything they can remember about a key concept.
22: Correct the mistakes
Share work with an error and ask students to find and correct it.
23: Strengths and weaknesses
Students need to reflect on their own understanding. Ask them to evaluate what they can do well and their difficulties.
24: 2 stars and a wish
Ever popular with teachers, ask learners to share two things they’ve done well in the lesson and one thing they need to improve. Provide a bank of example ideas for struggling students to choose from.
25: Self-marking quiz
Save time by creating formative assessment that marks itself, like Microsoft Forms. See at a glance which students need challenging or support.
26: Create your own example
Ask students to write a question or create a diagram to show their understanding of a concept.
27: Ranking
Use a ‘diamond 9’ or simple list to get students thinking about relative importance. The explanation of their decisions will give you tonnes of useful assessment.
28: Write the definition
Perfect for checking key vocabulary. You share a word, and they write and draw a simple definition of it. For struggling learners, make this a cloze procedure task.
29: What do I mean?
Give students a definition and ask them to decide which keyword it refers to.
30: Reflection journal
Plan time at the end of each lesson for students to write a diary-entry recount. Use key questions to help them organise their thinking and see strengths and weaknesses.
In summary
Formative assessment is essential whether you’re teaching in the classroom or from your laptop at home. It helps you tailor lessons to the needs of your learners. Good ongoing assessment helps you know when to speed up, practise something again, or abandon the lesson plan entirely.
There’s no need for formative assessment to be boring. Our wide range of ideas provides you with lots of inspiration to make it an integral and enjoyable part of every lesson.
]]>School closures suddenly forced teachers to shift to online teaching. Here at Wacom we’re committed to supporting you move to virtual lessons with our range of pen tablets and useful resources for educators.
When we talk to teachers about the biggest barriers to online learning, the same issue crops up every time– engagement. It’s one thing to capture your learners’ attention in the classroom, it’s another to keep them focused when teaching online.
And what about your quieter students? Those who feel less confident to share ideas and speak up. How do you engage them? We’ve got seven simple suggestions to help you support and give them the confidence to contribute.
1: Targeted questioning
If you ask the entire class a question, you know the same few students will always have the answer. That’s intimidating for less confident students. Some learners will never engage if given the choice.
Only hearing ideas from the same few students means you get a skewed impression of progress. Struggling learners are unlikely to reveal to the class that they feel stuck.
Targeted questioning is a simple strategy to make sure everyone speaks. Before your lesson, look at a class list and decide which questions you’ll ask particular students. During the lesson, highlight as they contribute so you don’t forget anyone.
Consider the questions you ask. A confident student may happily share and expand on an idea. A quieter learner may need a limited question with support structures to help them answer. Targeting your questions means every student has a good chance of being able to answer.
2: Give them time to respond
The pressure of expecting an instant answer means quieter students are likely to give up. They freeze, unable to think of an idea. Meanwhile, confident students desperately wave their hands or call out to say they know the answer.
Avoid the unpleasant shock of suddenly being picked on, by giving them time to prepare. Use their name first to get attention and give them a warning that their turn is coming.
Use sentences like:
- “James, after I’ve asked Andre this question, I will choose you.”
- “Sara, listen carefully because I’m going to ask you to answer.”
- “Alex, I will ask you for your ideas next.”
Allowing waiting time for answers isn’t something we do naturally. Next time you ask a question, silently count to ten before offering any help. The silence can feel uncomfortable but avoid immediately suggesting ideas or moving to another student. Give them thinking time to work out their answer.
3: Supported structures
Help quieter students share their ideas by providing a simple structure to frame their responses.
This could include:
- Multiple choice: Students choose the correct or wrong answer and explain why
- Ranking and rating: Great for gauging confidence levels about topics
- Sentence starters: Display on your screen for students to use when they answer
- Modelled sentences: You give an answer first so they can see what you want
- Rephrasing: Take their partial answer and expand it
- Vocabulary bank: Display key words for them to include in their answer
For struggling or reluctant students, these scaffolded supports are useful prompts to help them get started.

4: Offer different ways to communicate
Rethink the assumption that engagement means children speaking aloud in your live lessons. There are plenty of non-verbal ways for them to engage with the learning. Providing choice of how to respond is a useful way to build every student’s confidence.
Some learners may like to type a response in the chat bar, others may enjoy hands up or thumbs up and down. Some will want to hold up answers to the screen for you to see.
If you use breakout rooms in your live lessons, encourage all students to join in group discussions but let a more confident child share the ideas of the group when the class is back together.
5: Reward engagement
Quieter students need to feel valued. That doesn’t mean forcing them to talk or putting pressure on them in the live lesson. Instead, use rewards to encourage them to take part.
Keep track of the merits you’re giving out. Are they always going to loud, confident students? Often reward systems are used to manage behaviour, so children who disrupt learning end up with more than those who always work hard. How can you spot and reward the learners who deserve it most?
Use your usual award system to give credit to students when they engage. You might also introduce new incentives such as sending a certificate home to a student trying hard to participate.
6: Arrange 1:1 check-ins
Quieter students are less likely to seek your help. It can be hard when you’re teaching online to spot they’re struggling or feeling unhappy. Reach out proactively to check how they are finding the work.
There are plenty of ways to develop a 1:1 dialogue, even if you are working online.
You could try:
- A phone call home
- Individual emails
- A personal video call
- Sending a brief letter home
Students who are quiet in lessons may be more confident when speaking individually. Just remember to check your school’s safeguarding policies before making contact.
7: Reconsider your expectations
Does quiet mean less engaged? Some students may listen and learn but not want to participate actively in the class. Is this really a problem?
In your classroom you would expect some students to be quieter than others. What we don’t want is for them to feel left out. If students are submitting work and learning, do you really need them to speak up more during live lessons?
Others may be hampered by access to technology or internet connectivity. Don’t assume all students have a laptop at their disposal for your class. Recording live lessons to send home is helpful for those who can’t join you live.
Final thoughts
We shouldn’t try to ‘cure’ students of shyness. Naturally, some children will be louder and more confident, whilst others will be quieter. They key is that every student feels included and valued in your lessons.
Don’t assume being quieter means they’re not engaged. Avoid pressuring them to talk. Instead praise and reward contributions and speak to them 1:1 to check they feel secure with the learning.
If you’re looking for ways to improve your online teaching, check out our useful blog posts for educators. We’re constantly looking for fresh ways to support you as you embrace virtual teaching.
With schools all over the world redesigning because of COVID-19, blended learning is becoming a new normal. Blended learning has been around for a while and is the combination of traditional face-to-face instruction with aspects of online instruction all while students are in the classroom with the teacher. Blended learning strives to provide students the best of both face-to-face and online learning experiences.

Sajitha Ranjith is a mathematics teacher at an international school in Dubai. Like most teachers around the world, she had to face several challenges in the last few months because of Covid-19. Sajitha was looking for a tool that would help her to make the lessons more interesting and engaging for her students both in class and at home. It was particularly important to her that she could write mathematical steps directly on the screen in order to explain the individual steps to the solution to her students.
Watch the Video Here:

That is when she was introduced to the Wacom One which has today, become the perfect digital whiteboard for her. Watch the video to see how easy it is to get started and use the Wacom One for teaching. Sajitha will take you through a wide range of applications on the Wacom One which comes across as day to day activities for teachers nowadays. She will show you how to use Wacom One with One Note, Microsoft Word and PowerPoint. She also takes you through cool features like Ink to Draw and Ink to Math, which she believes is an absolute value add. Additionally, she will also explain how to compose an e-mail using Ink to Text, with the Wacom One and how she benefits from a dual screen set-up while teaching. A blended approach to learning ensures that the learner more engaged and driven, if the right technical resources are provided. Today Sajitha feels very happy and much more confident as a math teacher than when distance learning started. She believes that with the Wacom One her teaching has become more engaging and effective, which in turn has helped her students to gain a better understanding.
In the new, blended learning environment which has been a buzzword in the education industry lately, success depends on the technical resources with which the learning experience is delivered. These tools must be up-to-date, reliable, and user-friendly in order to be successful.

Wacom One is the perfect fit for this new era of education.
For more questions and inquiries please contact your education consultant: ajoe.thomas@wacom.com
mobile +971 52 2197960
or
Find your dealer:
UAE
Al Ershad Computer Trading LLC
KSA
Kuwait
YUSUF AHMED ALGHANIM & SONS W.L.L.
Oman

]]>
So, how can you teach successfully if you can’t rely on your internet? We’ve got seven simple ideas to help you deliver great lessons, despite the problems caused by your poor connection.
1: Boost your signal
Before you put up with a terrible connection, there are a few simple things you can do to make sure it’s running as well as possible.
Try these simple ideas to boost what you already have:
- Go wired, not wi-fi: Use an Ethernet cable to connect directly to your router. This should give you a more reliable and faster connection.
- Update your browser: Not only is the latest version more secure, it may also improve speed.
- Check your connection is private: Password protect your wi-fi to make sure no one nearby is using it without your knowledge.
- Avoid extension leads: If you must use one, make it as short as possible and keep the lead tangle-free.
- Be kind to your router: Put it on a table instead of the floor. Keep it switched on and away from other electronic devices such as baby monitors.
- Check your phone line: Microfilters let you split your phone and broadband signals. This stops them affecting each other.
Contact your internet service provider (ISP) to discuss if you have a problem with your connection. They can help you run simple diagnostic tests or see if you need an upgrade to boost your signal.
2: Use visuals to support speech
If you’re stuck with a poor connection, your speech can become distorted and hard to follow. Using a range of visuals is helpful to keep students following the lesson, even if they can’t hear you clearly.
Useful visuals include:
- Pictures
- Diagrams
- Sentence starters
- Process charts
- Vocabulary banks
- Subject specific equipment
Drawing visuals during your live lesson will be more successful than displaying static images on the screen. Students can easily follow the process if you draw and talk simultaneously. A pen tablet is great for writing during presentations.
Display questions for students to read. Don’t assume they’ll be able to hear you talk them through. Instead, use annotations to create worked examples. Write notes and comments as you go to help them keep track of any discussions.
3: Let them show responses
It’s not just you struggling with video calls. Many students are likely to suffer from a poor internet connection. When you ask questions, you’ll find a long delay or interference on the line. It’s frustrating for you and boring for your students to sit through. You quickly lose the pace you’d normally have in the classroom.
Instead, find ways for students to contribute without needing to speak. They could hold up answers to their screen or type responses in the chat bar. They might not need to talk during the lesson. Ask them to record ideas and submit them by email or on an online platform like Microsoft Teams.
4: Record lessons
Recording live teaching provides a way for students with poor access to watch lessons in their own time. Upload each video to a shared area and explain how to find it. Not only is it inclusive for learners with limited access to devices, it’s useful when a student is unwell and needs to catch up.
Try using a central location, like Microsoft Stream, to provide students with a simple way to access previous lessons without needing to download. It’s great for setting revision or supporting those who are struggling. You can use these videos again for homework and distance teaching.
5: Make your lessons short
Don’t replicate a traditional hour in the classroom. Make virtual lessons short and pacey to keep students engaged. Break learning into small chunks with activities and games combined with modelling and discussion.
Experiment with flipped learning by setting students something to learn about before your lesson. They come to your video call prepared to talk about what they’ve learned. This lets everyone work at their own pace and dedicates live lesson time to practising skills rather than introducing new content.
6: Keep it familiar
Online lessons work well when there’s a familiar structure to follow. Not only does it reduce cognitive load but also supports students struggling to follow you because of a poor connection.
If your lessons always follow the same pattern, they’ll know what to expect. This reduces the need for them to hear every word you say. Be creative and make lessons exciting but keep the underlying lesson organisation the same.
7: Prepare for losing your internet connection
Prepare for the worst so you’re ready if your poor internet connection prevents a live lesson from taking place. Email students before teaching and share any resources they’ll need.
Teach them what to do if there’s a connection problem that stops the lesson from happening. They can use the resources you’ve sent to complete activities in their own time. Adjust your PowerPoint or record a quick video and upload it to a shared platform for them to watch instead.
Final thoughts
Don’t let a poor internet connection ruin your lessons. If you must teach live online and can’t boost your signal, you must make it work for you and your students. Online learning is here to stay and likely to become a normal part of the teaching process.
Short, fast-paced lessons that don’t rely on students speaking work best. Offer different ways for them to contribute ideas to ensure they’re all fully engaged despite connectivity issues. Being flexible in your approach lets you deliver great virtual lessons even when your signal lets you down.
]]>Let’s look at five popular visual thinking tools you can use as a teacher and explore the benefits they offer you and your students.
1: Sketch noting
Have you seen sketch noting in action? It’s become a popular way of creating a visual summary of the key points from events and talks. You can also use it in the classroom to make notes through a lesson or create a recap of a unit of work.
Sketch noting is a way of visual note taking. You capture your notes using words and a range of quick drawings. There’s no right way to do it, so if you love doodling you might include lots of images. If you prefer words, your sketch notes will use more writing.
You’ll often see these common features included:
- Connectors: Lines, dots and arrows making visual connections
- Words: A range of sizes, styles and colours to emphasise phrases and key ideas
- Icons: Symbols that are quick and easy to draw
- Containers: Boxes for grouping ideas including bubbles, shapes and banners
- Illustrations: Relevant pictures and drawings that refer to the principal themes
Great sketch noting means deciding what key information to record; you’re not trying to capture everything. During meetings, look at the agenda to decide what you will need to remember. In lessons, use your success criteria to help make your sketch notes focused and manageable for students.
2: Inspiration board
Collect inspirational ideas you see online to create an inspiration board full of creativity, much like interior designers use mood boards. In addition to pictures, include diagrams and notes in a range of colours to help you organise your ideas.
Using your Wacom pen lets you insert images and write directly over and around them. You can collect suggestions for a new scheme of work or plan a classroom display. Our Bamboo Paper is popular with teachers because you can create notebooks for different subjects and projects all kept in the same place.
Rather than cumbersome folders of clippings and photocopies, having an online inspiration board makes it easy to add, edit and share your ideas. Why not create collaborative boards on shared platforms such as Microsoft Teams to let other colleagues add in their ideas?
3: Mind maps
If you need to collect all your ideas about a single topic or theme, a mind map is great for brainstorming quickly. Put your central theme in the centre of the page and arrange your ideas around it using simple connecting lines.
Mind maps are word heavy but can include a range of useful images within them. Use colour-coding to help organise the information. You can create branches from major lines to cluster ideas into groups.
Mind maps are useful in the classroom to capture class discussion, provide feedback and create topic revision aids. When teaching online in live or recorded lessons, use a simple tool like Microsoft Whiteboard to create your mind map and then use the sniping tool to capture the completed image for future lessons.

4: Concept maps
Often confused with a mind map, we use concept mapping to focus on the relationship between ideas. Usually the information is presented from the top down with arrows showing different connections moving from general down to specific. Often verbs are used to explain the relationships.
Concept maps need to be clear to follow and understand. Use colours and icons to help make them easy to read. Drawing with a Wacom tablet makes it easy to add and remove lines using different pens and the eraser tool.
5: Diagrams
Flow charts, graphs and other diagrams are all uncomplicated ways to visualise thinking. Sorting information into Venn or Carroll diagrams, creating timelines and graphs let you make links and categorise information. It’s easier to make connections when you have sorted the information into relevant groups and sections.
Creating a simple diagram is useful for showing a process towards an outcome. Use them in the classroom to create visual journeys through a unit of work or to map out a curriculum area with your colleagues. Using icons, drawings and colours makes them easy to navigate and understand.
Tips for using visual thinking as a teacher
Visual thinking tools lend themselves to collaborative thinking online. Use platforms like Microsoft Teams or Zoom to create shared visuals during lessons or department meetings to capture key information. Using a pen tablet makes it easy to handwrite, draw and doodle with the benefit of saving and sharing the results.
There’s no need to be artistic to create visual representations of your ideas. Keep your icons simple and easy to recognise. Drawing directly on your computer makes it easy to tidy up your representations as you go with no need to redraw. Using colour is the simplest way to organise information into obvious groups and sections.
Visual thinking is simple to implement in your classroom and offers a way to display ideas in a clear way. Working online lets you edit and keep these plans to use in the future. It saves lots of time redrawing and typing up documents which is great for busy teachers.
We asked teachers to share common problems they face when teaching maths to see what opportunities we can find.

Problem 1: Using manipulatives
Using concrete resources is the essential first step in teaching mathematics. Manipulatives such as Dienes blocks, Numicon and Cuisenaire rods have become commonplace. Students are unlikely to have this classroom equipment at home. They lose the tactile experience of maths.
Opportunities for visualising maths
Technology offers an incredible range of options for maths. There are countless websites and programs that use visual representations of your favourite manipulatives. High quality online maths activities let students use objects on the screen with the added fun of games and challenges.
Problem 2: Parental engagement
Many parents feel worried by maths. They say, “everything has changed since I was at school” and struggle to learn new methods. Online learning gives them an opportunity to disengage, leaving their child to access online lessons independently.
Opportunities for working with parents
Parents around the world are watching online video lessons with their children. Working virtually gives you the unique opportunity to educate students and their parents.
You can show how we use maths in real life. Set challenges around the home, using everyday situations. It’s a simple way to reduce the fear of maths and promote home learning.
Problem 3: Access to technology
The rise of distance learning has been an issue for students with limited access or ability to use technology. With families sharing a laptop or working from a mobile phone screen, it can be difficult for them to engage with your lessons.
Students struggle with platforms and websites they are unfamiliar with. Instead of maths, they spend their time learning how to navigate, where to click and how to use the site.
Opportunities to see the benefits of being online
It was easy in the past for some students to never use virtual resources. They relied on textbooks and paper-based exercises. Now they see the benefit of lessons they can complete in their own time. For students who struggle to work within time limits, need frequent movement breaks or require over-learning, virtual lessons are more accessible.
Problem 4: Assessment and monitoring
Did they understand the task or find the solution on Google? Are they working independently or did a parent do it for them? In the classroom you glance around to see who’s on task, struggling or sitting bored. Working virtually means losing the instant assessments you can make.
Opportunities for effective feedback
Online tools make marking easier than ever. No more wasted hours inputting data and analysing it. When work is completed online, marking can be instant. You can see where misconceptions have arisen, common areas of difficulty and students who need a challenge. This offers an enormous opportunity to devote more time to quality feedback and give support exactly when a student needs it.
Problem 5: Mathematical talk
Mathematics is full of vocabulary that students can struggle to learn. Classroom teaching lets you model and encourage students to elaborate, clarify and rephrase. With distance learning, they often write their work and lose the opportunity for mathematical talk.
Opportunities to talk maths
In the classroom, students flick through their book or look around to find vocabulary prompts. In your online class you embed word banks and sentence starters directly into your lesson.
Normally time is wasted when students forget key vocabulary. They have to wait for you to help. Working virtually, they can click a button leading straight to a video demonstration, drawing or diagram to get the support they need immediately.
Problem 6: Personalised learning
Learners work at different speeds. You might support a group who are struggling, whilst others access an independent problem. It can feel hard to spot struggling students when they’re not sat in front of you.
Opportunities to support individual needs
It’s easy to personalise online learning with a range of activities for every need. Lessons can be shorter and more focused with no distractions or behaviour interrupting learning. That leaves more time for individual feedback and challenge though 1:1 video calls, small group interventions and annotated feedback.

Problem 7: Collaboration in maths
Online learning feels more isolated. With less opportunity for paired and group work, students can receive less peer support and be more reliant on you to help them.
Opportunities to work together
Who said students had to do online learning alone? Set up collaborative groups and boards so your learners can share ideas. Create whole-class discussions using Skype, Zoom or Teams. Pair students up to work together or make flexible groups for them to work in.
How Wacom can help
Here at Wacom we’re committed to helping educators make the most of distance learning. Our range of pen tablets and screens mean it’s easy to find the right product for you.
Here’s how we can help you teach maths.
Writing and drawing in maths lessons
Every maths teacher knows how hard it is to type algebraic formulae. Wacom pens make it easy by letting you draw directly on the screen. In the classroom, clean your whiteboard and your notes are gone. With Wacom it’s easy to save annotations and use sniping tools to add the drawings to other documents.
Reduce cognitive overload
Busy screens filled with text and pictures don’t help learning. Use your Wacom pen to underline keywords and point to things. Add notes to diagrams and graphs and reduce the amount displayed to students by drawing in real time.
Planning maths lessons
Virtual teaching encourages us to plan collaboratively too. Add lesson plans to shared areas and use your Wacom pen to annotate them. It’s simple to record notes after delivering a lesson and add any diagrams you’ve drawn. Update lessons easily, with no need to retype.
Teaching maths online has many challenges, but the opportunities are vast. It’s never been easier to personalise learning in a way that is impossible in the classroom.
For students who generally struggle with lessons in the classroom, the rise of virtual learning can create more barriers for them to overcome. It’s a challenge to make your online lessons meet the needs of every student.
‘Struggling learner’ is a blanket term that covers so many difficulties. Some students lack access to technology or are unfamiliar with how to use it. Others have low literacy rates or difficulties with comprehension. Some will struggle to engage with lessons because of distractions at home.
Let’s look at common problems you will encounter when setting virtual lessons. Our simple suggestions will help you overcome barriers to learning so every student achieves their potential.
“Creating virtual lessons that support struggling students can be a challenge. We share simple techniques teachers can use to help everyone learn online”

Consider access to technology
It’s the children who struggle with learning who often have limited access to computers. You must think about how every student will access your lessons. Many families will share a laptop between parents and siblings or watch through a mobile phone.
Make sure you:
- Choose platforms that work on all devices, such as Microsoft Teams or Google Classroom. They can view both on phones and PCs or Mac computers.
- Consider how they will play videos– using Microsoft Stream lets students stream videos without having to download anything.
- Don’t assume students have the same programs you do– plenty won’t have PowerPoint or Publisher.
- Make they can view sure lessons without needing paid software.
Many schools are experimenting with live virtual lessons using Zoom, Teams or Skype. But remember students who are sharing technology may not have the freedom to watch live. Make a recording of your lessons for those who will need to be flexible about when they work online.
Support students with low literacy and comprehension skills
Online learning is an opportunity as well as a challenge. In the classroom, you are always torn between students ready to move on and those struggling to understand. Video demonstrations allow every student to watch at their own pace and rewind as needed.
Reduce the amount of information shown on each page or slide of your presentation. Record voice explanations of tasks and include vocabulary banks for those who struggle to read fluently.
Add relevant images and diagrams to your presentations. Wacom pen tablets are perfect for annotating, drawing and highlighting your resources. Keep your text as close as possible to images and avoid using visual distractions such as clip art and gifs.
Engage reluctant or disinterested learners
Some students are reluctant learners because they are unfamiliar with technology. Others have always been disengaged or are distracted by their home environment. Helping these students access and benefit from online learning is crucial because they are the ones most often left behind.
Be realistic about the work you set. Students are unlikely to manage full-time hours. Make your lessons 30-40 minutes long with a mixture of demonstrations, modelling and tasks to complete independently.
Set consistent expectations about handing in completed work and tell students what will be marked on what date. Keep track of submissions and plan what to do if students consistently cannot complete their work despite your support.
Create a familiar routine
Have a consistent schedule of work that is shared daily. Use a clear timetable so they know which lessons to expect on each day. Struggling learners often cannot manage their time without support so avoid sending out an entire week of lessons in one go.
Always post to the same platform to give them a familiar starting point and let them get familiar with it before focusing on learning. Make simple ‘how to’ videos using Zoom, Loom or Teams to show them exactly what to do.

Offer targeted support
Online learning does not mean a one-size-fits-all approach to lesson planning. In the classroom, some students require scaffolds, the same is true online. Virtual lessons offer many ways for you to create appropriate support for them.
Try:
- Creating a clickable voice explanation next to a task
- Embedding video clips
- Offering choice of task
- Work getting incrementally harder
- Modelled examples- pen tablets work well because you can highlight, circle and draw directly over images, or create your own.
How do you know who your struggling learners are? Think of ways to record progress in a manageable way, such as using surveys, polls and quizzes on Microsoft Forms. You can see at a glance which students need your help.
It’s also worth thinking about how you share answers to tasks. If the students submit their answers and receive the results a week later, they’re unlikely to remember what they did or learn from them. Make feedback an integral part of learning and consider using model answers within a lesson.
Make your support personal
A problem with online learning is students losing individual attention from teachers. Can you offer drop-in live online sessions, or sign them up for 1:1 video calls to speak with you individually?
Voice recording has made creating personal feedback less onerous. Instead of typing out long responses to work, record a brief message so they can hear your familiar voice. You can send personal messages by email or give regular shout outs when you set lessons.
Many schools create shared systems for monitoring student contact, such as editable documents on Microsoft Teams, Dropbox or Google Drive. This allows staff to choose students to call or email, and share who needs further support with colleagues.
Use a small range of platforms, websites and programs
There’s a wealth of resources available online. It’s tempting to use everything. But for struggling learners, this just gives them more unfamiliar things to learn.
Every new website means an address, username and password to remember. Sticking to a limited range of resources helps your struggling learners become familiar with what to do. This reduces the cognitive load, letting them learn more efficiently.
Create helpful guides
Find a few websites, apps or programs that offer a wide range of learning opportunities and use them as much as possible. Create a simple document for students containing all their usernames and default passwords. Leave spaces for them to add any changes. If you teach younger children, it’s useful to send these out to parents.
Make a simple user guide for each platform with screenshots or videos to help them navigate. Pen tablets are useful because they let you easily highlight, draw and signpost, but you can access basic drawing tools on programs such as Microsoft Word.
How can we help?
Struggling learners are at risk of falling further behind in online learning without your support. Virtual lessons offer so much potential but only if you remember that some may have limited access to technology and difficulties using it.
Here at Wacom we’re passionate about making online learning inclusive. Our pen tablets let you personalise your lessons and deliver them effectively to meet the needs of every student. Check out our helpful e-learning YouTube page to see how you can use Wacom in your classroom.
Everytime you think about how to start a character, a creative block might come immediately, but Iris is here to show you how to overcome it and start creating some of the most original pieces out there with the help of Maya and Zbrush and of course, her loyal Wacom Cintiq 24.


“I have been working with Wacom Cintiq 24HD for almost 8 years.
Working with the product has done wonders for my work.
Being able to touch lines on the screen and controlling the power of the sculpture made me a better and more accurate artist”
In this article, you will find some tutorials that are worthy to look at, given the fact that the uniqueness of her talent is displayed there.
Make the most out of your Wacom tablet learning from the best artists out there. Do not forget to enjoy!


In this next Tutorial Iris will show you how to model a Low Poly cartoon Hand in Autodesk Maya 2020. For more tutorials please subscribe to her channel 🙂

Here is a Work in Progress… It is made in Zbrush and based on Galit Weisberg concept. So cool!


Go follow her to get the best inspiration and knowledge.
https://www.youtube.com/IrisOgli
https://www.instagram.com/iris_ogli
https://www.facebook.com/ogli3d
https://www.artstation.com/irisogli


Born in 1984, Simon is the internationally acclaimed author, concept designer, and artist of the art books Tales from the Loop (2015), Things from the Flood (2016) and The Electric State (2017). Stålenhag’s highly imaginative images and stories depicting illusive sci-fi phenomena in mundane, hyper-realistic landscapes have made Stålenhag one of the most sought-after visual storytellers in the world. Tales from the Loop was ranked by The Guardian as one of the “10 Best Dystopias,” in the company of works such as Franz Kafka’s The Trial and Andrew Niccol’s Gattaca.


Not only have Stålenhag’s unique and cinematic retro-futiristic images earned him a worldwide fan base but have also made him a go-to storyteller, concept artist and illustrator for both the film and computer gaming industry. The art book The Electric State will be turned into a major motion picture and Amazon Prime have ordered a full season of a TV show based on the art book Tales from the Loop.