That means it’s often up to a creative kid, young person, or adult beginner to take matters into their own hands and find whatever resources they can to teach themselves how to draw. Luckily, there are a lot of free resources for learning how to draw online – and we’ve pulled together a bunch of them to get you started. Here’s a practical guide for young people, beginners, and improving artists to get started on their creative journey and learn how to draw.
Start with the Foundations: Perspective
Most art instructors will tell you that you have to build a strong foundation to build off of. That means things like value, perspective, and understanding basic shapes. For example: Perspective! It’s one of the core essentials when you’re learning to draw. Here are a couple tutorials from pros Monika Zagrobelna and Sam Yang:
Extension: Anatomy
One of the hardest things to learn to draw is the human body! Even if you’re drawing stylized characters, knowing how hands, feet, and body parts all fit together in real life is important so you can build off of that. Here are a few great places to start:
Specifics: Character Design
If you’re interested in something specific like creating your own characters, these tips and tutorials should help:
Specifics: Drawing Animals
Enough humans! What if you want to learn to draw animals? Going to the zoo or looking at your pet and drawing from life is important. But check out these tutorials from expert animal artists, like the legendary Disney animator Aaron Blaise, below:
Tips: Using References
Some artists might think you need to be able to just visualize everything in your head. But most artists recognize the importance of using references for inspiration! Here are a few takes on using references in your work:
A great resource: Skillshare
Did you know that a bunch of Wacom products come with a free three-month trial of Skillshare? There are tons of great courses and classes on there to help with your creative journey. Here are just a few we wanted to point out:
Want more resources for learning to draw?
Wacom is committed to supporting young and beginning artists in their creative journeys! Check out our Learning to Draw page for a wealth of resources – general tips and tricks as well as a specific collection of tutorials for character design and for manga & anime.
]]>Hello everyone! We hope you had a great weekend!
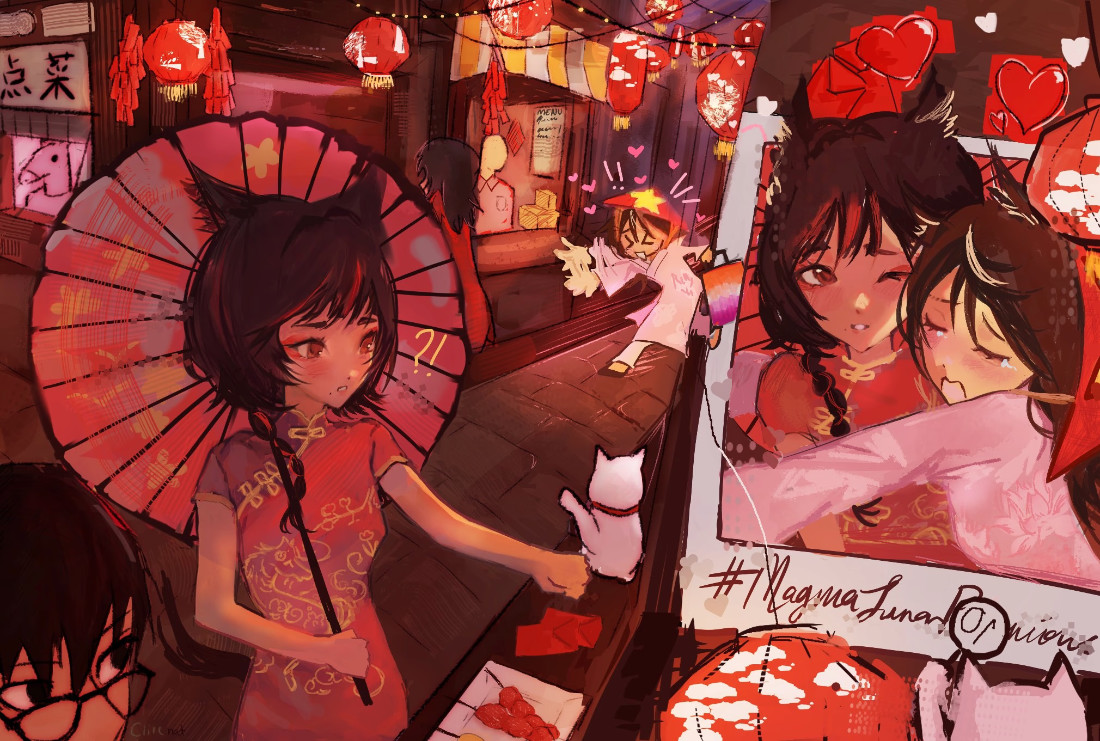
Thank you all so much for your interest in Magma and Wacom’s Lunar Reunions art competition! We had some exceptional entries and it was a tough one to judge… especially between our top three! We’ve tallied up the results and, finally, we are ready to announce the winners!
If you participated, thank you! It was great to see what you came up with together! If you didn’t, we still hope you have a good time looking at the winning entries!
Check out the winners below!
First Place:
First Place winners are: Berrycake, hjoy, and 012.
Second Place:
In second place: Thecoss, francesca_m, and Bboboo.
Third Place:
And in third place: 楊. dante dabbles, and 冷凍披薩.
Community Prize
And finally, for your community prize voted for by you: cl1ve and EFFIE
Furthermore, we also want to give a shoutout to a few pieces that we felt were very strong as well. For all of the honourable mentions below, we wanted to say that you had an excellent showing – your pieces were absolutely gorgeous, and we had a tough time deciding on the winners. We sincerely wish you the best for the next round, and we might be in touch!
prowino and thelostautist : https://magma.com/artist/prowino/posts/69a31fc8c213465e3e670d52
karinis_flopera and katak_terbakar: https://magma.com/artist/katak_terbakar/posts/69a6bdc31b55ab01b9842f2a
chiechiee and rensu: https://magma.com/artist/chiechiee/posts/69a5c302432eaae30e2ef398
Once again, big thanks to Wacom for joining us in this competition! Wacom is the global leader in digital pen and tablet technology, empowering creativity across the world. From first sketches to final masterpieces, Wacom tools are trusted by artists, designers, animators, and illustrators in studios, classrooms, and at home.
Thank you all so much for competing! This was a blast, and we are already looking forward to hosting the next one!
Please do follow our judges for this competition as well! We really loved seeing what you all came up with!
New to Magma? Want to learn more?
Magma is a browser-based collaborative drawing application that lets you work on the same canvas with your friends or other artists from around the world! A free three-month trial of Magma Blaze is included with your purchase of a variety of Wacom drawing tablets. Learn how to get started in Magma by clicking here: Getting started in collaborative drawing with Magma: How to create Art Jams and Shared Canvases
]]>Joining the discussion was Raha Dabiri (storyboard artist), Todd Hoppmeyer (storyboard artist and animator), and Vinod Krishnan (technical director on The Simpsons), moderated by Megan Davis from Wacom.
Key Takeaways & Memorable Quotes from the Round Table:
Breaking Into the Industry:
All three panelists emphasized that relationships and genuine connections are crucial. As Todd put it: “I think networking has kind of a cold connotation to it. I think it’s about building relationships.” Vinod added that it’s about “making friends and having good conversation,” rather than traditional networking.
Essential Skills & Portfolio Advice:
Todd stressed the importance of fundamentals: “I think foundations stand out. I think if you understand core basics, it really makes you stand out. Understanding things like perspective.” Vinod emphasized personality in portfolios, noting recruiters look for “what kind of person they are through their branding, through their way they carry themselves, the way the fonts they use.”
Industry Wisdom:
Vinod shared a particularly insightful perspective: “We’re not looking for Disney artists… We can elevate you in time, but it’s the mentality you carry.” He emphasized being open to learning and making mistakes.
Work-Life Balance & Personal Projects:
The panel honestly discussed the challenge of personal work, with Vinod admitting to having “about 130 unfinished PSD files.” They recommended scheduled creative time and the mantra “finish not perfect” from Jake Parker.
Staying Adaptable:
Raha emphasized curiosity: “I think recently I’ve been learning more about myself and prioritizing myself and what excites me.” The group agreed that soft skills, and understanding that there are always new things to learn, are as important as overall artistic ability.
Community Building:
For those outside LA, they strongly recommend Discord communities, fan projects, and online engagement. Todd shared a success story of a Portland artist who connected him with Disney artists through fan art forums that eventually led to him securing a job.
]]>If you want to get started with collaborative drawing in Magma, artist Sad_Banana_ has you covered. They wrote this comprehensive tutorial for getting started with two of the primary Magma use cases: Art Jams and Shared Canvases. This tutorial focuses on the Wacom MovinkPad 11 experience, but everything should be similar no matter what Wacom product you use to create your digital art! Note: the content of guest blog posts does not necessarily reflect the opinions of Wacom.
Why should I give Magma a try?
If you’ve used Photoshop, Clip Studio Paint, or even if you’re brand new to digital art software, Magma is a very approachable drawing application that has the added bonus of being able to draw with other artists and friends in real time! Together you can paint, draw and sketch with each other in a way that provides for a lot of fun interactions, or really cool collaborative projects.
Magma also incorporates tools that allow creative freedom, with extensive customization of brushes, a liquify tool, blending brush tool, and a few others. Magma has been my go-to drawing software for over two years, and it does an amazing job balancing simplicity and more advanced features. Magma responds beautifully with pressure sensitivity right out of the gate, making it a great application for Wacom users. If the pressure sensitivity is not to your liking, though, the software also provides options for adjusting pressure curves to accommodate your drawing style.
There is no need to install an app to start drawing; Magma is browser-based! All you have to do is share a URL with other people to connect and draw together. Everything you create with Magma will be stored in your Artdesk by default, with options to export the canvas as a PNG, JPEG, PSD file, or separate layer images to be saved locally. Your canvases and Art Jams are associated with your account and you will have access to them. The Magma Blaze plan – a free trial of which is included with a bunch of Wacom purchases including Wacom MovinkPad 11 – also gives you more Artdesk storage space so you can keep creating. Blaze members also get an ad-free experience, can make custom brush presets, and can use a reference window to import reference photos.
How to draw with others on Magma: Art Jams and Shared Canvases
First things first, you’ll need to create a Magma account! If you haven’t done that already, go ahead and do that, and then come back to this tutorial.
Quick Tip #1: Add Magma to Home Screen on MovinkPad 11
I’m using the Google Chrome browser that comes natively installed on the Wacom MovinkPad 11. You can claim more screen real estate by going to the hamburger button at the top right of the screen and selecting “Add to Home screen.”
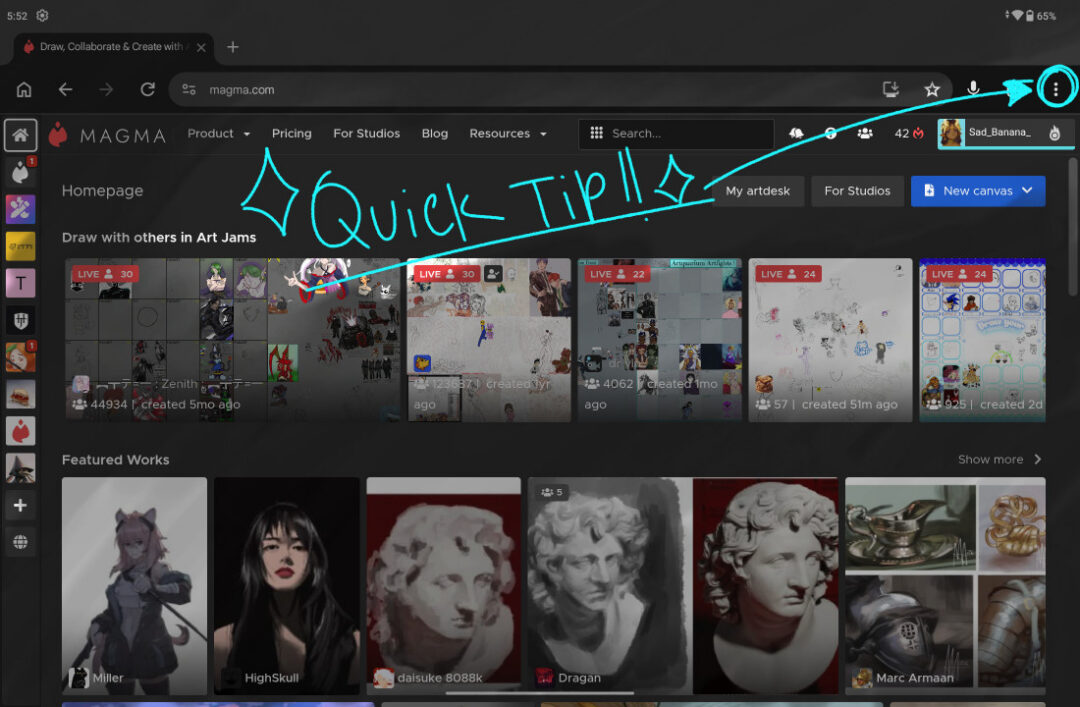
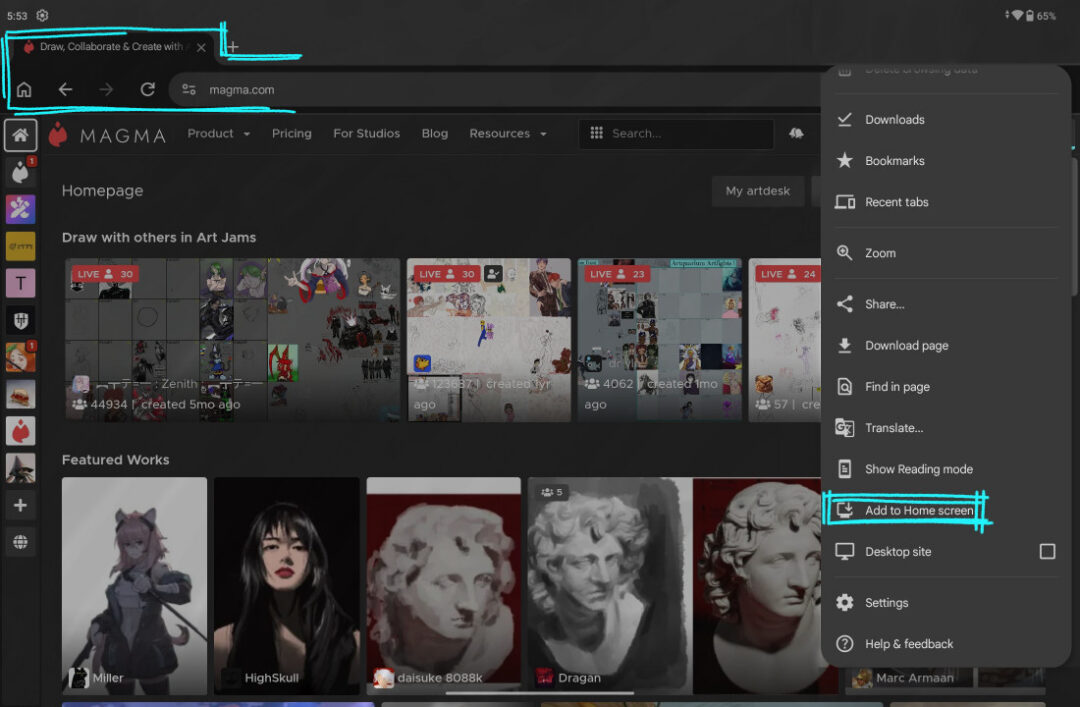
When launching Magma from this shortcut, it will hide the search bar and browser tabs to allow more drawing space!

Now we’re all set to start considering what canvas type we’ll make.
There are two approaches to start drawing with friends or other artists on magma: Art jams and Shared Canvases.
First, Decide: Should I do an Art Jam or a Shared Canvas?
You will need to decide if you want to host an Art Jam or a Shared Canvas.
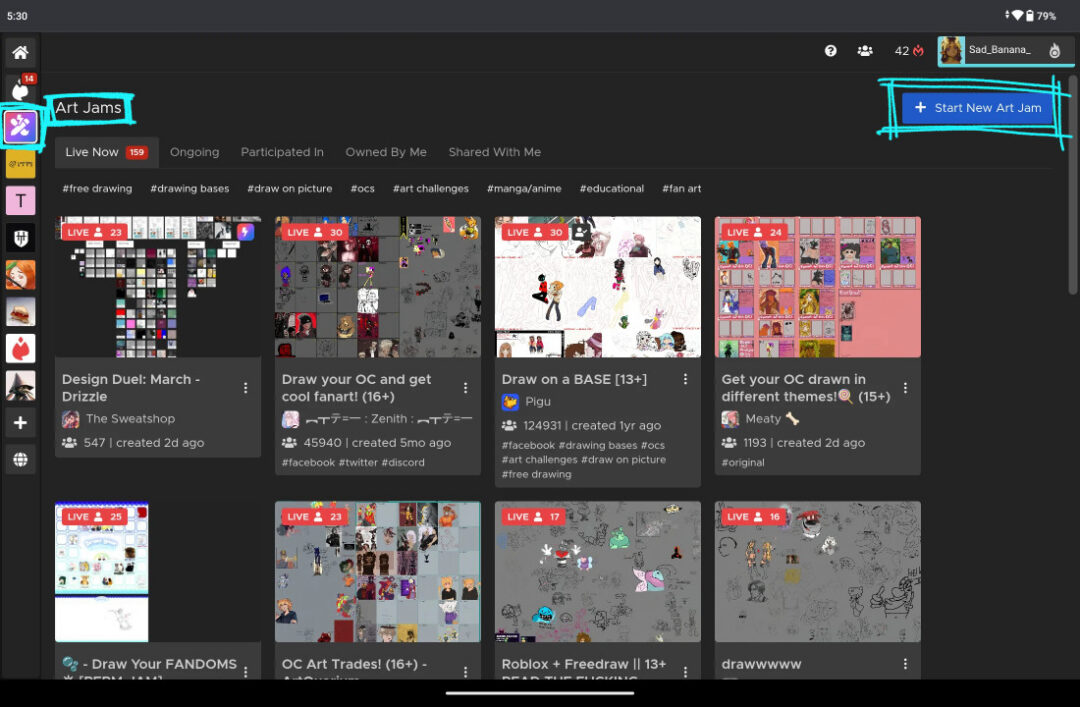
Art Jams are site-hosted, public canvases that, by default, let any Magma user join. Art Jams are listed in the Art Jams tab, with the most active or popular ones listed first. It’s a great opportunity to meet new artists and see unique art styles and take on the same subject.
Shared Canvases are more controlled, because they are not public – you need to share the canvas link or invite users to them directly. Shared Canvases are also located in your Artdesk and will use your Artdesk storage.
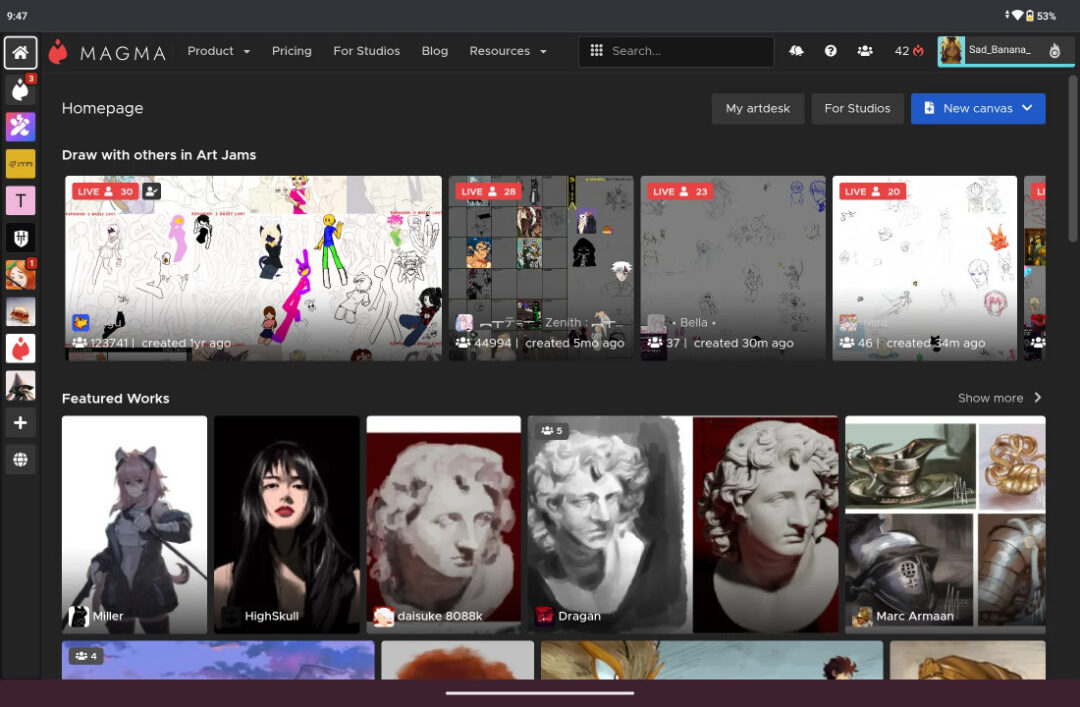
To get started, Magma will load you into the homepage when you are logged in. Here you will see featured artworks, a few live Art Jams hosted by other users, and some options to go to your art desk or to create a new canvas.
How to set up an Art Jam on Magma
Art Jams are a great way to meet new artists to draw with if you don’t have anyone to join you!
Step 1: Start New Art Jam
To set one up, you’ll need to go to the Art Jams tab. Here, you will see a bigger grid layout of the current Art Jams available, but to create your own, you tap on the big blue button that says “Start New Art Jam.”
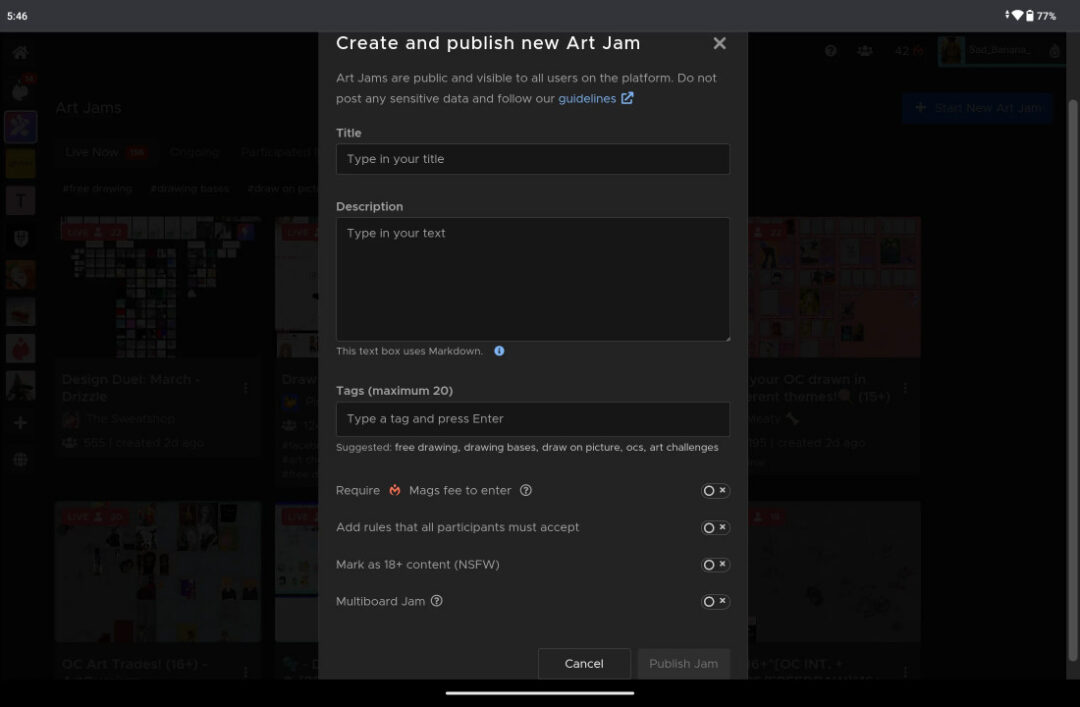
Once you do that, you’ll see a set up dialogue box to input information about your Art Jam.
In this example, I will be hosting my own Art Jam featuring some reference photos I’ve taken with the Wacom MovinkPad 11.
Step 2: Art Jam Title, Description, and Tags
You will create a Title for your Jam, and there is a section for you to write a Description for it as well. I typically use this section to write out any guidelines on how to participate in the Art Jam in this section.
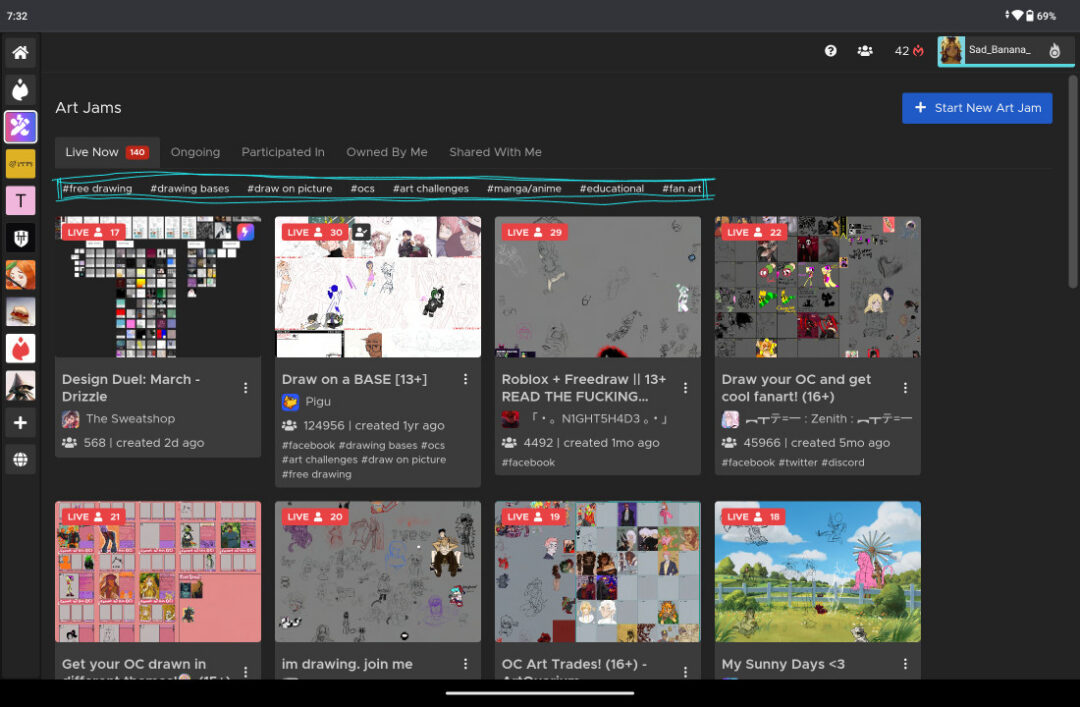
The Tags section provides another way for the Art Jams to be organized, so you can add some tags here to help people find your Jam. If we go back to the Art Jams page, you can see the tags listed above the list of Jams and thumbnails. You can click on the tags to list all the jams in that specific category.
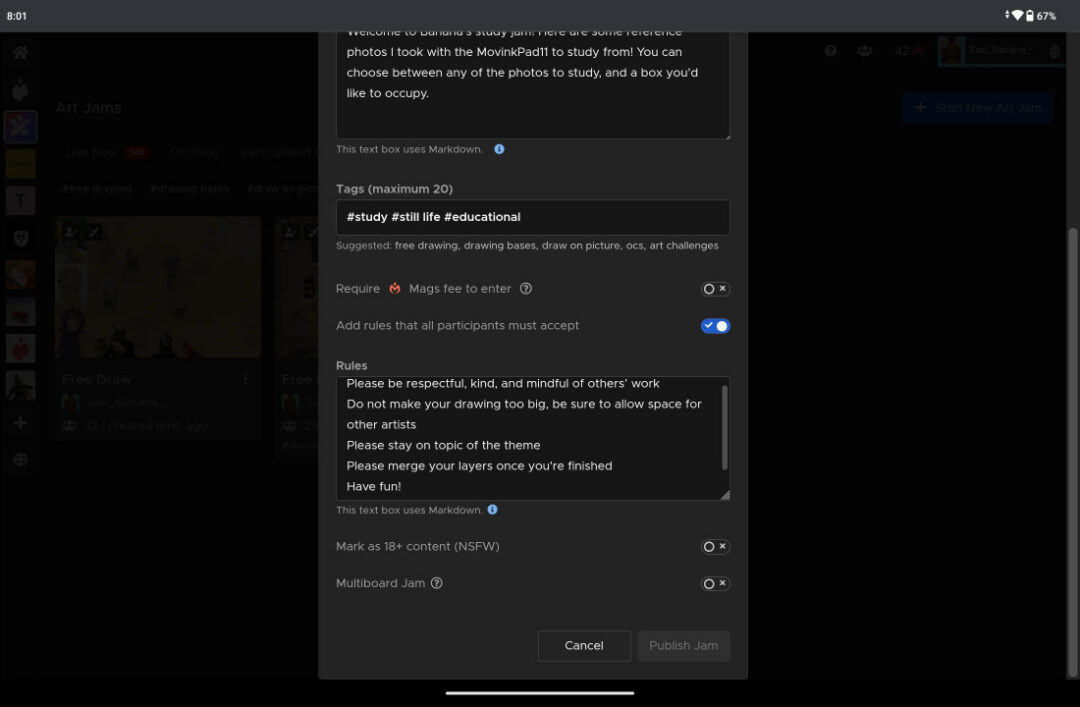
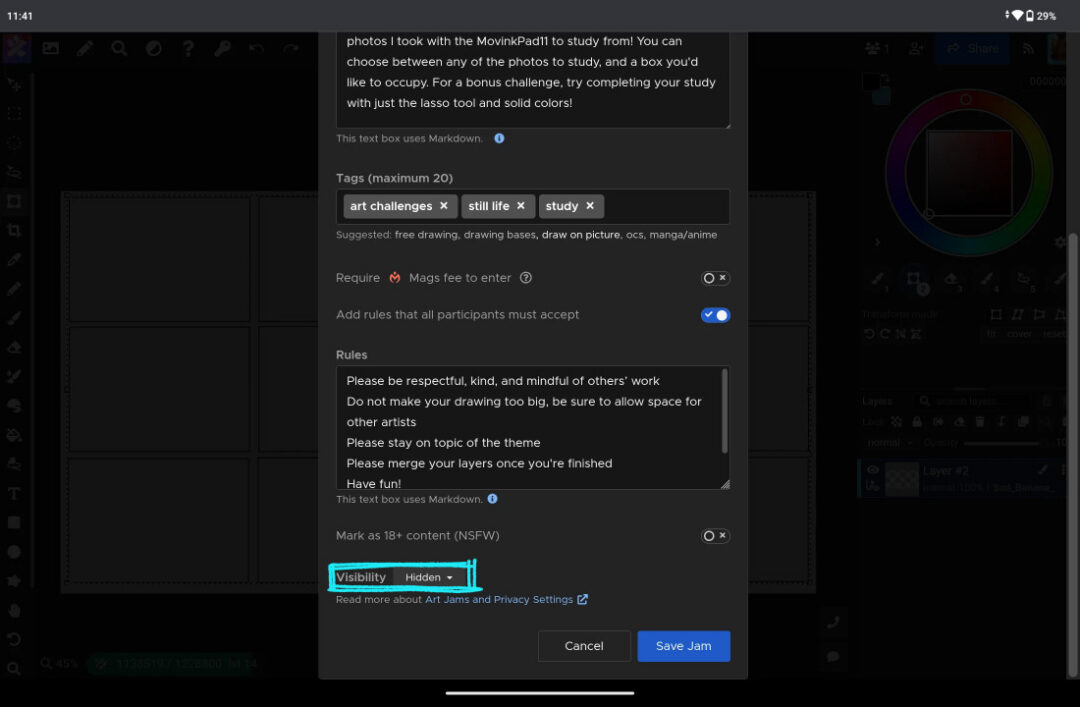
Step 3: Setting Art Jam rules
I recommend enabling the “Add rules that all participants must accept” option. This will pop up an extra dialogue box when users try to join the Art Jam, and they will have to agree to the rules before they formally join the Art Jam canvas. Magma is a well-moderated platform, but there will always be some stinkers in the bunch that will try to ruin fun for others, so it’s always a good idea to set some ground rules on what behaviors are not tolerated in your art jams.
I encourage participants to review the guidelines and sitewide rules. These are also expected to be followed with any Art Jam or canvas you host or are a part of. If there is anything you find suspicious, I would encourage you to report it to the Magma team!
Quick Tip #2: Description Box markdown
Another quick tip: the Art Jam description box and rules box supports markdown syntax! If you’re interested, you can follow the Magma Team’s guide here.
Once everything looks good to you, you can now publish your Art Jam! You will be taken to your Art Jam canvas after you hit the Publish button.
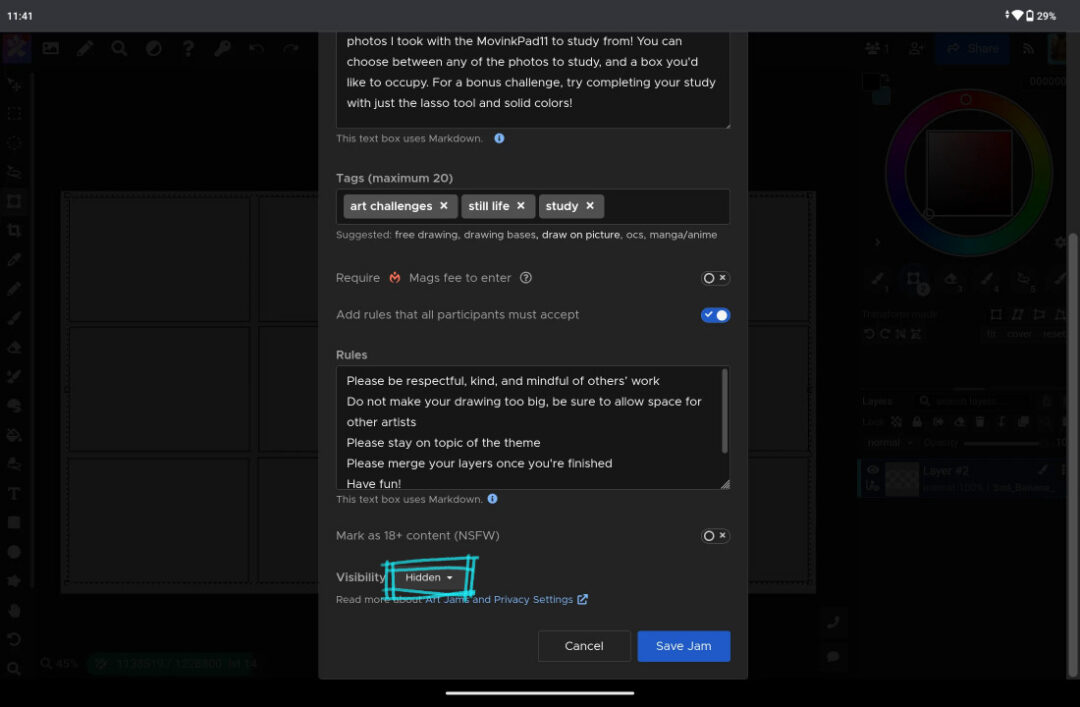
If you need some time to set everything up before going “live” and listing your jam on the Art Jam page, you can unlist the art jam by clicking on the canvas name found at the top middle of the screen, clicking Edit, then changing the visibility to “Hidden.” You can also re-list your art jam by going through the same process.
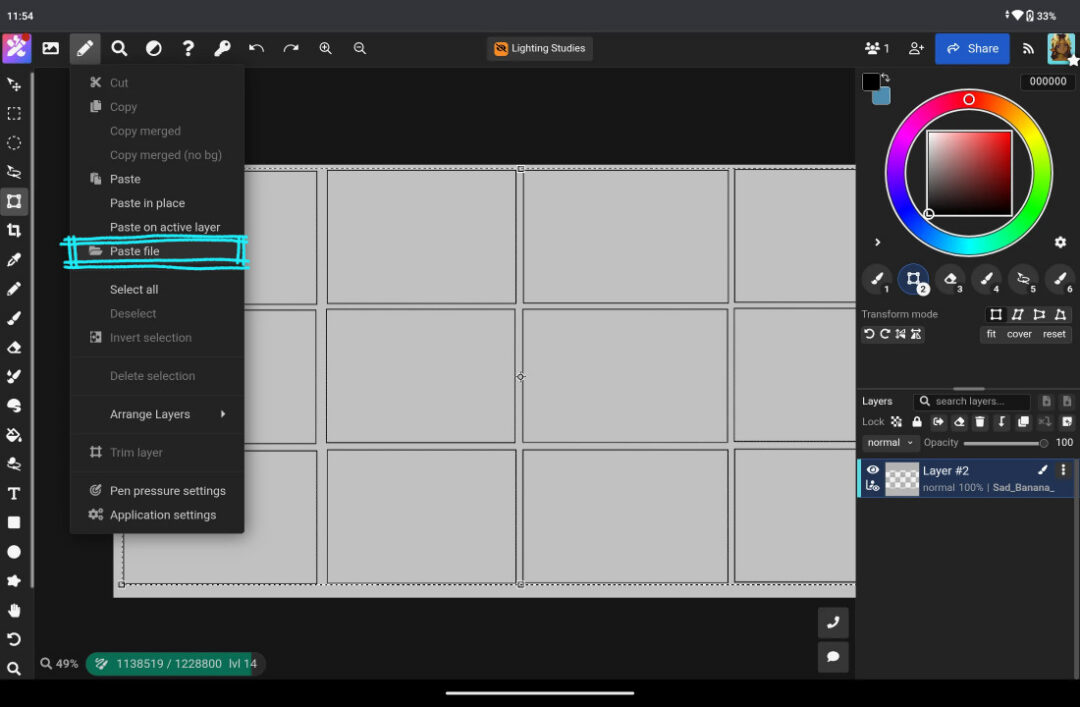
Quick Tip #3: Reference photos
If there are some photos you took, or a cool reference you found online, you can go to the Pen icon and then “paste file.” This will add the imported photo into its own separate layer that you can move, transform, and/or distort if you need with the Move tool. Since I took my own study reference photos with my MovinkPad 11, I will be importing them from my photo gallery from the device.

Step 4: Art Jam Admin Options and Roles
Before you start drawing, I will also recommend you look at the Admin Options. These will be accessed via the “Key” icon in the top left menu.
Here, you can change permissions of the three different roles a user can have in Magma canvases. Since you are the creator of the Art Jam, you will be in the “Admin” role by default. You will have to manually select which users you would like to move to the “Approved” role once they join the Art Jam canvas. All other users are automatically assigned to the “All” role when they join the Art Jam.
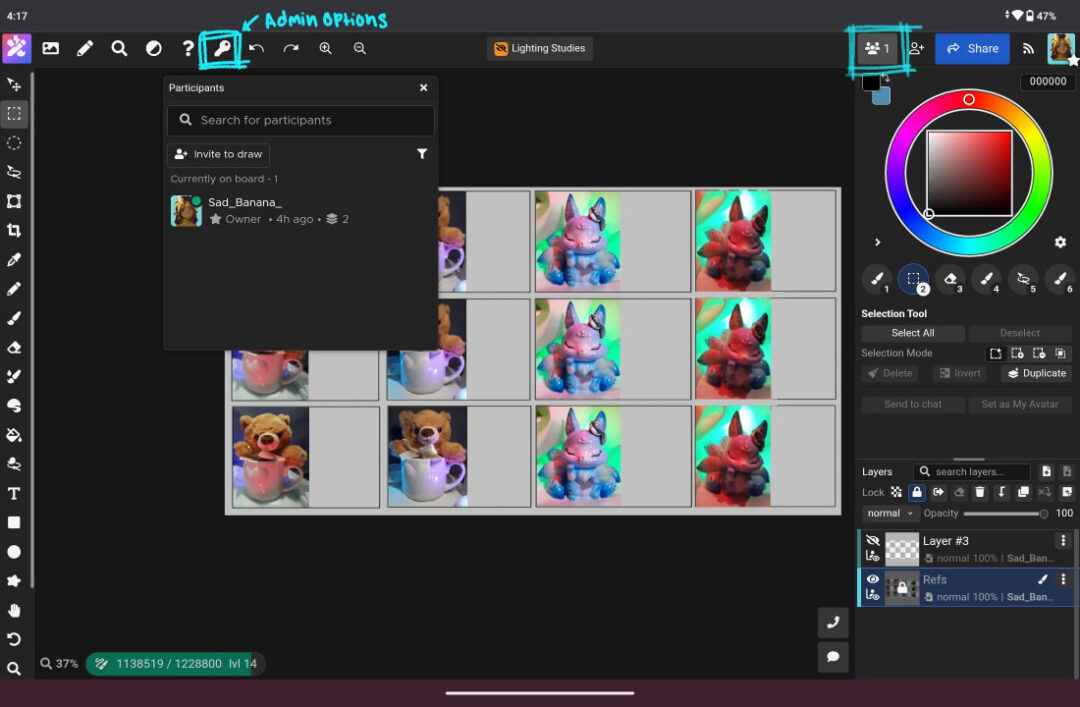
To assign roles, find the Active Users section that is in the top right of the screen. It’s to the left of the blue Share button. Once you click on the thumbnail of the profile pictures of active users on the canvas, it will pop out more information on current users, and users who previously joined but are currently offline in the canvas. If you click on the vertical three dots that are found to the right of the user’s name, it will open another menu that lets you change which role they currently have along with a few other options.
I would recommend giving the “Approved” users permission to:
- Paint bucket
- Re-order layers
- Paste
Some options I would recommend giving only “Admin” users permission to edit:
- Drawing settings
- Resize canvas
- Create comments
I tend to use these settings so it leaves a little less room for trolling and griefing. While it is not a common occurrence, Art Jams are public and anyone can join, so I always tend to take some precautions for those reasons. Magma has a wonderful resource on how to handle a user who may not be compliant with the rules that you’ve set, though, and it can be found here.

Starting from the top of the Admin Options list, I recommend keeping the “Anyone can take over offline users layers” box unchecked. This option is off by default, but when enabled, it allows any user to take over a layer of another user who is no longer actively on the canvas. This could cause some confusion if there is a user who stepped away for a few minutes and came back only to discover their art was accidentally deleted by someone else.
There is also an option to limit the number of layers each user can have in total. If there are too many active users or too many layers, it can cause unfortunate amounts of lag depending on your device. This is especially true for all-in-one drawing pads like Wacom MovinkPad 11, as they do not have the same processing power and memory allocation as a desktop computer might. In that case, I go ahead and limit them from the setup options. I recommend limiting each user to only one layer depending on how many users are in the Art Jam, or what the goal of the jam is. This of course is also subjective, and for my study jam, one layer is reasonable.
Step 5: Open your Art Jam to the public
With the admin settings and set up completed, it is now time to reopen the Art Jam to be joinable.
Once you ensure your Art Jam is set to “public” visibility, users will join in your jam via the Art Jam page! If you want to invite specific users you already know, or need to share a URL with someone so they can join, keep reading ahead. I will be going over shared private canvases, and the process for that is pretty similar for both Shared Canvases and Art Jams.
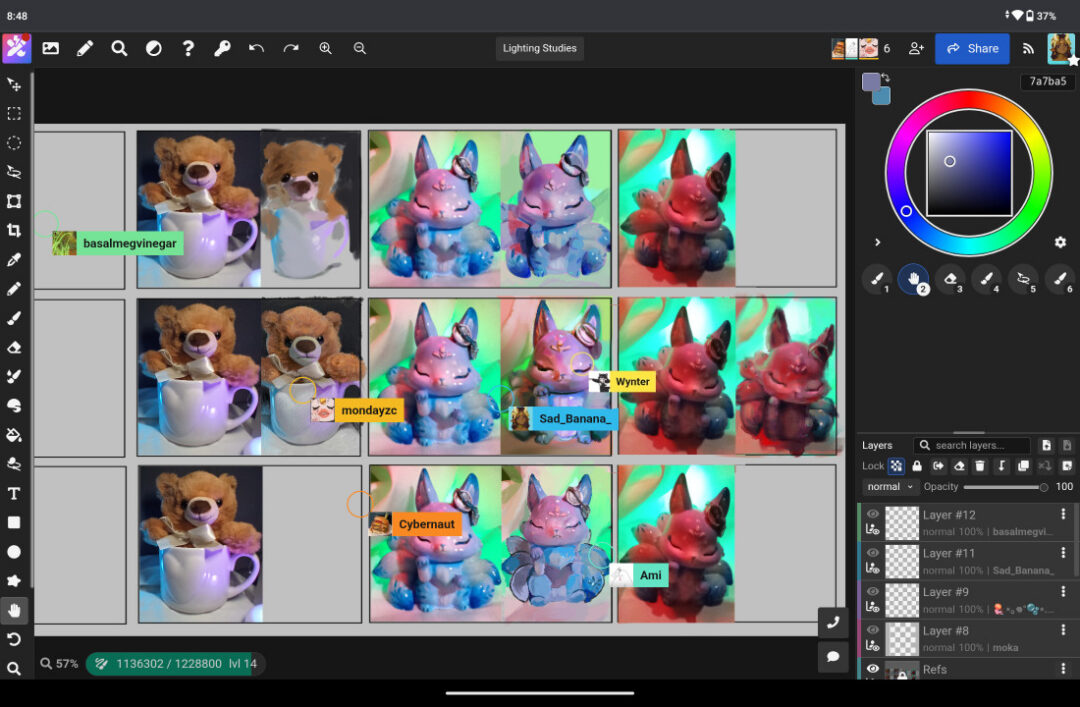
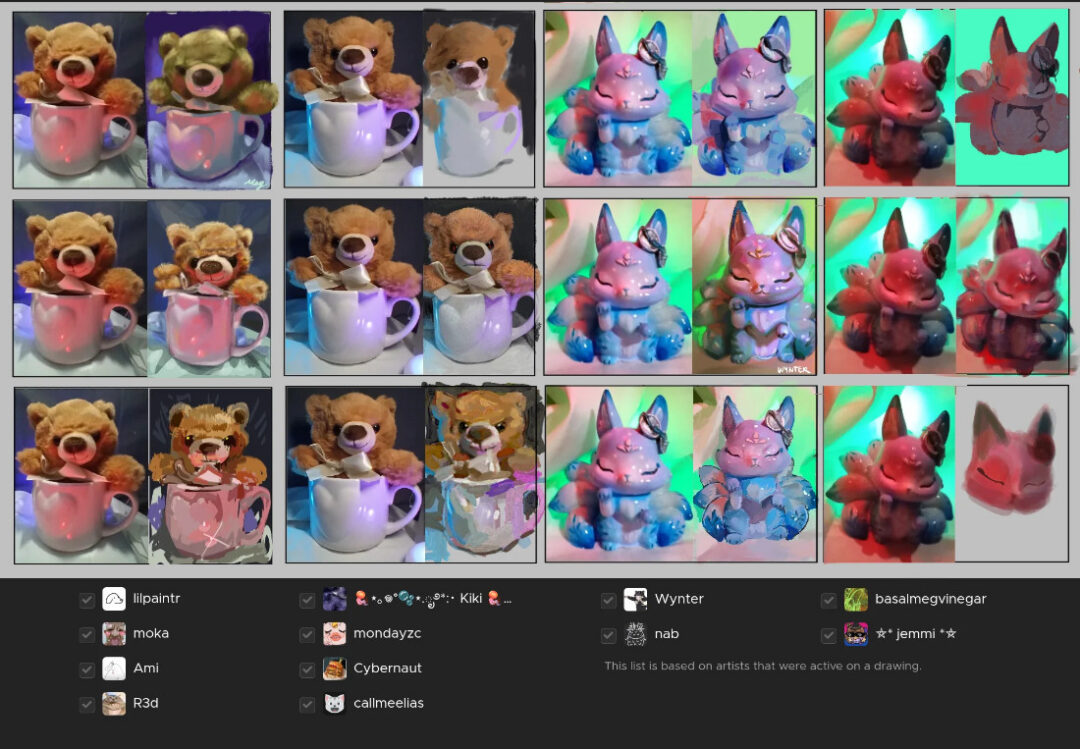
Here’s the finished study canvas from my Art Jam; everyone did an amazing job! It’s fun to see everyone’s different interpretations of the same reference.
How to set up a Shared Private Canvas in Magma
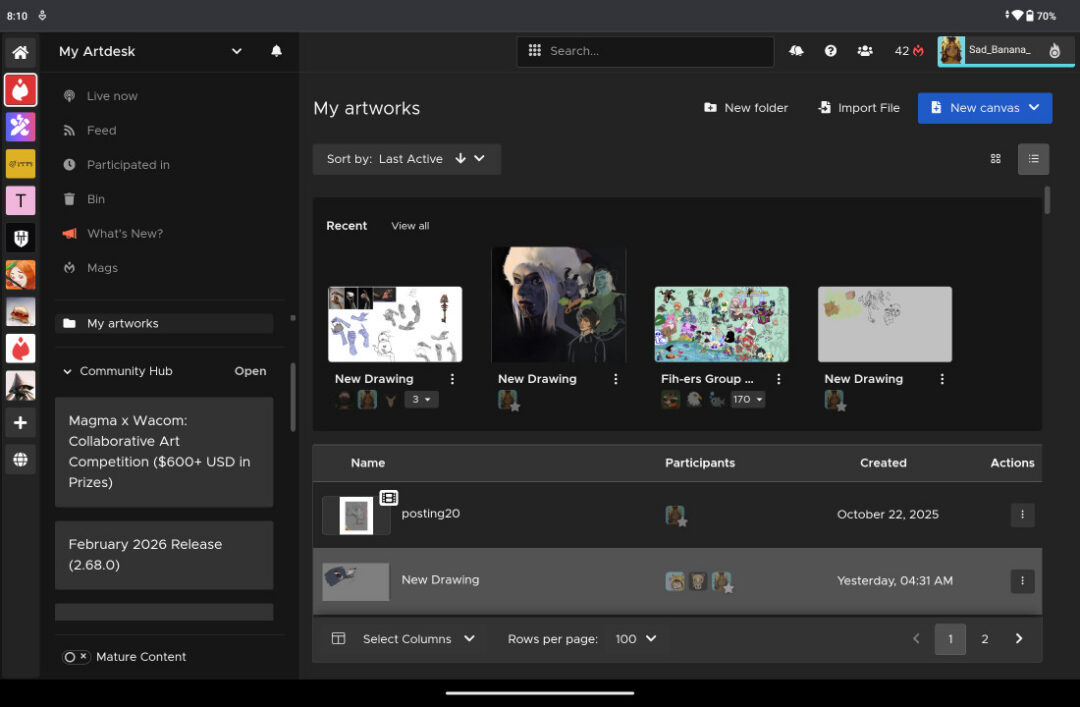
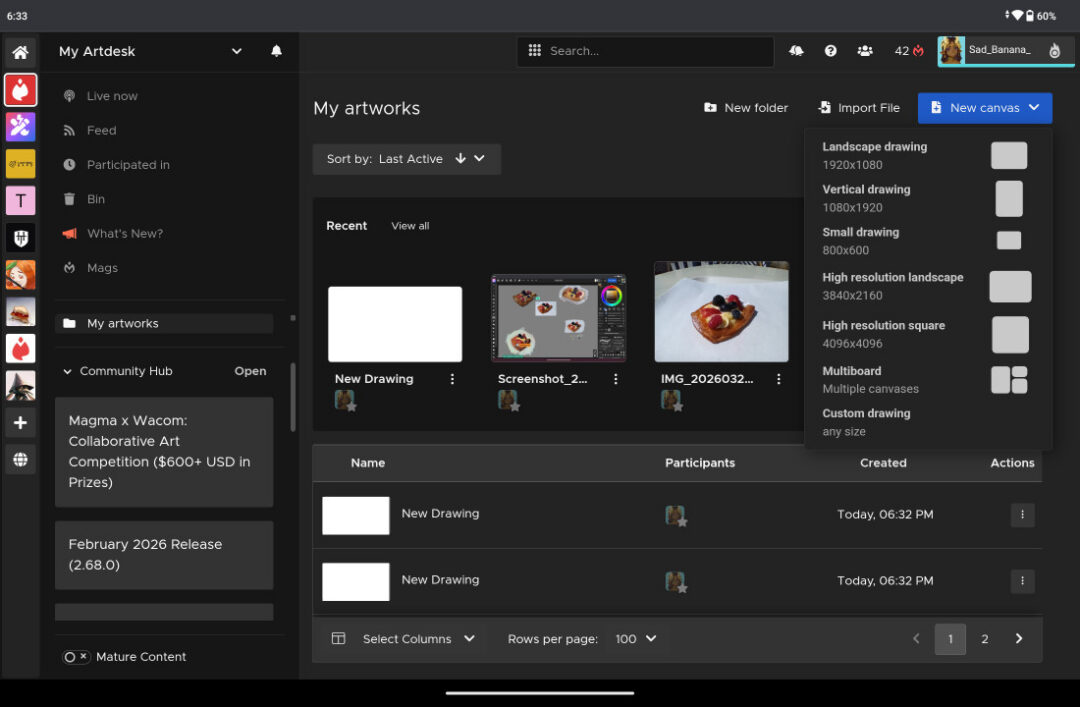
Privately Shared Canvases are great for gathering a couple of friends to draw with a specific theme or objective in mind. You can set up a Shared Canvas from the home screen using the “New canvas” button or by visiting your Artdesk.
Step 1: Create a New Canvas from your Artdesk
You can go directly to your Artdesk by either clicking on the Magma logo, or by visiting the home page and clicking the “My Art Desk” button in the top right. There will be a blue button that says “New canvas.”
Step 2: Set up your Shared Canvas
Clicking “New canvas” will give you options and some canvas size presets to choose from. Since it’s a more controlled and smaller environment, we can get away with choosing a slightly higher resolution. However, for this Shared Canvas, I will be uploading another photo I took on a walk with the MovinkPad 11 by using the “import file” option.
Once you choose a preset, or import your photo, the canvas will look pretty similar to an Art Jam. All of the functions are the same as earlier. I thought this rock was a prime subject for an imaginative doodling session, and I went ahead and imported it to start a new canvas.
Step 3: Invite friends to your Shared Canvas
It’s a little quiet right now, so let’s invite some friends to draw with us! If you want, you can use your same admin settings that you use for Art Jams, but ideally since this will be a curated canvas that you’re directly inviting other users to, you might not need that much moderation in the canvas.
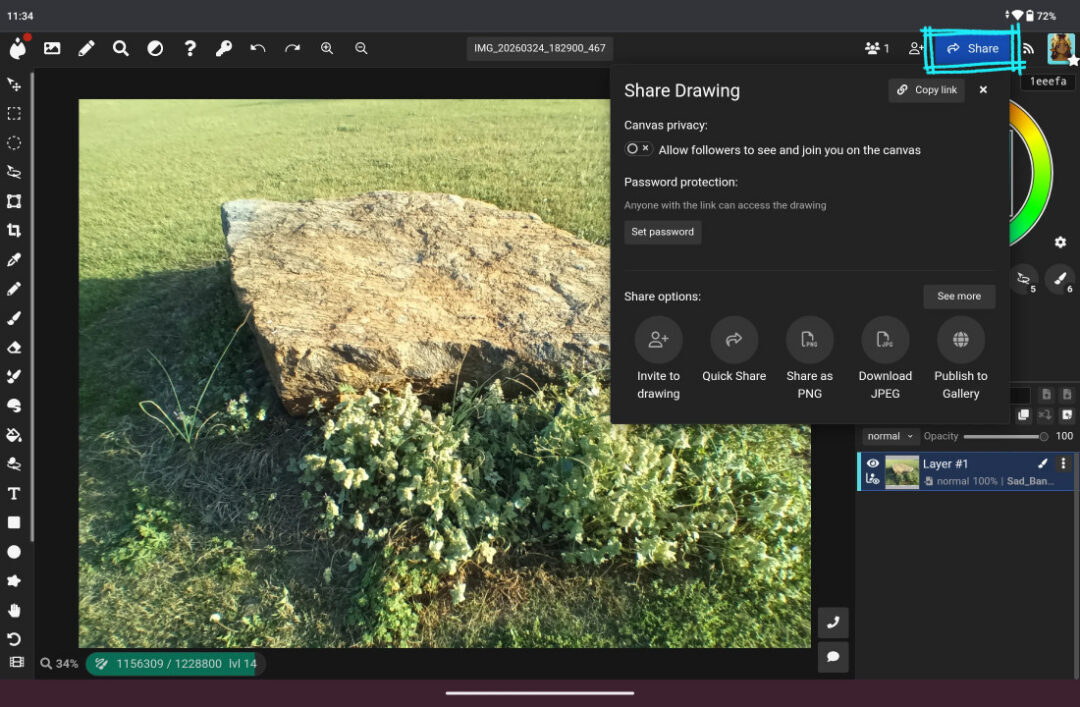
In the top right menu, there should be another blue Share button. This will let you invite users to the canvas internally through Magma, or copy the link to your clipboard. Personally, I like to invite users to join me in the canvas by sharing the URL!
If you want to invite users that you’ve recently drawn with in Magma, or some of your top followers, you can also invite people directly through the Magma platform by clicking “Invite to Drawing.”

This will bring up another box and there are a couple of categories to choose from. The Recent tab will populate with users you’ve drawn with lately in other Art Jams. The Followers tab will populate with a preference of showing your most interactive followers.
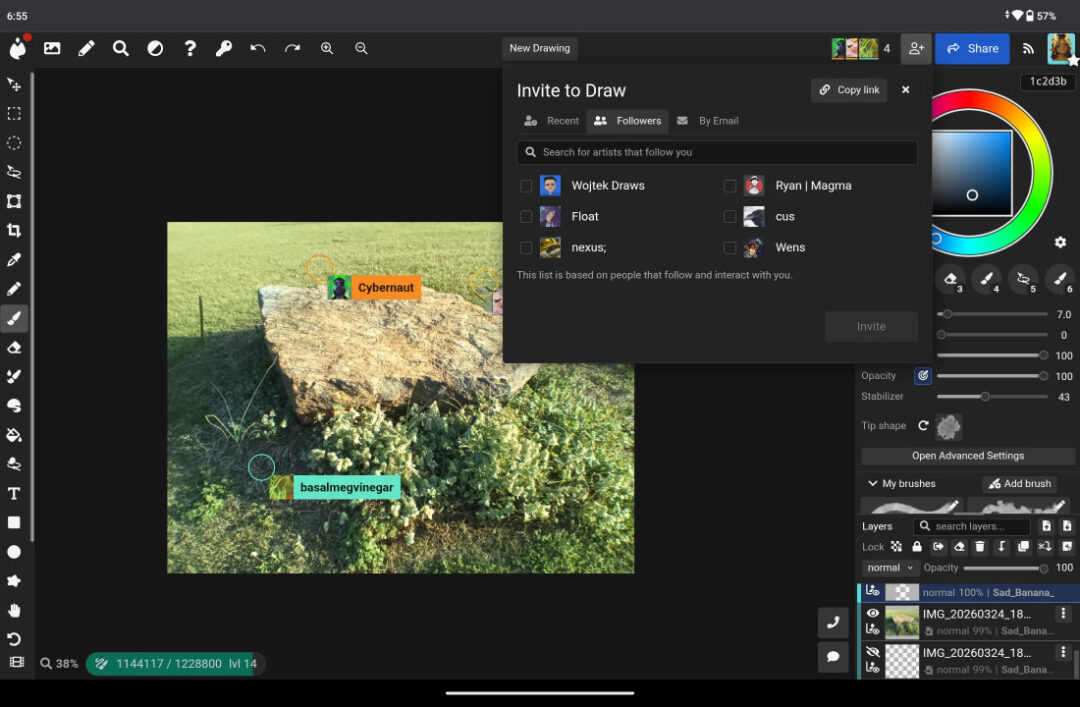
There is also an option to invite other users via email. Once you add their email address in the address bar, you can click the Add Email button. It will add each email address you add into a list format. When you’re all done adding recipients, hit the Invite button.
Step 4: Start drawing together in your Shared Canvas
Once your friends and contacts have joined you, you’re all set to start collaborating and drawing together! Here’s what my friends and I created based on the reference photo I added to the Shared Canvas. Needless to say, I had a lot of fun and we all were inspired by each other!
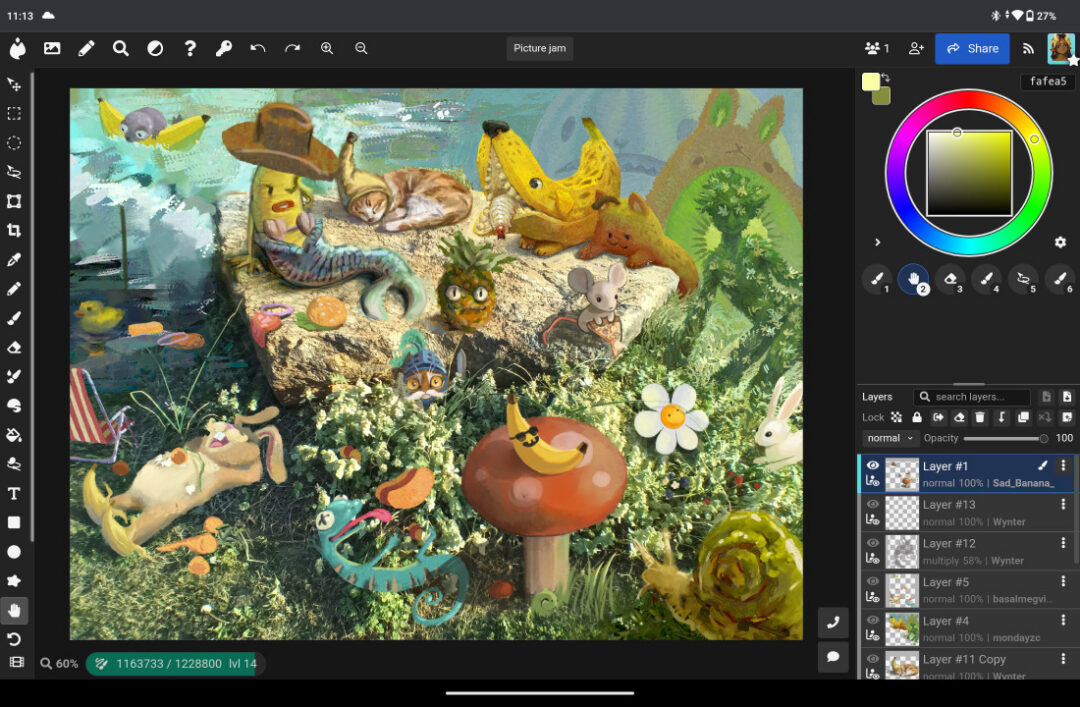
These two examples are just the tip of the iceberg of what you can host and make with others. I say go out there and explore what you can create with others! If there are any other questions you may have about using Magma, I would recommend joining the Discord server, or checking out the Magma guide resource here.
]]>About Chromebooks
Just in case anyone needs an introduction, a Chromebook is a simplified laptop that runs Google’s Chrome OS. They’re intended primarily as vehicles for browsing the internet and using web services, and are staples in classrooms around the United States for their simplicity and ease of use.
While they primarily use web-based services accessible via the Chrome browser, they can also run Android apps via the Play Store. And despite what you might have heard about them in past years, Chromebooks have come a long way lately, with manufacturers increasingly rolling out mid-range and even high-end Chromebooks, with specs comparable to Windows laptops – and sometimes they even have faster actual performance, since the OS consumes next-to-no system resources.
If you have a Chromebook, simply add a Chromebook-compatible drawing tablet – the Wacom Intuos pen tablet and Wacom One 14 pen display are excellent, affordable, entry-level options – and the right creative software. Then your Chromebook can become a drawing tool that allows you to express your creativity and your unique style.

What Chromebook specs will I need?
There are a wide range of art programs you can run on Chromebooks. Some of them will run on virtually any Chromebook, and some might require a slightly higher-end device. Generally speaking, you don’t need to worry too much about specs with Chromebook – but if you have a lower-end device, then it may lag a bit if you try to create a large canvas with multiple layers, for example. If you’re shopping for a Chromebook, you might want to go for at least a mid-range one so you don’t suffer from cursor lag when drawing. Generally, anything with a decent processor and at least 4 GB of RAM should be enough to run any of the programs listed below.
What drawing tablets can I use with Chromebook?

Wacom Intuos
This has been the gold standard for pen tablets since the 90s. The Small version comes in a wired or a Bluetooth Wireless version, and there’s a Medium size one for extra space as well! Wacom Intuos is Works with Chromebook certified, so it should work seamlessly with most Chromebooks! Note: Wacom Intuos connects via USB-A. You may need a USB converter on some Chromebooks. Learn more.
Wacom One 14
Wacom’s most affordable drawing display, Wacom One offering the same peerless pen-on-screen drawing experience as a Wacom Cintiq in a smaller, more budget-friendly package. Both the monitor and its pen are lightweight, so it’s easy to travel with. Note: Wacom One 14 connects via USB-C. You may need a USB converter on some Chromebooks. Learn more.
What art software will run on Chromebook?
The ability to run Android apps gives you far more choices than you’d have in-browser alone: too many to fit a real guide to them into this article. But here are a bunch of suggestions!
Your best options
Here are what I consider the top options, followed by a bunch more that might be just as good, but that I just haven’t tried.
- Clip Studio Paint: The mobile version is nearly as full-featured as the desktop version. In my personal opinion, it’s the GOAT art program. Even better, any purchase of Wacom Intuos or Wacom One 14 comes with a free three month trial of Clip Studio Paint Pro!
- Magma: This browser-based collaborative art program allows multiple people to work together on the same canvas online!
- Sketchbook: This is a simple, lightweight, app famous for its drawing tools.
- IbisPaint: A very popular and versatile drawing app with tons of brushes available.
- Krita: This one differentiates itself from the others in that it’s not a phone app, but a whole “desktop-class” art program that’s merely installed through Play Store.

Other options to consider
Browser-based Apps: Sketchpad, Photopea, Kleki, Pixilart Draw, Sketch.io, Sumo
Android Apps: Medibang Paint, Tayasui Sketches, Infinite Painter, ArtFlow, Pixel Studio, PaperColor
That’s more than 15 apps in total! So if there’s anything stopping you from drawing on your Chromebook, it won’t be a lack of options.
On Saturday afternoons, from April 25 to May 16, Wacom is thrilled to host Blender Fundamentals: The Painterly Path to 3D, a free workshop series led by artist iris muddy. Designed to bridge the gap between traditional expression and digital modeling, this series invites creators of all levels to rethink their approach to Blender.
Click here to learn more and register!
In this workshop, iris will emphasize staying playful and loose and making the most of simple building blocks. In a world of hyper-realistic renders, this series champions the sketch, encouraging students to embrace imperfection and harness the power of implying detail rather than over-defining it.
Click here to learn more and register!
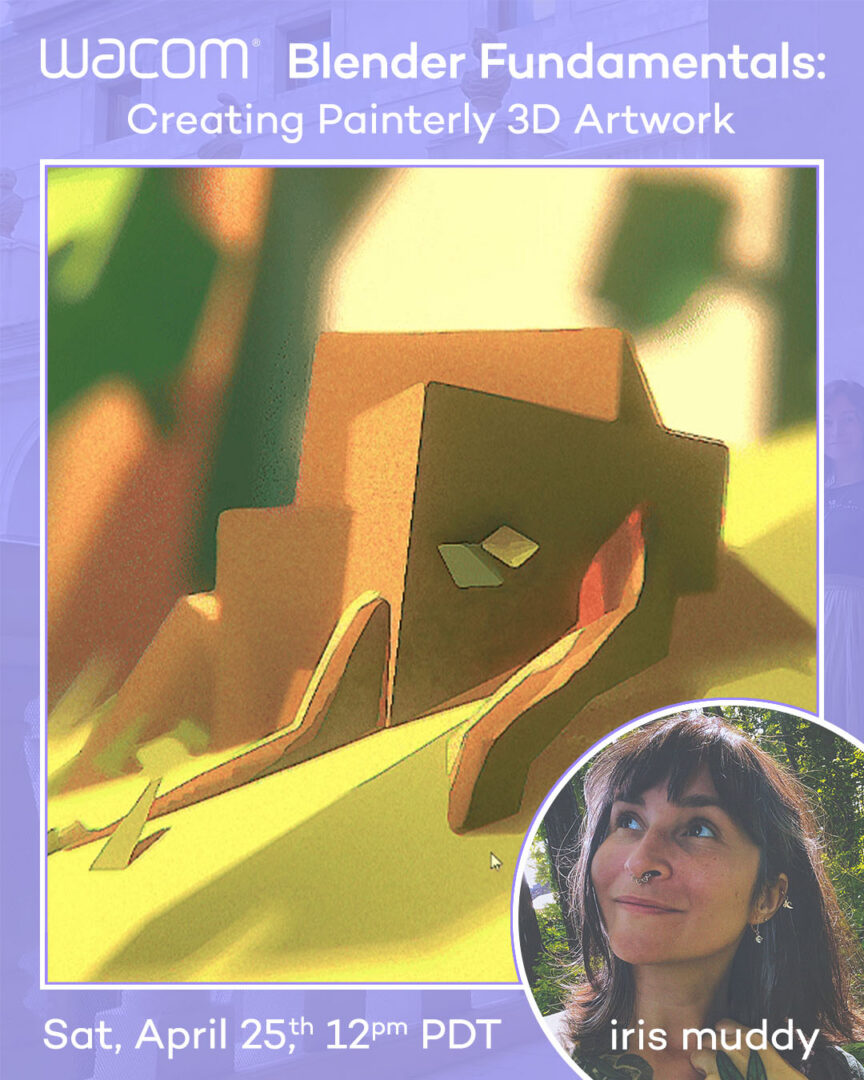
Week 1: Creating Painterly 3D Artwork
Saturday, April 25, 2026
12:00pm – 2:00pm PT / 3:00pm – 5:00pm ET
We begin at the foundation. Iris will guide participants through the “digital maquette” approach, focusing on simple building blocks.
This session is all about overcoming the initial feeling of being overwhelmed in Blender by treating your 3D workspace like a sketchbook. You’ll learn go-to tools and techniques that prioritize expression over technical rigidity.
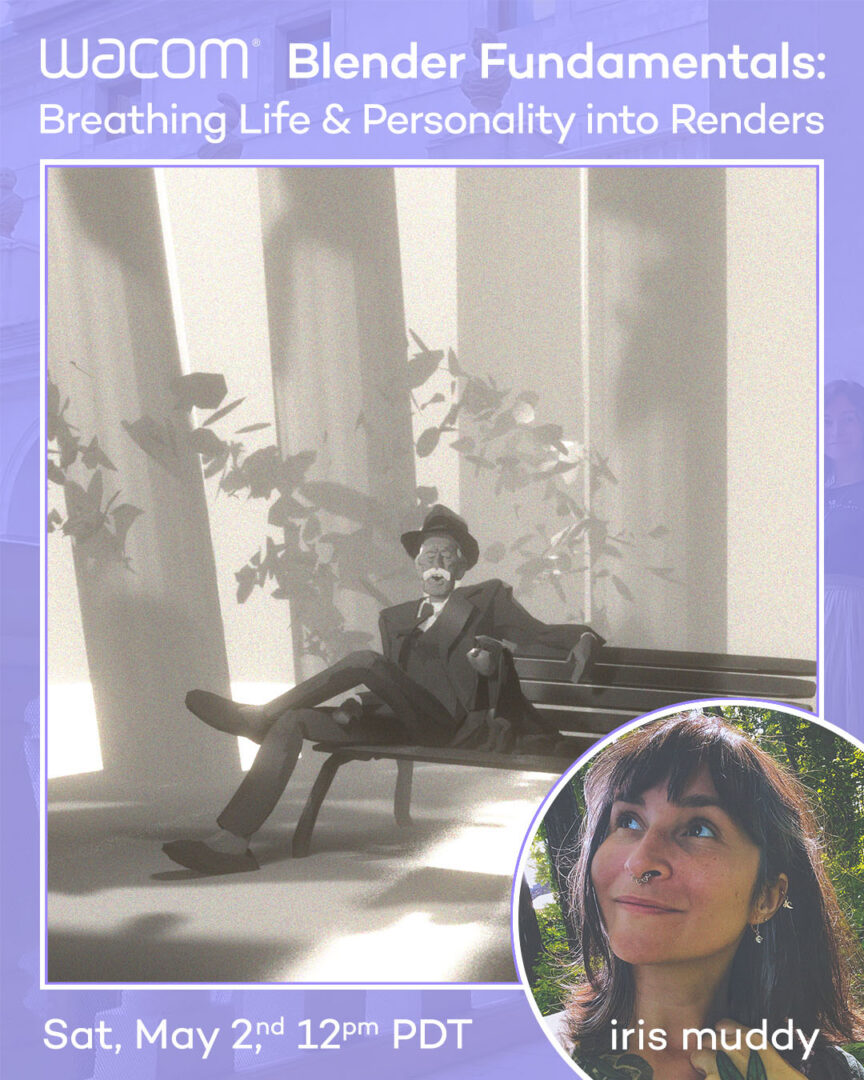
Week 2: Breathing Life and Personality into Renders
Saturday, May 2, 2026
12:00pm – 2:00pm PT / 3:00pm – 5:00pm ET
Once the “digital clay” is shaped, how do we make it feel alive? The second week shifts focus to the elements often considered secondary: lighting, cameras, and compositing.
You’ll discover how subtle shifts in atmosphere can transform a basic model into an evocative, personality-driven image.
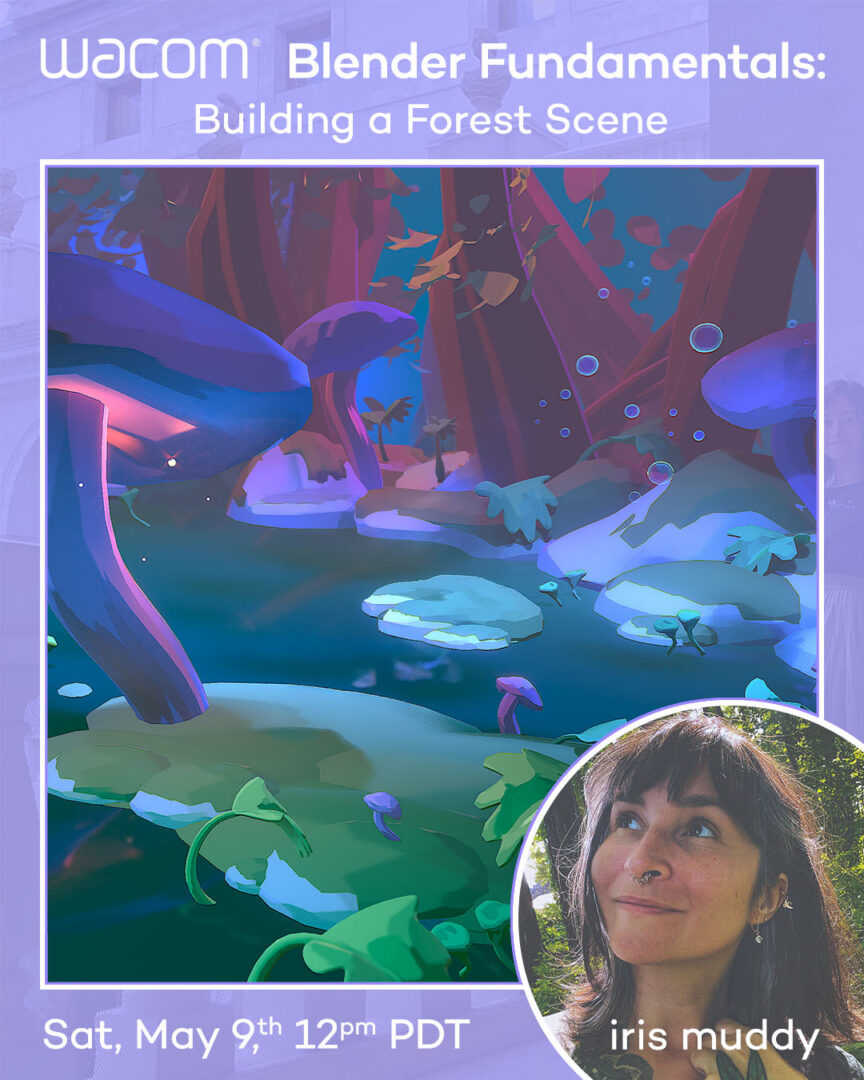
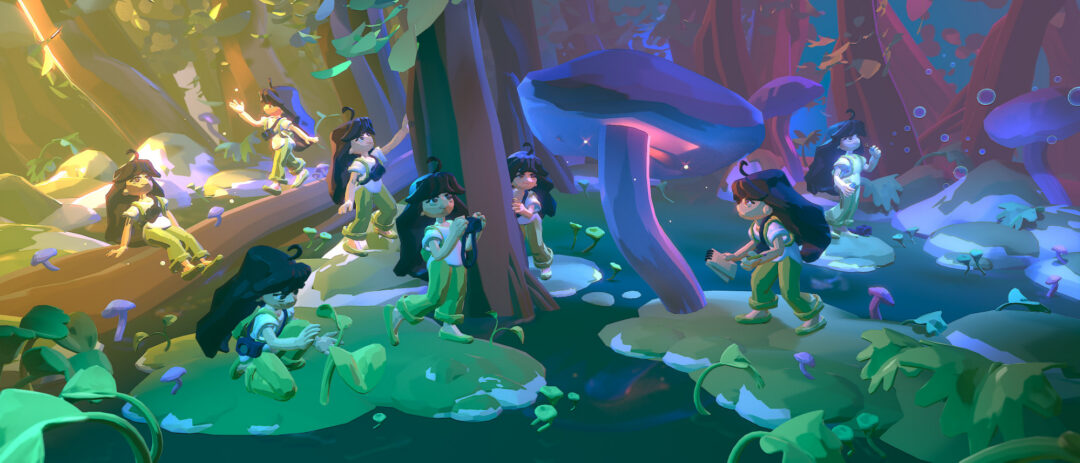
Week 3: Building a Forest Scene
Saturday, May 9, 2026
12:00pm – 2:00pm PT / 3:00pm – 5:00pm ET
Putting theory into practice, Week 3 is a comprehensive “ground-up” build. We will utilize poly modeling, sculpting, curves, and subdivision to create a lush forest environment.
Drawing inspiration from the creative constraints of low-poly video games, Iris will show you how to achieve stunning results using limited basics and simple shapes.
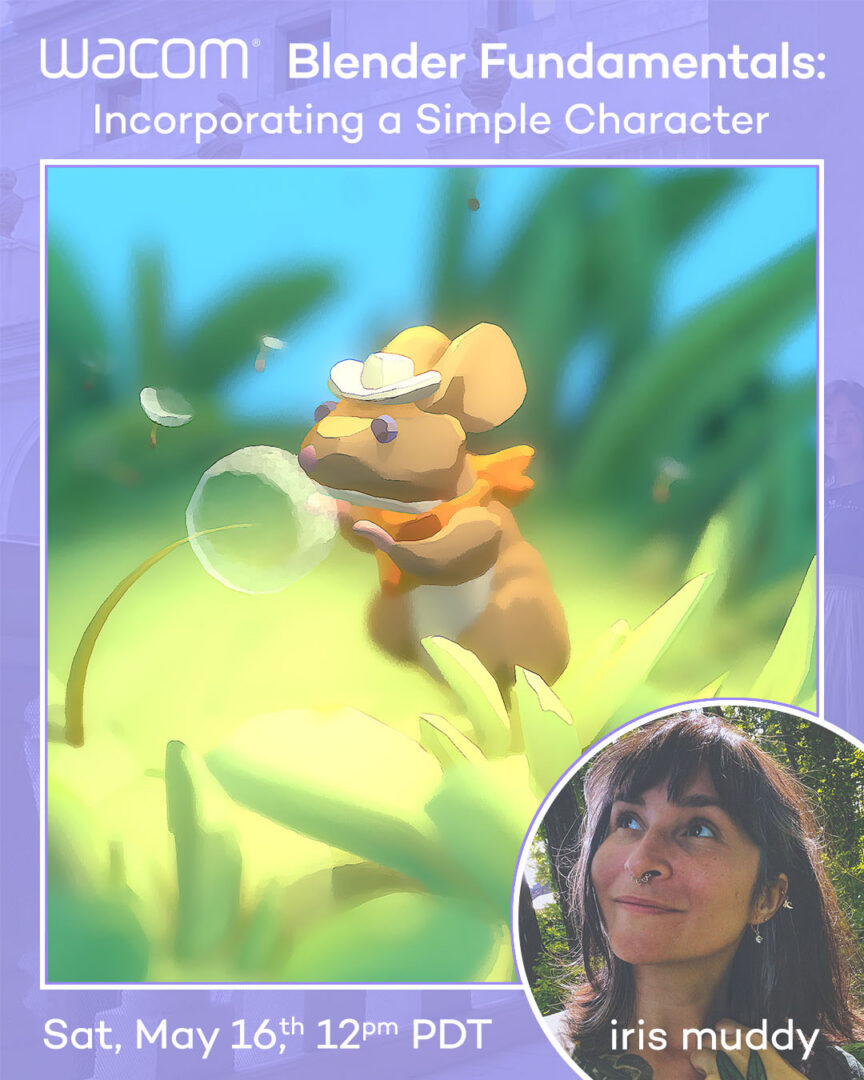
Week 4: Incorporating a Simple Character
Saturday, May 16, 2026
12:00pm – 2:00pm PT / 3:00pm – 5:00pm ET
In the final session, we bring it all together by integrating a character into a nature scene. This workshop reinforces the entire workflow, demonstrating how thoughtful, simple components result in rich, expressive art.
The goal is to leave you with the “permission to play” and the confidence to continue your journey in Blender.
Hi! In this tutorial, I’ll guide you step by step on how to draw anime hair correctly using Clip Studio Paint software. Check out the tutorial video here, or keep reading for the full tutorial.
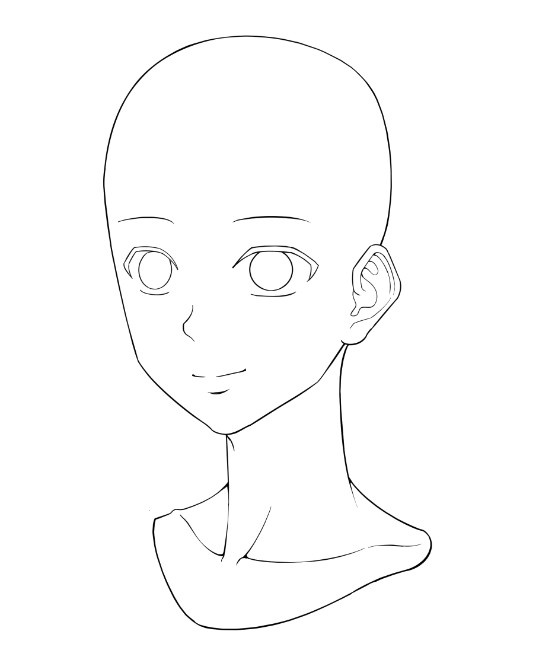
Before we start, prepare your own anime head drawing. Alternatively, you can download my head drawing at this link and follow along with me.
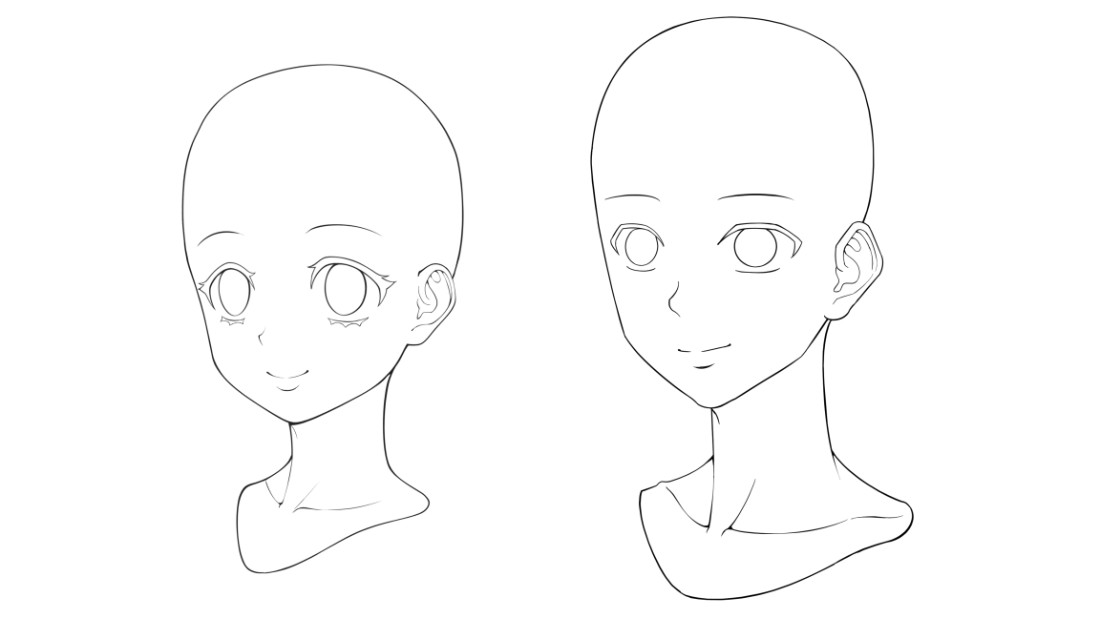
Preparing Line Art
Once you’ve downloaded the file and opened it in Clip Studio Paint, go to Edit → Convert Brightness to Opacity. This is a convenient way to remove the white background and keep only the line art. Then, create a new layer underneath the line art layer and fill it with white to use as the background. Now everything is set up and ready for us to start learning drawing hair.
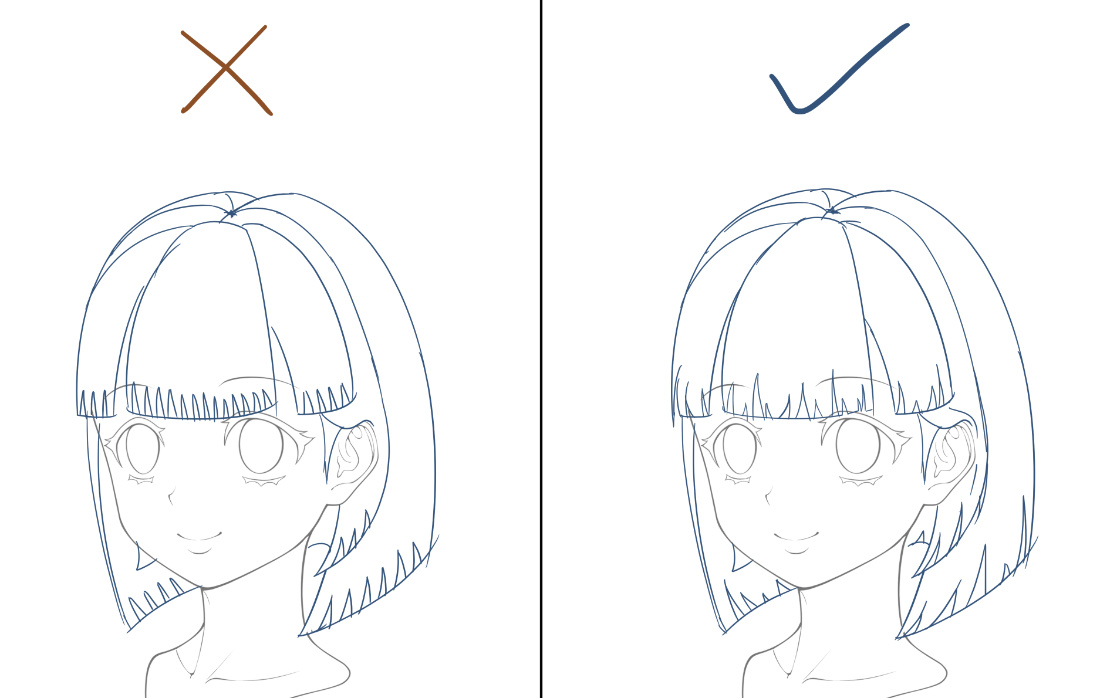
Common Beginner Mistake #1: Skipping the Scalp
A common mistake beginners make is drawing the hair without first establishing the scalp or base shape. Hair grows on top of the scalp, not directly from the face outline. If we skip this step, the entire hairstyle can end up looking flat or incorrectly positioned.
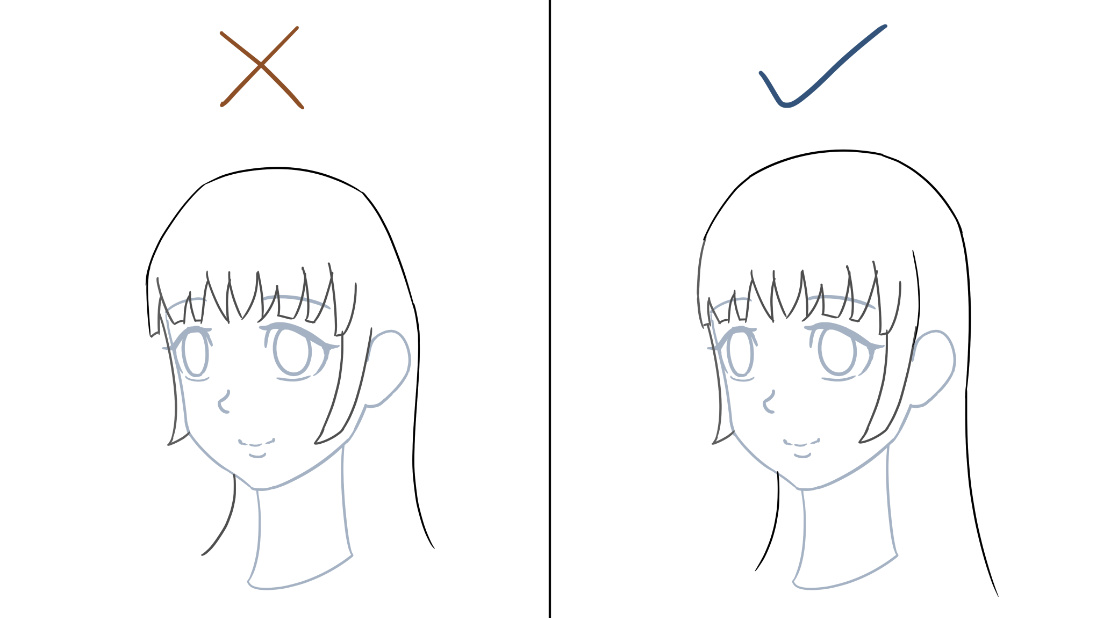
I like to think of the scalp as the foundation for the hairstyle. By sketching it first, it becomes much easier to wrap the hair naturally around the head. We can then erase the scalp at the final stage. Lets focus on the anime girl character first.
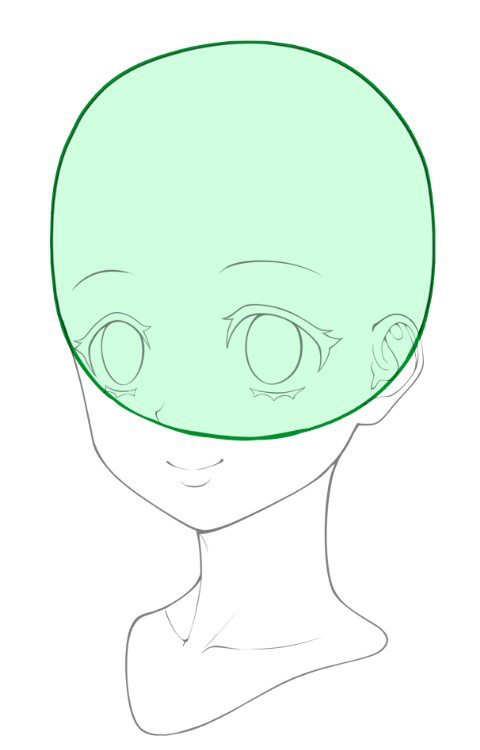
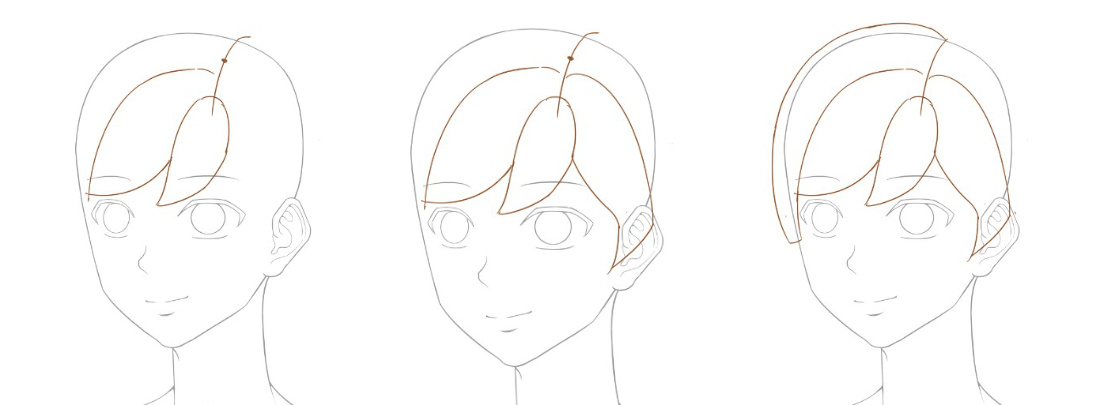
Step 1: Make Sure the Scalp Is Drawn First
Make sure to draw the scalp if you are using your own anime head drawing. In anime-style drawing, the scalp is usually simplified into a round or circular shape. This circle represents the top and back of the head and helps guide where the hair should sit.
Common Beginner Mistake #2: Drawing Hair Strand by Strand from the Start
It’s tempting for beginners to fill the hair with lots of small lines, but this often makes the hairstyle look flat and messy, and it becomes harder to control the overall hair design.
Instead, mark the hair whorl first, then focusing on designing the overall flow of the hair using larger hair chunks. I’ll explain this more clearly in the next two steps.
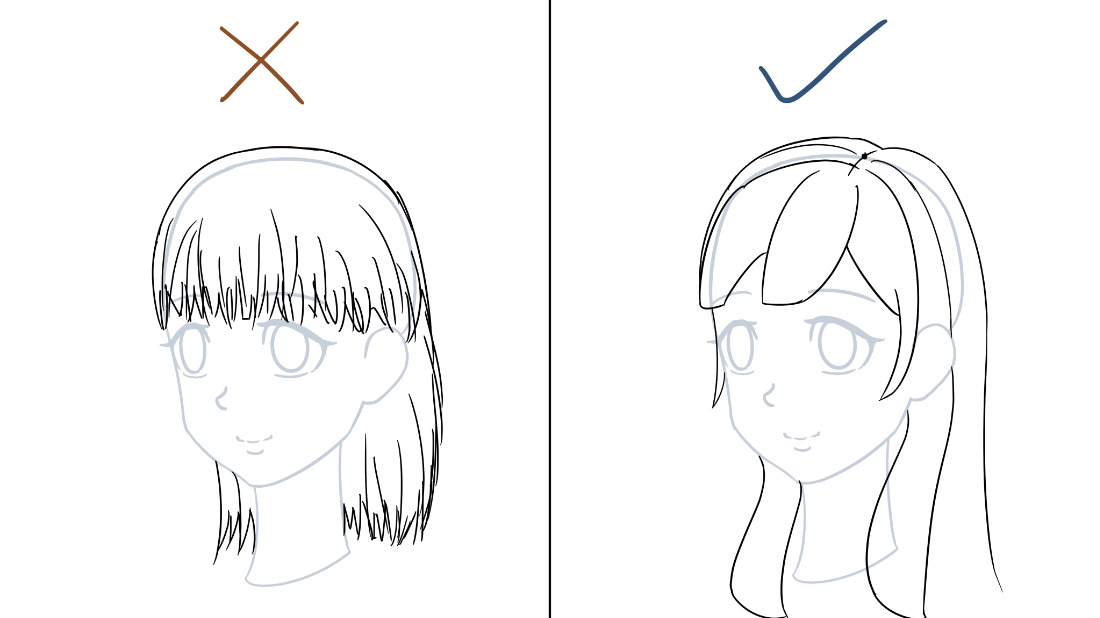
For now, try to avoid drawing individual hair strands right from the beginning. It doesn’t typically lead to good hair design.
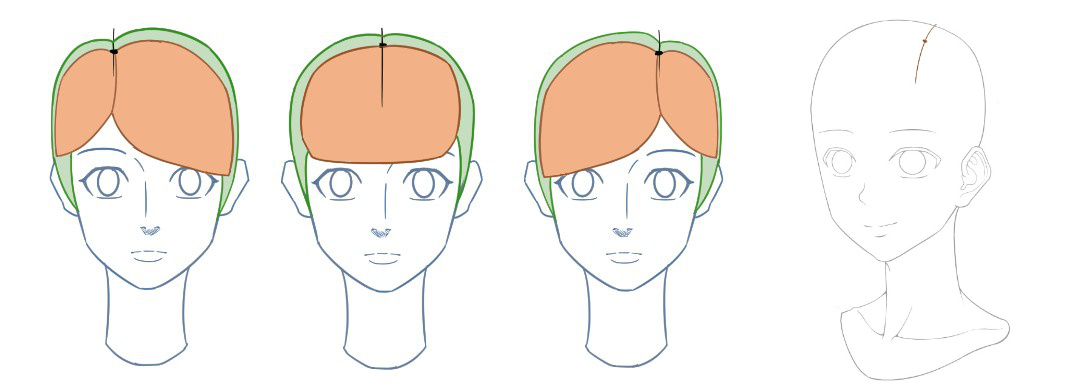
Step 2: Mark the Hair Whorl
Hair does not grow straight down evenly from the entire scalp. Instead, it usually spreads outward from a specific area on the top of the scalp. When viewed from a high angle, you can see that the hair grow from a line or point, which is called the hair whorl (highlighted in red below).
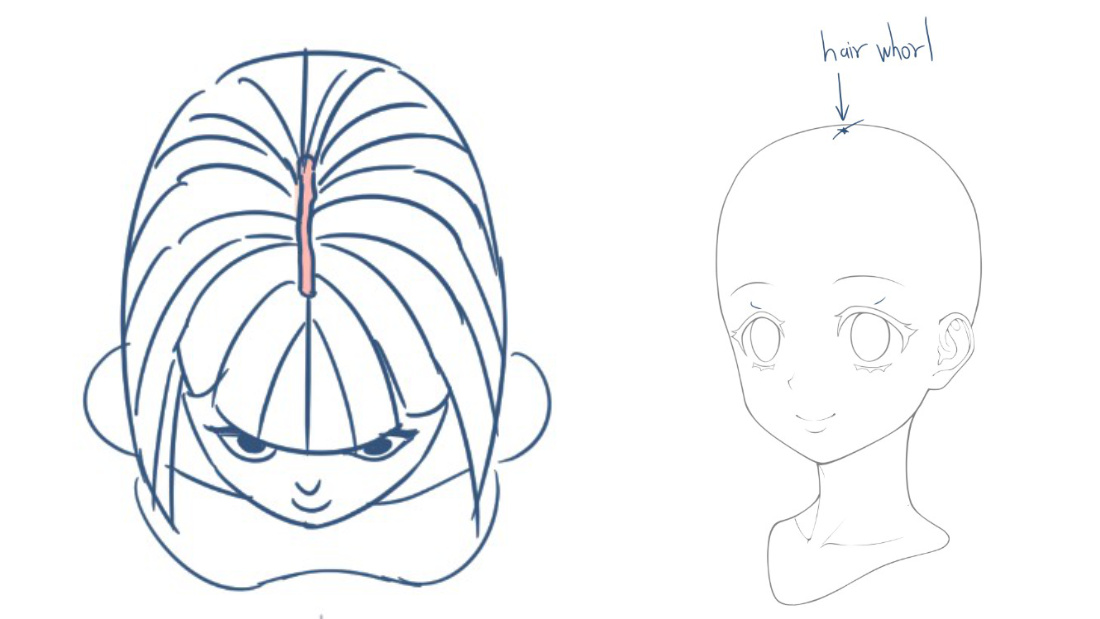
Everyone has a hair whorl, but its position can vary from person to person. In anime drawing, we usually simplify this by placing the hair whorl on the left, center, or right of the scalp.
Lower the opacity of the head layer, then create a new layer on top to start drawing. In this example, let’s place the hair whorl at the middle, which is around the center of her head. Since the head is an oval, the mid point always stays in the middle at any angle. By marking the hair whorl first, it becomes much easier to design the flow of the hairstyle using hair chunks in the next step.
Step 3: Design the Flow of the Hairstyle Using Hair Chunks
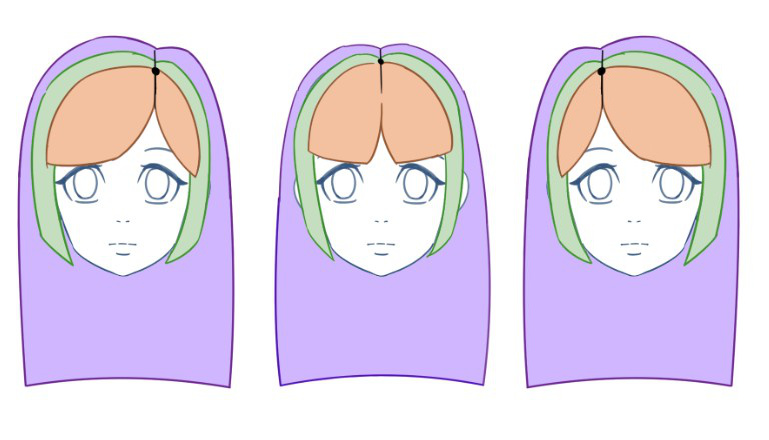
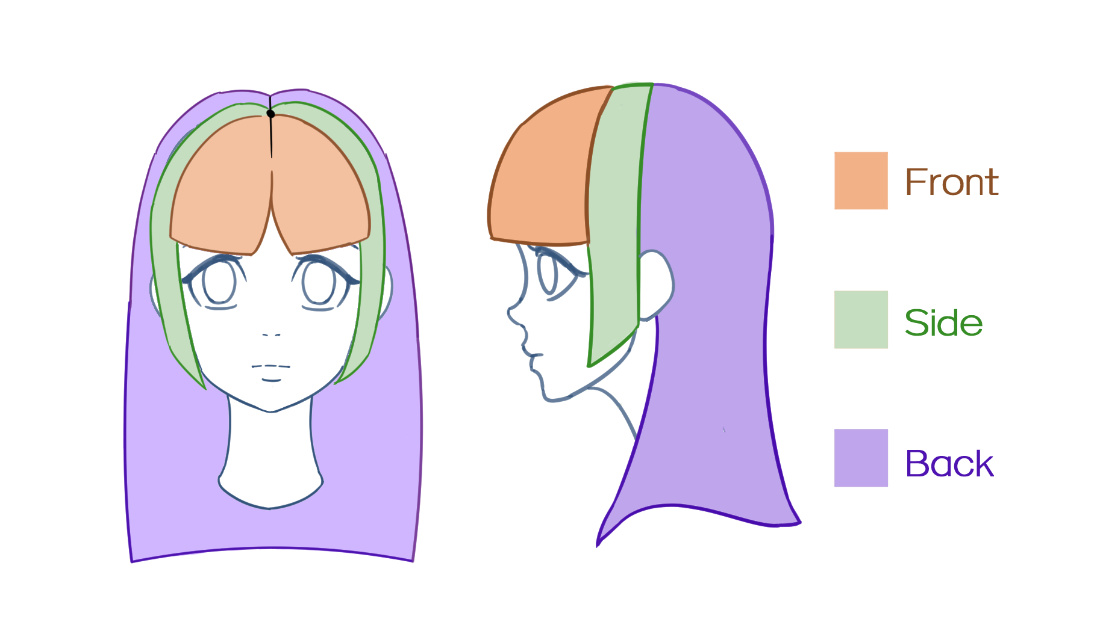
When designing hair chunks, think of the hairstyle as being divided into three main sections: the bangs (front), the sides, and the rear (back). This applies to both short and long hairstyles. Keeping these three sections in mind helps guide the direction of your hair chunks. It prevents you from drawing them randomly and gives the hairstyle a clearer flow and structure.
In this example, let’s draw a moderately short hairstyle for this anime girl. After marking the hair whorl, start by drawing the front section (bangs). Divide it into three hair chunks, with the middle chunk larger than the two on the sides.
Personally, I find it easier to start my lines at the hair whorl and extend them downward to form each hair chunk. You can try starting your lines from the hair whorl or maybe from the sides or bottom if that feels more comfortable for you. No matter where you begin your lines, remember that the hair whorl is the origin point of the hair. Because of this, the hair chunks should visually connect back toward the hair whorl.
Then, draw the side hair chunk. Make this chunk longer and slightly sharper, giving it a different shape design compared to the front chunks. You can also optionally add a small sideburn near the ear, which we will draw in this tutorial.
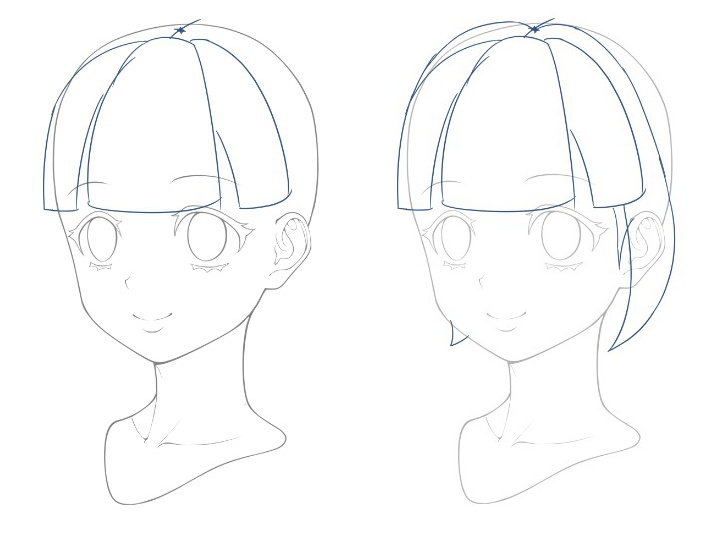
Lastly, draw the back hair chunk, which is the largest of all.
Hair Drawing Tip: Flow Direction
When designing hair chunks, you can also change the flow of the hair. Instead of having all the hair chunks fall straight downward around the scalp, you can adjust the direction of some chunks to create a more interesting design.
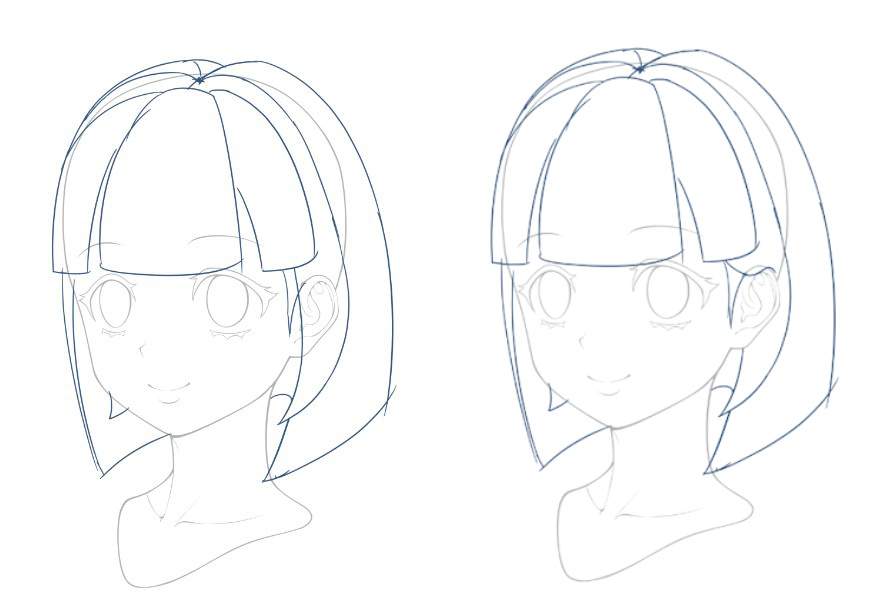
In this example, we can erase and make the side hair chunk flow backward toward the ear instead of covering it.
As you can see, we have constructed an interesting volumetric hair design without drawing a bunch of messy hair strand lines. Once you are satisfied with the overall hair chunk layout design, you can start turning the chunks into hair strands.
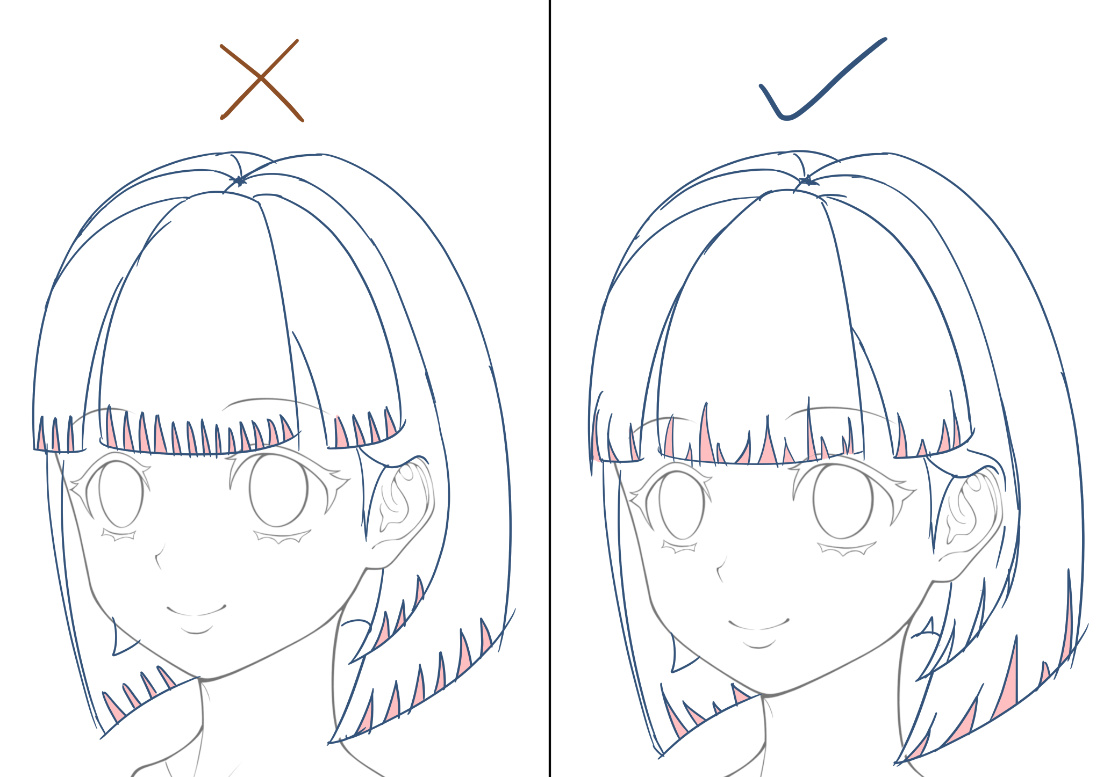
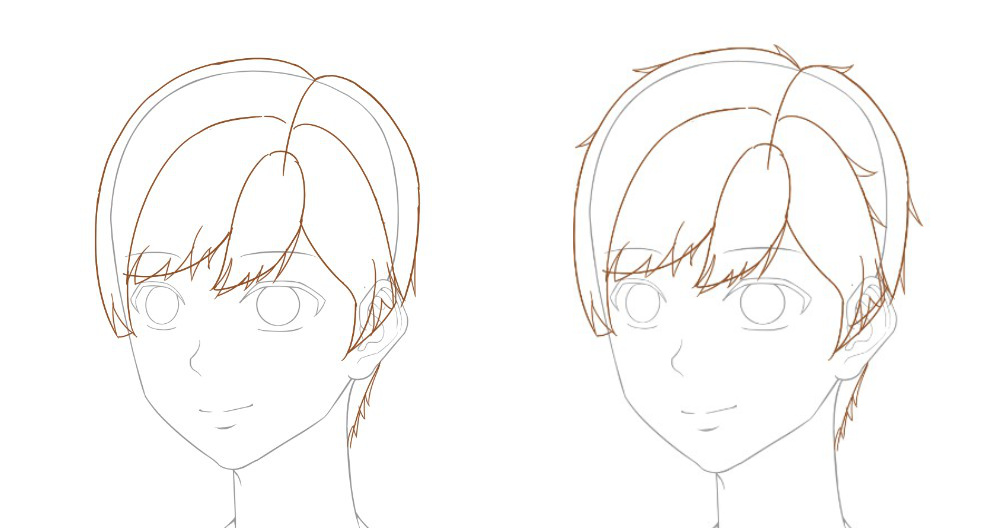
Step 4: Detailing each hair chunk into hairstrands
Common Beginner Mistake #3: Drawing Each Hair Strand the Same Pattern
Beginners often draw each hair strand with similar width and length, which results in a stiff, unnatural hairstyle. To make the hairstyle look natural and interesting, make sure the strands vary in height and width – some taller, some shorter, some wider, and some narrower. A little repetition is fine, but avoid repeating the same size across the entire hairstyle. I personally like to think in terms of big, medium, and small when drawing each hair strand.
Another useful technique for drawing hair strands is to focus on the negative shapes, which are the small triangular gaps between strands (highlighted in light red below). Try to make the triangular gaps vary in shape and size in each hair chunk to keep the hairstyle natural and interesting.
Step 4b: Adding Unique Individual Strands (Optional)
To make the character’s hairstyle more unique, you can add individual strands that stand out from the main hair flow. In this example, we can add a strand on top of the hair whorl flowing in a different direction, and two strands around the side hair.
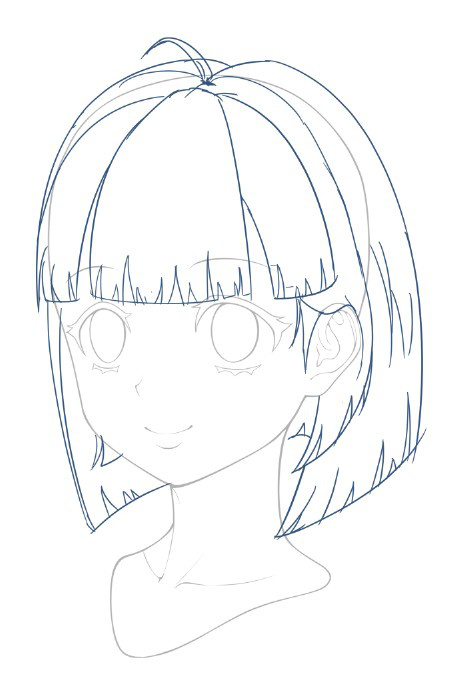
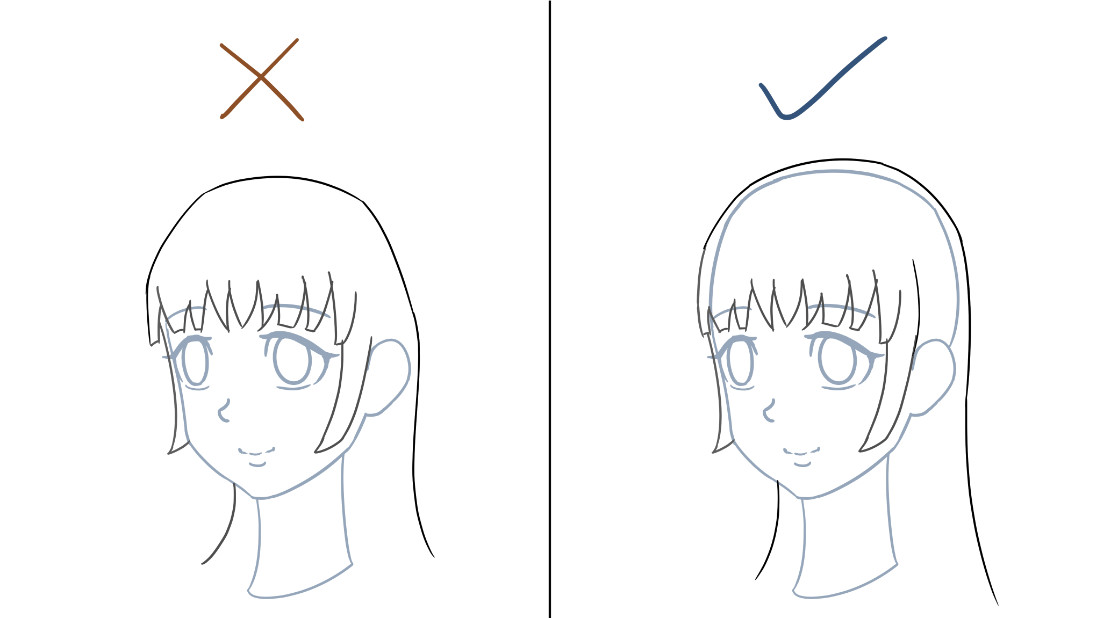
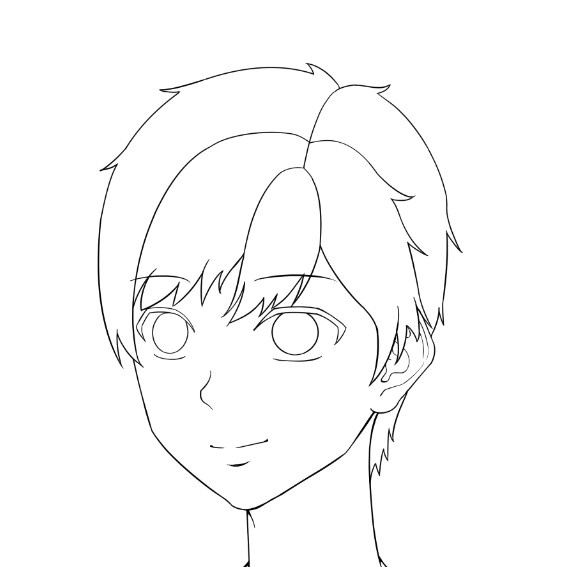
Step 5: Clean Line Art
Once we are satisfied with everything, go back to the head layer and erase the scalp where the hair is covering it. Then lower the hair layer opacity and create a new layer on top to draw clean line art for the hair.
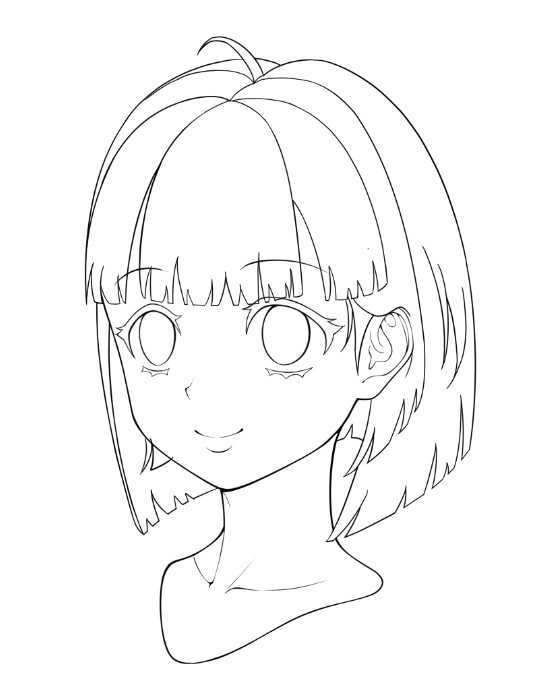
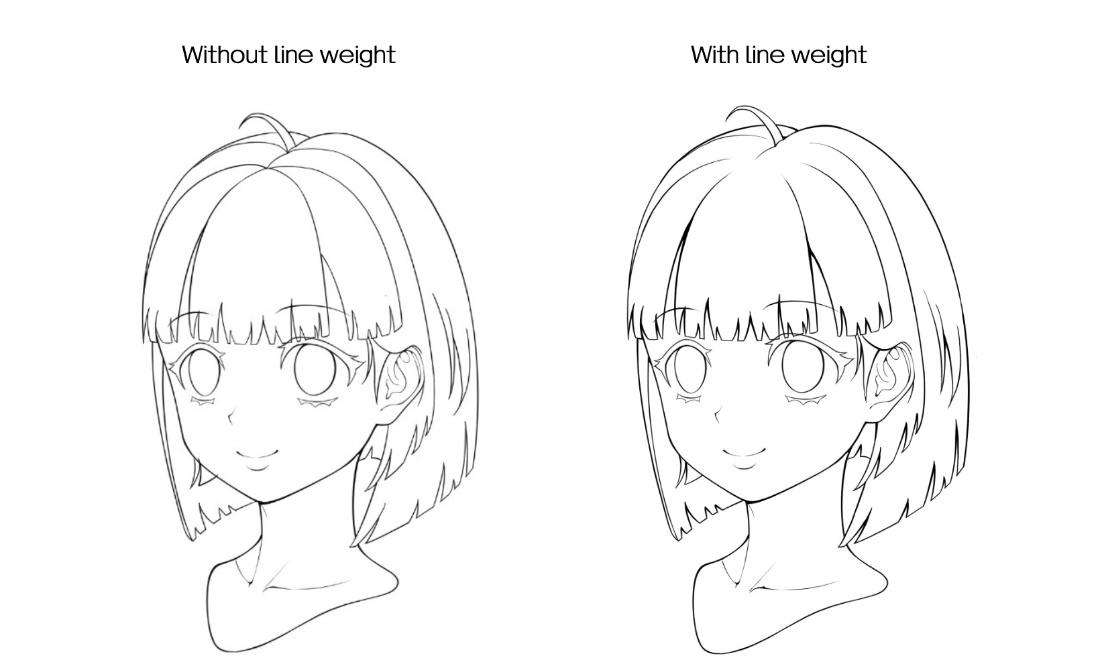
Hair Drawing Tip: Line Weight
You can enrich the line weight by thickening the lines between hair gaps to create occlusion shadows. You can also use an eraser to gradually taper the lines as they approach the hair whorl. Leaving some blank space also helps the hair look more natural.
Hair Drawing Tip: Detailing
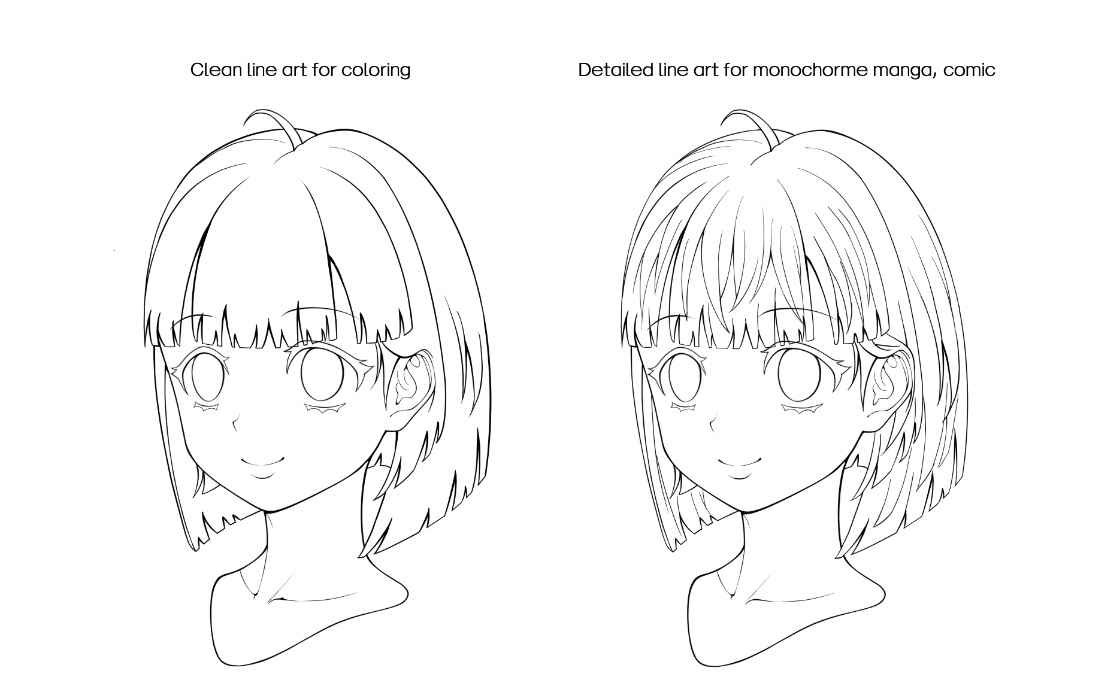
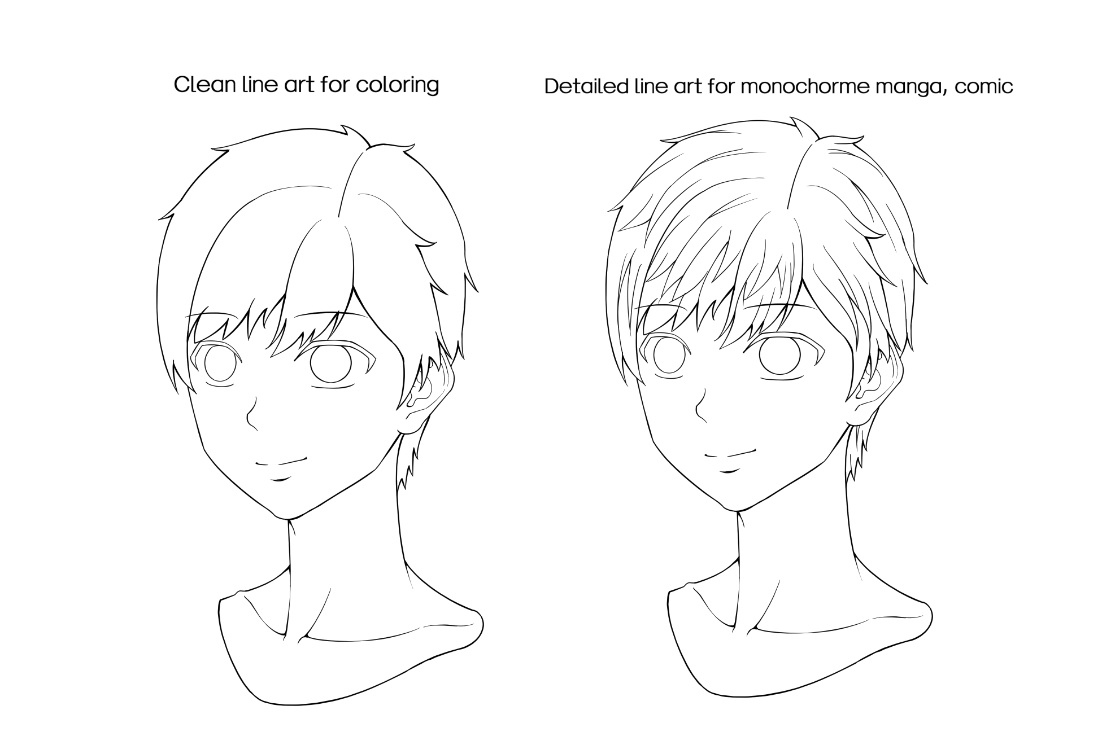
You can keep the hair clean as it is now, or add as many strand details as you want depending on your art style and preference. In general, if you do not plan to color, you can add more details, similar to a monochrome manga or comic style. However, if you intend to proceed to coloring, keep the line art clean for coloring, so you have more room to develop the details during the coloring stage.
Now you should have a better idea of how to draw anime hair step by step!
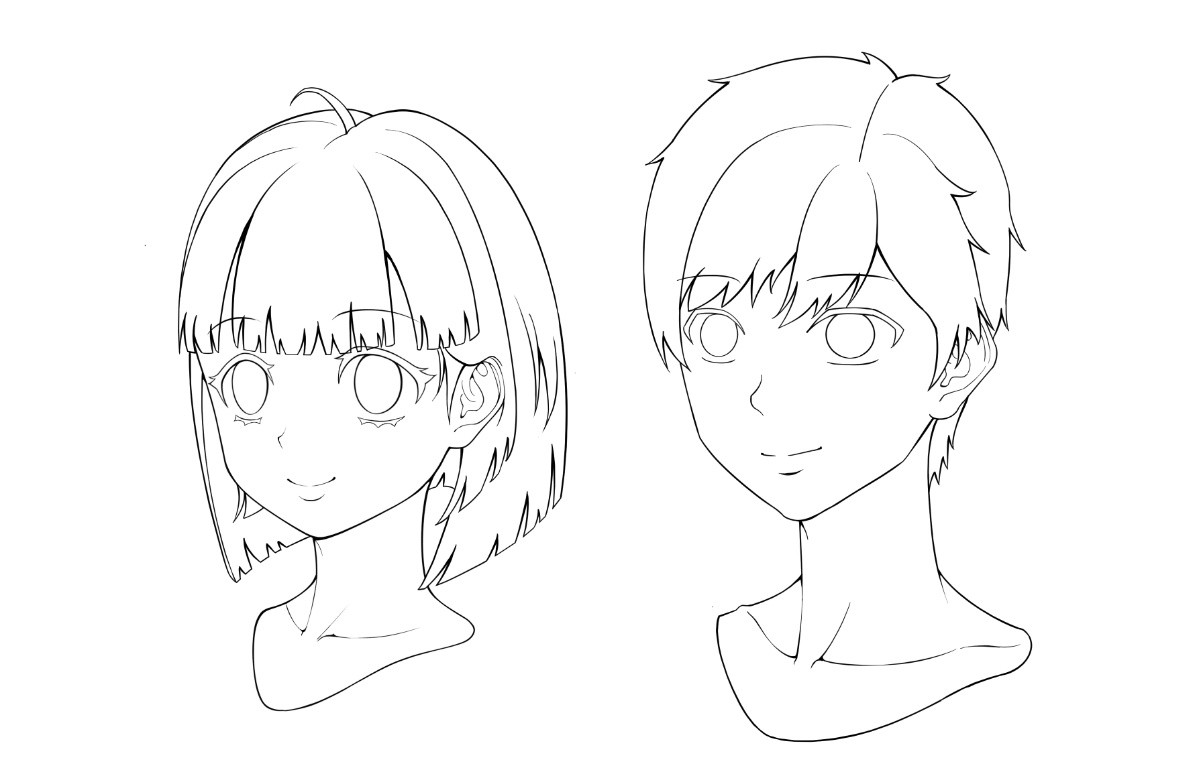
Let’s go through another example – this time, an anime boy’s hairstyle. The method is exactly the same.
Step 1: Draw the Scalp
Make sure the scalp is drawn first before adding the hair.
Step 2: Mark the Hair Whorl
Just like with anime girls, the hair whorl can be placed on the left, center, or right side of the scalp. Lower the head layer opacity and create a new layer on top to start drawing the hair. This time, let’s place it on the character’s left side to create a right-swept hairstyle.
Step 3: Design the Flow of the Hairstyle Using Hair Chunks
Boys in general have shorter hair, but just like girls, the hair can be split into three sections: bangs (front), side, and rear (back).

Start by drawing the front hair from the hair whorl. Draw one larger and one smaller chunk, both flowing toward his right side.
Anime Hair Drawing Tip: Flow Direction
You can always experiment with drawing hair chunks in different flow directions. In this case, I feel the front hair doesn’t always have to fall straight down – it can also be styled to the side. So here, we can draw the left front section flowing backward toward the left side, slightly covering part of the ear.
After that, we can design a longer hair chunk on his right side to help differentiate it from the other chunks. Lastly, we can draw the side and back sections as one connected chunk to complete the overall chunk design.
Step 4: Detailing each hair chunk into hair strands
Just like how we drew the girl’s hair earlier, start refining each hair chunk into strands. Try to vary the width and length of each strand to make the hair look more natural.
Step 4b: Adding Unique Individual Strands (Optional)
We can also add a few flipped-up strands, which are very common in male anime hairstyles. However, be careful not to add too many, unless you’re aiming for a spiky or messy hairstyle.
Step 5: Clean Line Art
Just like how we draw girls’ hair, ease the scalp then draw a clean line art on a new layer.
Anime Hair Drawing Tip: Line Weight
Enrich the lineweight by thickening the hair gap as occlusion shadow and taper the lines as they converge into the hair whorl.
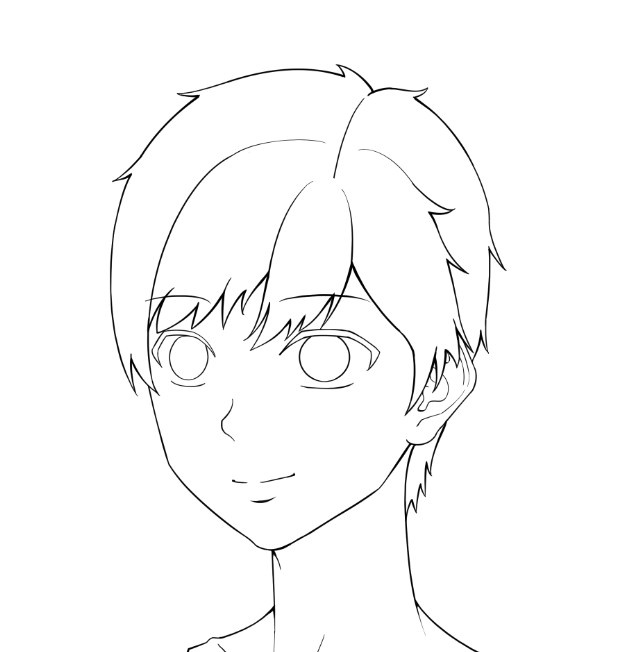
Anime Hair Drawing Tip: Detailing
Once your hair drawing looks solid in its simple form, you can decide whether to add more strand details to enhance it. If you plan to move on to coloring, keep the line art clean for more room to develop the details during the coloring stage.
That’s a wrap! You’ve now learned how to draw anime hair step by step.
Want more tutorials? Check out my other ones at Clip Studio Tips. Keep practicing, have fun, and I’ll see you in the next one!

Want more drawing tutorials? Learn to draw with Wacom
Check out Wacom’s Learn to Draw page for tons of tutorials for character design, anime & manga, and more digital drawing tips from the experts!
]]>A couple months ago, we interviewed her to ask about her background, inspiration, and if she has any career advice for early-stage creatives. Click here to read that interview. We also asked her to break down her creative process so we can all learn from her example! Check out the five-video series she did explaining her process below.
Part 1: Composition
Helen always starts off with a scene in her head, usually a pretty neutral one, so she can line up all of the elements before she begins. She gives the example of a Chinese wedding: a little palonquin, people carrying it, and people in the streets. While she sketches, she thinks of the scene as a film set and herself as the camera person, imagining that there’s a little camera swiveling around for different shots.
If she puts the camera in front, it would give one view – so she draws that view – but if she puts the camera on the side, a bit closer, you can focus on a particular detail. She moves the “camera” front and back to place different compositional elements around, and goes inside and outside of structures (like the palonquin) to look at characters and emotions from different angles.
Once she’s experimented with different angles and shots, she picks one and gets started adding more detail and filling out the shot.
Part 2: Directing the eye
Then she moves to focusing on a particular shot. An important question to think about initially: how do you direct the viewer’s eye to where you want it? Chen typically starts by focusing on value. She’ll go into a value sketch of what the framing might look like, with shadows directing the eye to certain areas, and those areas have more detail and higher contrast than some of the less important areas of the frame.
After sketching out the values and focal areas, it’s time to start thinking about color.
Part 3: Color
Colors should be integrated into the scene and make sense for the scenario. As the shot Helen’s working on takes place during a Chinese wedding, the color red was very important. Similar to what she did with value in the previous step, in this colored shot the red gets more and more vibrant and dramatic the closer you get to where she wants to draw the eye. She also points out that not only does the focal point of the illustration have more intensely saturated color, it also has some of the more interesting shapes and details.
Part 4: Lighting
When she starts a painting, Chen likes to keep everything flexible. She uses multiply and adjustment layers to apply lighting effects to her work, so that she can change things on the fly and re-do things as needed. She knows where she wants to go from the very beginning, but does it this way so she can till stay flexible. She can even change a scene from daytime to nighttime if she chooses, without having to start over!
Part 5: Final Touches
The last thing she does is add in final little touches. For example: throwing on a gray value map to check out the values. In the example in the video, she only realized once she looked at the illustration in this way that the palonquin was a little brighter than she wanted, so she was able to tone it down a bit. Some other final touches she will add are things like lens effects, bloom, and other depth of field cues to really draw the viewer’s eye.
That’s it! A huge thank you to Mingjue Helen Chen for taking the time to walk us through her process. Congratulations on the huge success with K-Pop Demon Hunters! We can’t wait to see what’s next!

About the artist
Mingjue Helen Chen is a visual development artist and production designer currently based in Los Angeles. She’s been working in the animation industry for years for major studios such as Walt Disney Animation Studios, Warner Brothers studios, Paramount Animation, Netflix Animation, and Sony Pictures Animation. Notable projects include Wreck-It Ralph, Big Hero 6, Raya and the Last Dragon, and most recently she served as Production Designer for Sony Pictures Animation’s K-Pop Demon Hunters.
But there’s actually a lot more to drivers than that, especially when it comes to Wacom devices, and not all drivers are created the same. This article will explain what drivers are – especially Wacom tablet drivers – what they do, and why Wacom’s drivers are considered by many to be the best in the digital art industry.
Wacom device not working correctly, or need the latest Wacom driver for some other reason? Click here.
What are drivers and what do they do?
At its core, a driver is software that helps an external device, like a Wacom tablet, communicate effectively with your computer. For a lot of very simple peripherals, like mice and keyboards, drivers are built into your operating system. For more complicated devices, like printers, you often have to download a specific driver for that device.
And for a very complicated device, like a Wacom creative pen tablet or pen display – complete with advanced technology for cursor placement, pressure sensitivity, pen tilt, touch and gesture controls, ExpressKeys on the device, customizable buttons on the Wacom pen, and much more – it’s important to have a well-engineered, comprehensive driver so that all of those different elements can work well with your computer, and be effectively customized to suit your own creative preferences.
Wacom has built in the absolute best technology into its pens and tablets; that’s why so many professionals count on Wacom devices for their creative projects. The driver makes this communication between the device and your computer possible. But there’s so much more: if you want to adjust your pen pressure curve, change the keyboard shortcuts assigned to different buttons on your pen or device, adjust the active area or which monitor your device is mirroring, customize the gesture controls on your device, or essentially change anything about the way your Wacom device interacts with your computer and the software you’re using, the driver makes that possible. Here’s a short list of some of the things Wacom drivers make possible:
- Customizing pen settings
- Assigning ExpressKeys, dials, and pen buttons to keyboard shortcuts and application-specific adjustments
- Enabling on-screen shortcuts
- Toggling different display settings
- Utilizing preset settings groups
- And much more!
That’s another reason they need to be well-engineered, by the way – drawing tablets need to communicate well with both your operating system and with every individual software application you use on your computer, all of which work in different ways and are updated all the time with new features (which means new ways to communicate with your hardware).

How do I use the Wacom driver?
When you’re first using a Wacom device on your computer, you’ll be prompted to download the relevant driver for your computer type and operating system (except in some cases, like if you’re using a One by Wacom pen tablet with a Chromebook computer). Then, to get everything connected and to start customizing your settings, you’ll open up and install the Wacom Center application on your computer.
Wacom Center is the home for your Wacom drivers. It’s where you can fine-tune nearly everything related to your Wacom pen tablet or display, and where you can find all kinds of features specific to Wacom drivers. There are a bunch of tips, tricks, and tutorials in there too, and it’s also where you can redeem any software offers that came with your Wacom device!
What can you do with Wacom drivers?
All digital input devices, like drawing tablets, have essentially the same function: you do something on the device with your digital pen, fingers, or by using ExpressKeys, and the driver translates that into input in the software that you’re using. It can be just that simple! But it can also be much more complex, and that’s where a well-engineered driver, like the ones created by Wacom – the company that essentially invented digital input technology and has been perfecting it for 40+ years – come in.
Wacom devices are known as the best in the business, and have been trusted by creative professionals across industries for decades because of their precision Japanese engineering and rugged build quality. But they’re also beloved because of their innovative feature sets, unmatched by competitors.
For example: did you know you can map touch input on your device to a separate monitor from pen input, so you can manipulate references on one monitor while working on another? 3D artist Pablo Muñoz Gómez breaks it down in the below video:
In fact, he created a whole series of videos outlining different tips, tricks, and features that rely on the Wacom drivers to do cool things. Check that playlist out here.
Wacom drivers make all kinds of unique and creative workflows possible. Another feature not too many people know about is the Grid Panels feature, which is great for Wacom pen displays like Wacom Cintiq, which don’t come with built-in ExpressKeys:
And that’s just the tip of the iceberg! Within Wacom Center – and hosted on Wacom’s YouTube channel, our social media accounts, and the Wacom Support website, there are tons of tips and tricks for making the most of your Wacom device.
Why are Wacom drivers considered the best in the digital art industry?
Wacom drives are often considered the best because the experience of using Wacom creative pen displays and drawing tablets is superior across the board: the devices are made of higher quality materials and have a rugged, long-lasting build quality, the pen-on-tablet feel is more natural, the precision and flow are accurate and intuitive, and the customer support is excellent. Not all of those aspects of using a Wacom device are driver-related, but many of them are! Here are a few of the reasons Wacom’s drivers get rave reviews:
- Excellent software application integration: Wacom has been working hand-in-hand with the best digital art software companies, like Adobe (Photoshop, Illustrator) and Celsys (CLIP STUDIO PAINT) for decades to optimize their applications for use with Wacom tablets. That means everything you customize in your Wacom driver should work exactly how you want it to in whichever software application you’re using.
- Better precision and pen-on-device feel: Wacom devices combine the best hardware – the IC chips and other technology in the pens and devices themselves – with the best software drivers for the most precise, most natural pen experience. That means less lag and parallax, a smoother pressure transition, and excellent accuracy.
- Deep levels of customization: Nearly everything can be customized on your Wacom device, from pressure curves to ExpressKeys to active area to multiple-monitor setup workflow adjustments – either across your entire workflow or in different applications specifically.
- Stability and support: Wacom drivers are known for being more stable, for being updated more quickly, and for offering better customer support if something does go wrong.
Frequently asked questions:
What is a driver?
What can you do with the Wacom driver?
How do I use the Wacom driver?
Why are Wacom drivers considered the best in the digital art industry?
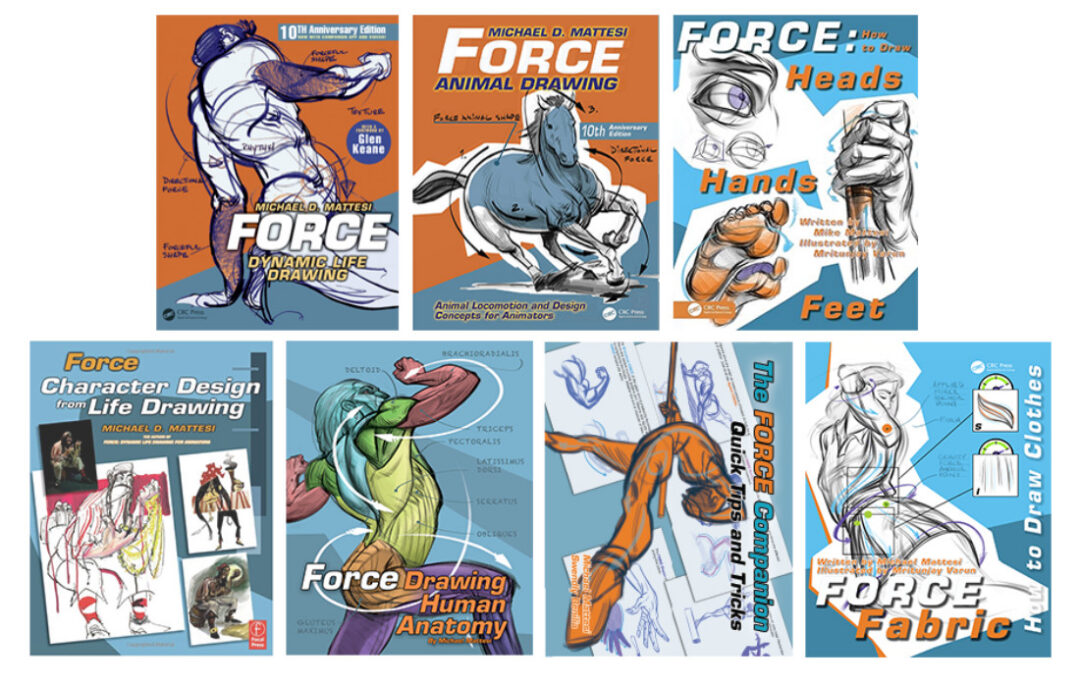
Another great resource? One of Mike Mattesi’s seminal Drawing FORCE books. Through his books and online resources, Mike Mattesi has taught thousands of people to draw using his FORCE method. FORCE is “built on an animator’s mindset – physics coupled with the beauty of rhythm and function.” It’s the best way to go from a beginner to a pro-level artist, he says, because “other methods teach you how to copy what you see instead of understanding why something looks the way it does,” which is what FORCE provides.
We wanted to know what such an accomplished artist and educator thought of the Wacom MovinkPad Pro 14 all-in-one portable drawing pad – was it good for drawing using the FORCE method? We sent him one to get his thoughts, and talked with him about his background, inspiration, why beginning artists should consider the FORCE method, and more. His review of the MovinkPad Pro 14, as well as our interview with him, are below. Note: the interview below has been edited lightly for clarity and length.
When and how did you know art was going to be your career? Were you a creative kid?
I drew as a kid but it was for fun; I had no career motive until high school. I did four years of architecture and two years of commercial art, but the publication of the Dark Knight comic drove me to go to The School of Visual Arts (SVA) to be a comic book artist.
How did you decide art school was the right path for you? Do you think young artists in 2026 should consider art school, or are self-teaching opportunities, including online art education programs like Drawing FORCE, a better path?
I graduated high school in 1988, so there were not as many options as today. I knew I needed help to become a professional, so I chose SVA. They offered a comic book program. Ironically, I did not go into comics but went into animation instead! When I got into Disney Animation, I realized that my prior education was barely enough to do the job. So I had to learn most of my essentials from other animation artists.
Nowadays, the entertainment art industry doesn’t care if you have a BFA; your skill is shown in your portfolio. You can learn without an overpriced brick and mortar art school that may not set you up with the skills needed for a job. In fact, for this reason, I am launching an online FORCE Art Academy very soon. It’s portfolio-centric. Our curriculum is designed around the end goal of a student – having a great portfolio – and then knowing what they need to get there.
If you could describe the FORCE method that you teach in a single sentence, how would you? How does it differ from other drawing methodologies? Who would benefit the most from learning this way?
FORCE is the best method to go from a Beginner to Pro level artist. FORCE is built on an animator’s mindset: physics coupled with the beauty of rhythm and function. Many other methods teach how to copy what you see, instead of understanding why something looks the way it does.
Most other schools teach a classical approach that is, in my opinion, outdated for the modern entertainment industry. We teach artists how to use FORCE in their work, an undeniable truth, bringing more believably and humanity to their art. It’s why Disney and Pixar excel over other studios, because of their understanding of how to use FORCE in their design and animation. Any artist can benefit from the FORCE Drawing approach, from production artist to hobbyists, comic book artists to storyboard artists, illustrators or even fine artists.
You’ve worked in animation, comics, advertising, product design, and a variety of other fields, but for years you’ve been committed to teaching others through Drawing FORCE. Why is teaching others important to you?
I love helping others experience that “click” moment, the moment of enlightenment, of change! It is very exciting to see another person evolve and improve their abilities. I am addicted to that within myself and want others to experience this as well.
You’ve worked traditionally quite a bit, especially for figure drawing. What’s your relationship with digital art? You had a chance recently to try out the Wacom MovinkPad Pro 14, what was your experience like with it?
I have been drawing digitally since the early 2000s on a tablet and then on a Wacom Cintiq pen display since 2007. At the start, it was challenging. I felt as though my hand was in the way! The hardest thing for digital to match is the friction of a pencil sliding over the paper. This friction creates control. With FORCE Drawing, that control of line really matters since the line has so much meaning. That being said, the experience of digital creation has improved. The glass is thinner, bringing your hand closer to your art. Also, with digital, every art supply you want to experiment with is all in one place, with an infinite ability to iterate!
I’ve just started tinkering with the MovinkPad Pro 14. So far, I love the large screen size, how light the device is, the fact that I can draw with the pen horizontal to the screen with no weird visual blips from the pen or my fingers and hand, are big improvements. I like the matte finish of the screen.
All I really want is for it to be even bigger! Maybe a 17-inch tablet next? And I want the surface with even more friction, more tooth! I know that is the tough part, to get that friction and not wear down the screen or pen tip. Just sharing my dreams.

What advice do you have for beginners who are trying to learn the basics of drawing – figures, anatomy, movement, shapes, etc.?
My advice is for you to learn what you need to help your work, and strive to see and understand these new ideas! You should follow artists and instructors that are already doing what you want to accomplish in your work. Do they know how to explain what they are doing so you can learn it? Many students come to me after having paid for a mentorship with an artist that crafts amazing work, but does not know how to teach what they are doing. Teaching is a skill all unto itself. We all can use mentors to help us get to our goals more effectively. I would not be where I am today without my mentors.
What’s your take on the relationship between accuracy and style? Is it important to learn how to draw the human body, for example, “correctly?” Or is something else more important?
I don’t dwell on correctness, as I focus more on clarity – clear understanding and seeing. I think the more you learn, the more you can have an opinion. Learn to see and understand the world around you with utmost clarity. This clarity grants you a great deal of information you can have an opinion about. This information will allow for more skill and more skill allows you to speak your mind with more clarity. This applies to all art styles.
Any other general advice for young or beginning artists?
Pick the right education for your goals! I teach FORCE and this approach says that gravity, rhythm, problem solving, and understanding matter when drawing. This brings drama, humanity and storytelling to your work. If you want to learn how to paint a still life, though, I’m not the right teacher!

About the artist
Mike Mattesi has worked as an artist on numerous award-winning projects in varied capacities in animated film, advertising, video games, comics and art education, including with Pixar, Disney, Marvel, Hasbro, ABC, Electronic Arts, Nickelodeon, and many others. He has also authored seven FORCE books, published in numerous languages, utilized around the world to inspire and educate artists on the concept of FORCE. He has instructed FORCE Drawing for over 25 years and inspired thousands of artists.
Follow his work or learn more about Drawing FORCE at his website or on Instagram or Facebook!
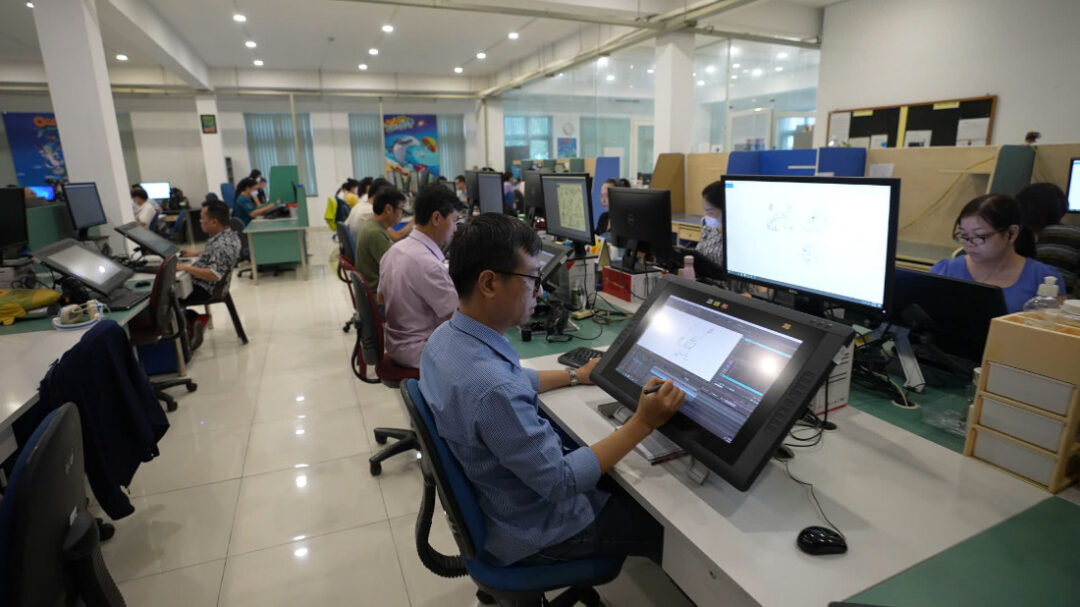
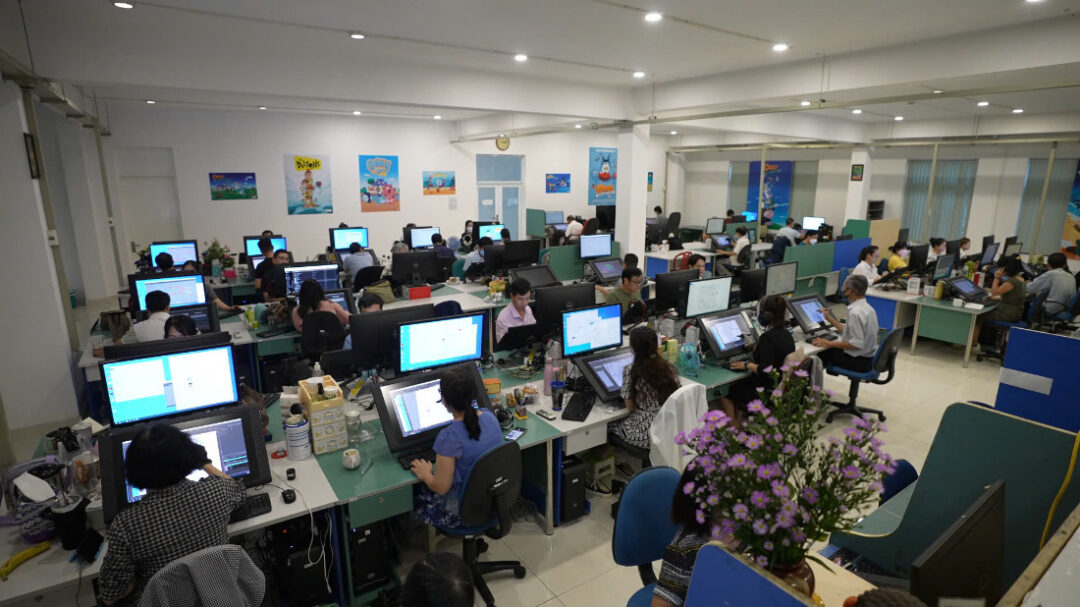
Why Wacom Is Essential to Xilam Vietnam’s Workflow
To support complex, long-form productions, Xilam Vietnam relies on a set of industry-standard Wacom tools:
Wacom Cintiq 22HD / 2260HD: Used primarily by animation teams and some background artists.
Wacom Intuos 3 / 4: Used for simple background tasks and supplementary work.
These devices were chosen for key reasons:
- Industry standard: Reliability and precision for long-term projects (series/films).
- Natural drawing experience: Pressure sensitivity and responsiveness for clean linework and frame-by-frame animation.
- Ergonomics & stability: Reduces fatigue and ensures seamless integration with professional software.
What the Creative Team Says
Xilam Vietnam’s supervisors and leads share firsthand insights into how Wacom supports their craft:
“Wacom performs better at detailing and line work compared to other tablets, and it’s also faster for color grading. In terms of precision, it makes checking colors and managing lines easier. With the new Wacom device, colors are displayed more accurately.” – Nguyễn Đăng Nguyên, Background Supervisor
“For me, Wacom remains the most reliable and suitable brand for professional production environments. Compared to other tablets, particularly the Cintiq series, Wacom offers superior pressure sensitivity, precise accuracy, and smooth performance when handling large files on a PC. In addition, its durability ensures consistent stability even after many years of use. For animation studios and large-scale projects, I find Wacom to be more efficient and optimal than tablets, which are primarily designed for personal portability.” – Bùi Linh Ân, Animation Lead
“I have used two types of Wacom Cintiq, DTK-2200 and DTK-2260. I found the newer version to have a few advantages: it doesn’t overheat, the drawing lines are smoother, it’s more suitable for different desk heights, and it’s lighter to move around.” – Mã Bá Hùng, Layout Supervisor
“The Wacom Cintiq features buttons that are easy to set up with shortcuts, making workflow more efficient. I find it more intuitive to use, and the display allows me to see my drawings with greater clarity.” – Huỳnh Kim Hoa, Layout Lead
“Wacom is highly convenient and easy to use, offering multifunctional features along with a very effective stylus. The non-slip screen provides a natural drawing experience, closely resembling the feel of drawing on paper. Overall, I truly enjoy working with Wacom.” – Lê Phương Thảo, Animation Lead
How Wacom Supports Every Stage of Production
Wacom is used across all stages:
- Roughs
- Keyframes
- In-betweening
- Cleanup
- Backgrounds
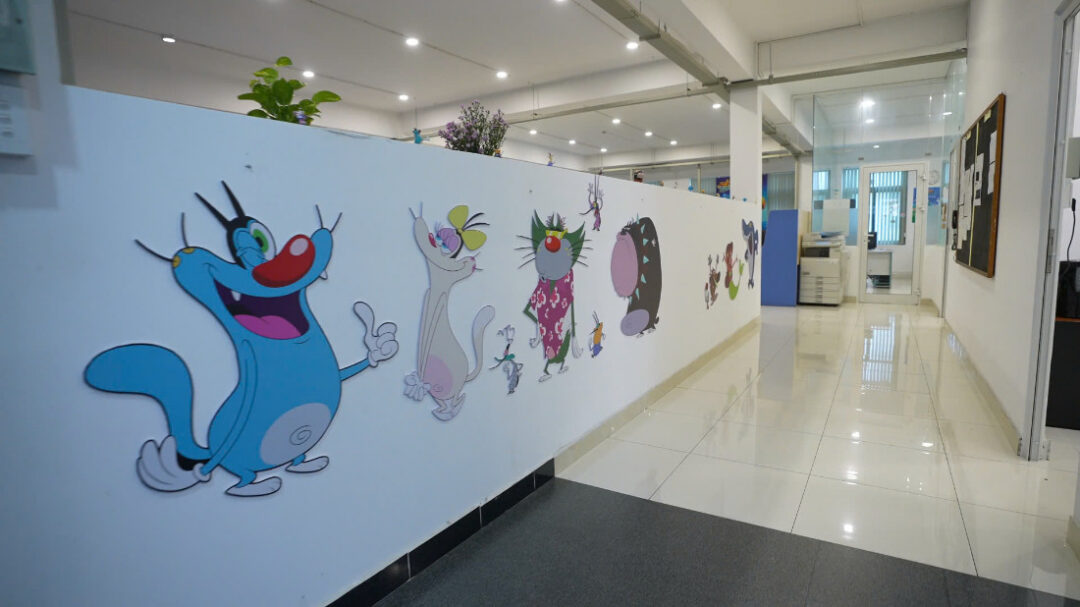
You can explore examples of Xilam Vietnam’s work here:
Advice for Aspiring Creators
Xilam Vietnam shares practical advice for 2D animators:
- Master the basics first — Movement, timing, and clean lines over speed.
- Use reliable tools — Choose devices (like Wacom) to refine traditional techniques.
- Practice with patience — Excellence comes from repetition and attention to detail.
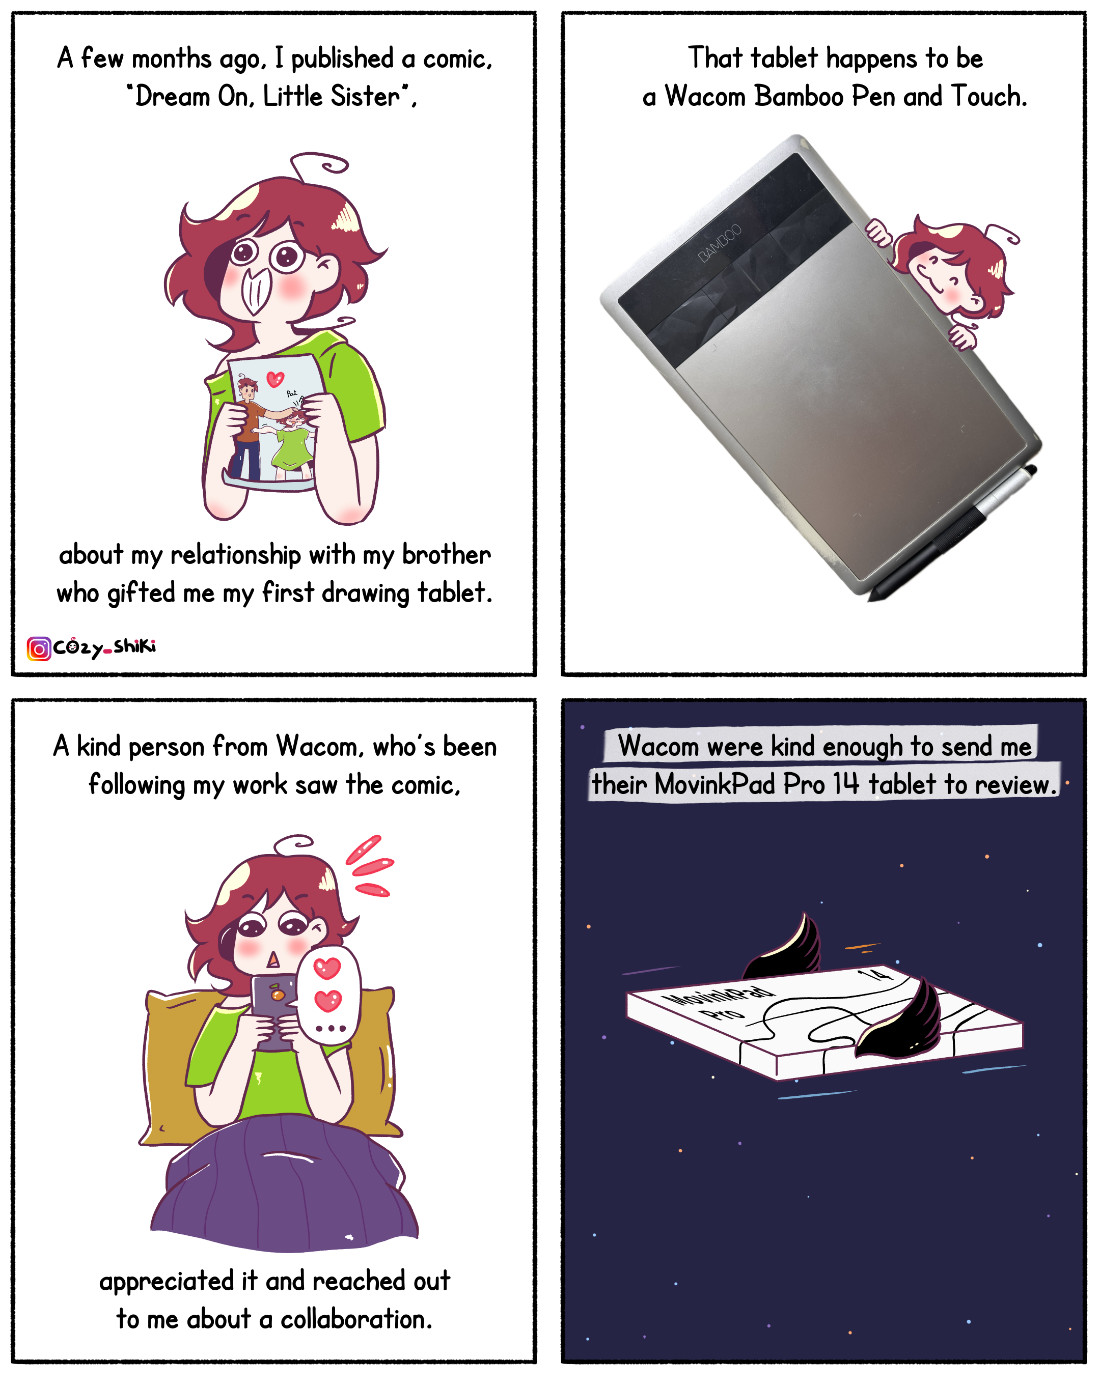
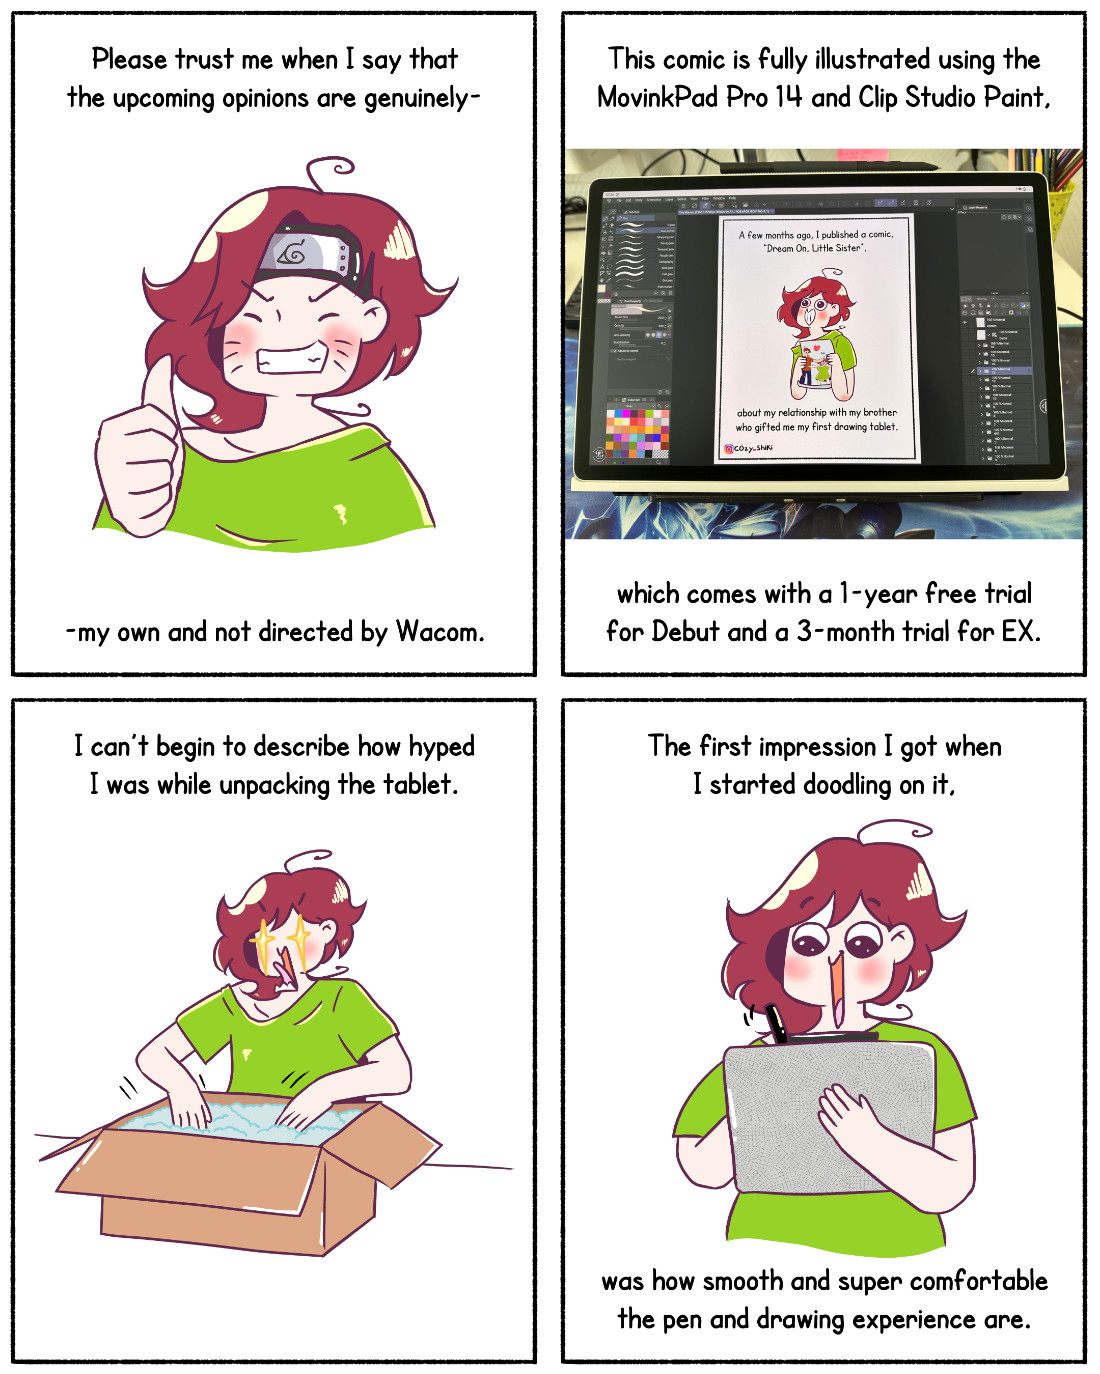
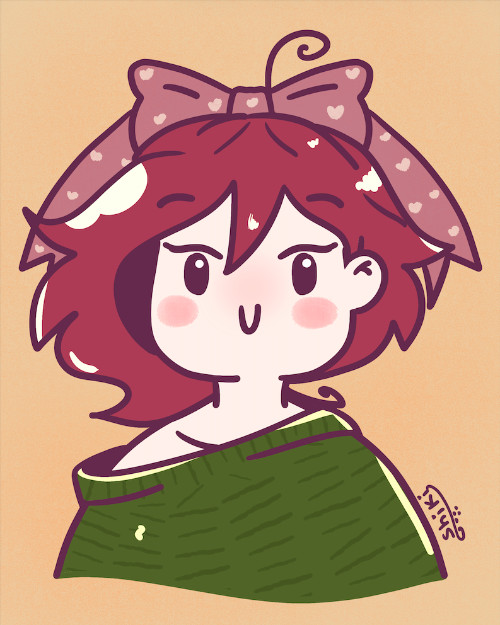
Cozy_Shiki, of Shiki’s Cozy Comics, who grew up in Tunisia but is now based in Germany, got into comics as a young age, making them with her mouse and trackpad. Her older brother saw her interest, and supplied her with her first drawing tablet, a Wacom Bamboo tablet! She outlined the story of getting support from her brother and pursuing her art dream with the comic “Dream On, Little Sister,” which went viral online. We loved the story of how Shiki’s older brother, and the Wacom tablet he got for her, set in motion a path that led her to where she is today as a comic artist!
One of us here at Wacom was already a fan of Shiki’s work, and got in touch with Shiki to talk about the viral comic, her background, choosing to persist in comics despite setbacks, and why she chooses to be vulnerable about mental health in her work. We also sent her a MovinkPad Pro 14 all-in-one portable drawing pad to try out and give us her opinion on.
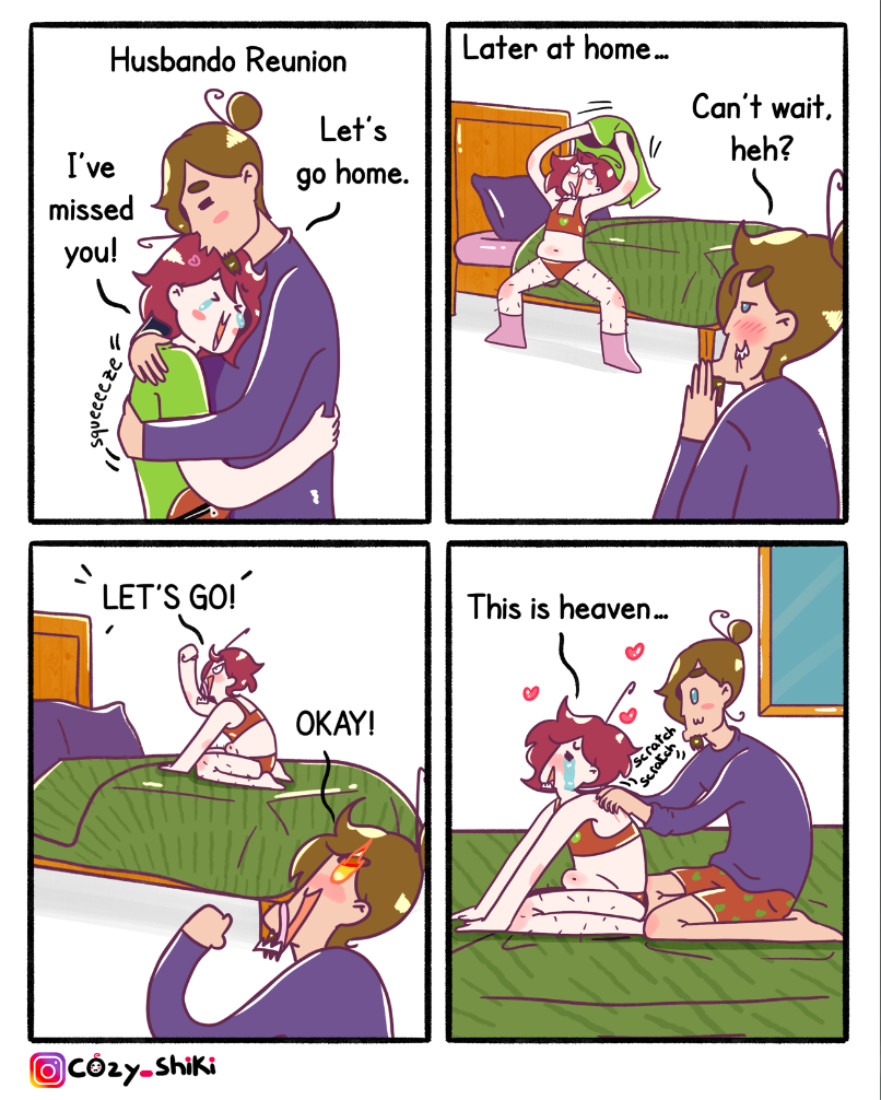
She made the following comic about the experience and about the MovinkPad Pro 14! Check out the comic below, and keep going to read the interview with Shiki. Note: the below interview has been lightly edited for clarity and length.

How did you first discover your passion for art? I know you got your first Wacom tablet from your brother; and you’ve shared comics about other siblings’ creativity. Did you feel like you had opportunities to nurture your creative passion as a young person?
I first discovered my passion for art when my mom bought me magazines of Winnie The Pooh at a young age. I found myself replicating the illustrations in my notebook. Then I became a huge fan of Witch Magazine, and later manga and anime. After drawing from a lot of those references, I slowly started scribbling my own drawings and developing my style.
Early on, you enjoyed art – but studied engineering in college. Why? What do you think about art school and the difficult choice a lot of young creatives have between doing something “safer” like pursuing a standard college degree, compared to going to art school or self-teaching?
I’ve always been passionate about art since a very young age. But I was also a good student with high grades. With a lot of influence that art in Tunisia won’t get me anywhere, I simply followed my grades towards a “safer” direction which was engineering.
I think this difficult choice between the “safer” path and one’s passion is something a lot of creative people face. Some of my friends who are great artists opted for other careers like med school. I didn’t, but I don’t consider any choice to be the “wrong” one. We all think and function differently, and everyone has their own circumstances. Whichever path you end up choosing, quoting my favorite anime Cowboy Bebop, “You’re gonna carry that weight.”
How did you end up pursuing art after graduation, and what kept you going through the first couple years of struggling to make art your career? What advice do you have for a young artist who’s struggling to make a creative career work?
During my last year in college, I started a Tunisian webcomics series which found a lot of success. I felt motivated to give making comics and animations a try. So after graduating, I convinced my family to let me take some time off and try to make a living from my art.
Two years passed with no income! I felt so discouraged, and struggled a lot with my mental health during that time. What kept me going was the love I was getting from my readers and viewers. They’re really kind to me, and some of them still stuck around until this day. The final push that got me out of my dark place was my brother helping me get a job as a designer. I could then balance having an income in a creative field, and making my comics on the side.
I can’t promise that this “big magic” is a fixed point in time for every artist out there. I worked so hard to make it happen, but I was also so lucky. What I can say is that if you follow your heart and passion, it won’t be an easy journey. But once you make it, every sweat and tear will feel worth it.
Why do you make comics in particular? Did you experiment with other art forms early on, or did you always love comics?
My earliest drawings were based on Winnie the Pooh comics; they were my first influence. Then I started making caricatures about my family, and later friends. I love making caricatures! At some point I also experimented with manga style for a while.
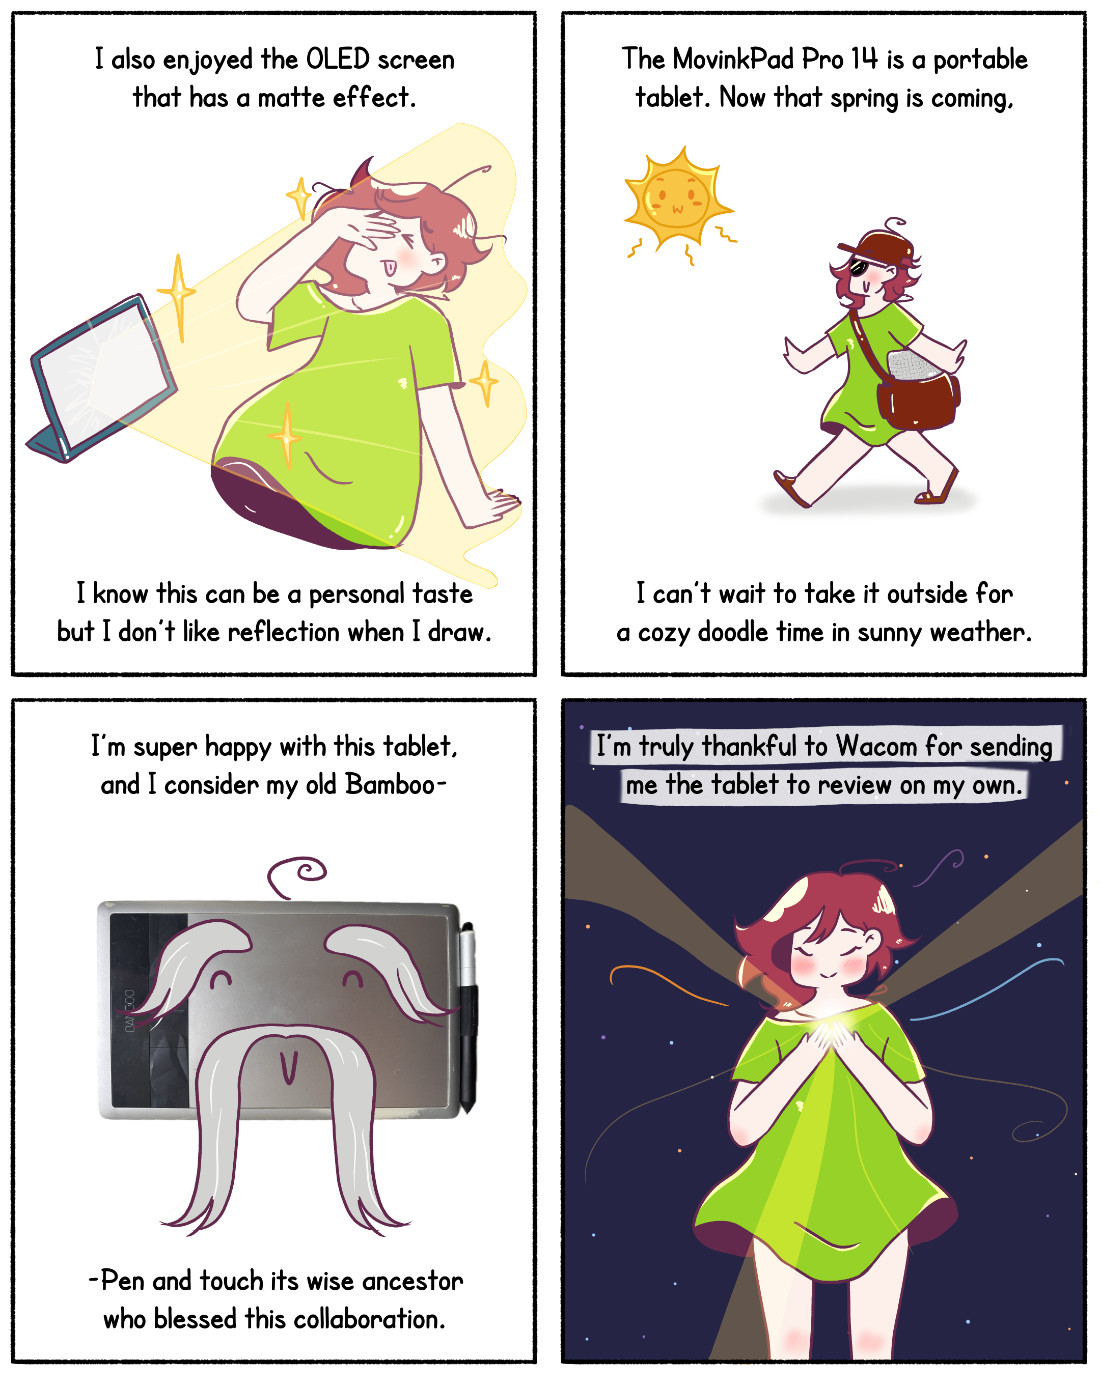
You’ve recently had a chance to try out the new Wacom MovinkPad Pro 14. What do you think about it so far? How might it change or affect your creative workflow?
I love the drawing feeling on the MovinkPad Pro 14. It’s smooth and light. And I love the vivid saturated colors on the OLED screen. I’ve already created some comics with the tablet using Clip Studio Paint. I used to draw with the software on my PC, and it feels good coming back to it. I’m certain I will keep making more art using it!
Your style is very loose, dynamic, fun, colorful, and expressive, while still being extremely clean. How did you develop your art style?
I think the references I used while replicating art at a younger age helped me develop my own style. There’s no shame in referencing other artists, and the more I drew the more my personal style kept developing until I finally could call it “Shiki Style.”
You’ve been very open and vulnerable about mental health and other difficult topics in your comics – and some of those have had some of the widest reach online. What inspires you to be so forthcoming and honest in your work, and why do you think it has resonated with people so strongly?
The first comic I did about my mental health goes back to 10 years ago. It was about my fight against fear and The Monster, with a twist at the end. I remember readers loving it and connecting to it.
Then I went back to the light silly comics, until about a year ago when I published a comic about my late dad on reddit. I never expected it to have such an impact on people, and the kind reception encouraged me to work on more personal comics. Artbymoga also inspired me a lot with her raw comics about mental health.
When I make a comic about my mental health, I do it partly to help myself, like journaling. I just put my feelings and thoughts into canvas. I’m always anxious to share such personal matters on the internet. Then I read the kind comments about how the comic resonates with someone or helps them through their struggles, and it fills me with gratitude.
Speaking of mental health, you changed the name of your comics from “Shiki’s Stupid Comics” to “Shiki’s Cozy Comics.” Why?
I had the name of “Shiki’s Stupid Comics” for over 10 years. I named it that because I always thought my comics were stupid, and in a way, worthless. When I started posting my personal comics, though, I saw how they impacted people. And a lot of my readers wrote that the comics weren’t stupid at all!
Slowly, I started perceiving my art through a different, kinder lens. One day, I decided not to devalue my work anymore, so I changed the name to “Shiki’s Cozy Comics” and published a comic announcing the transition. My readers were so supportive and wholesome, as always!
Do you have anything coming up on the horizon that fans of your work should look out for?
I don’t have anything planned, but it’s my dream to make a comic book and publish it one day. Who knows…
About the artist
Cozy_Shiki of Shiki’s Cozy Comics is a Tunisian comic artist and animator based in Germany. She’s known for her bright, dynamic, and often silly journal comics, which cover her life in Germany, her family history, and honest explorations of mental health.
For the Wacom team, NAEA is always a highlight of the year. It gives us the chance to connect with educators we often communicate with through email, meet new teachers discovering digital art tools for the first time, and reconnect with friends we see each year at NAEA or at state art education conferences. The conversations and shared enthusiasm for teaching art are always inspiring.
The Wacom Hero Lab
One of the most exciting parts of our booth this year was the Wacom Hero Lab, a hands-on make and take experience where educators created their own Art Hero trading cards using Wacom tools and CLIP STUDIO PAINT.
Teachers had the option to begin with ready-to-use templates or design their own character from scratch. We were so impressed by how many educators chose to create their own original Art Hero instead of simply coloring the templates. The creativity was flowing throughout the event. We saw capes, imaginative tools, creative superpowers, and unique backstories come to life right in the booth.
Participants also received the Hero Lab lesson plans and classroom templates, which give educators everything they need to recreate the activity with their students. Many teachers shared ideas for adapting the project to different grade levels, media arts classes, or storytelling projects. It was exciting to hear how quickly educators began imagining ways to bring the activity into their classrooms.
Digital Playground Sessions
Throughout the conference we also hosted sessions on the Digital Playground stage. These sessions focused on approachable ways educators can bring digital art into their classrooms.
Michele kicked things off with Chromebook Creativity: Quick and Free Digital Art Tools, showing how teachers can transform everyday Chromebooks into creative studios using free web-based art applications. The session highlighted tools students can use for drawing, painting, design, and mixed media projects without needing to install any software. Many educators appreciated leaving with ideas they could implement immediately in their classrooms.
Sarajean led Creating Comics with CLIPSTUDIO, which introduced the comic creation workflow using CLIPSTUDIO PAINT. The session walked through pencils, inks, color, layout, and text while also exploring how teachers can structure their classroom like a comic studio.
Christopher presented Digital Illustration 101, a welcoming introduction to the fundamentals of digital illustration. Educators explored the basics of sketching, rendering, coloring, and shading while learning techniques that help student work look intentional and polished. The session emphasized that these principles apply regardless of which drawing software teachers are using in their classrooms.
Sarajean Chung also hosted a thoughtful session titled Why Make Art When AI Exists? This session explored one of the most common questions facing creative classrooms today. The discussion focused on helping students develop a strong artistic foundation, encouraging persistence through challenges, and building a healthy mindset around creativity and problem solving in a rapidly changing technological landscape.
Hands-On Creativity at the Wacom Booth
The Wacom booth stayed busy throughout the conference as educators explored Wacom products.
Many visitors were interested in how digital tools can support traditional art practices, while others wanted to explore which devices work best for illustration, animation, and design. Some stopped by for a quick demo while others stayed longer to draw, sketch, and ask questions about bringing digital creativity into their programs.
What stood out most was curiosity. Educators were eager to learn how these tools can help students express their ideas, build new skills, and explore creative career pathways.
A Community That Inspires Us
One of the most meaningful parts of NAEA each year is the opportunity to spend time with such a passionate group of educators. The dedication art teachers show in helping students discover their creative voice is inspiring.
At Wacom, we are proud to support this work by providing tools, classroom resources, lesson ideas, and professional learning opportunities for educators.
Until Next Year
Thank you to everyone who visited the booth, joined a session, created an Art Hero, or simply stopped by to say hello. These conversations and connections are what make NAEA such an important event for our team each year.
We are already looking forward to gathering again with this incredible community. See you in New York for NAEA 2027!
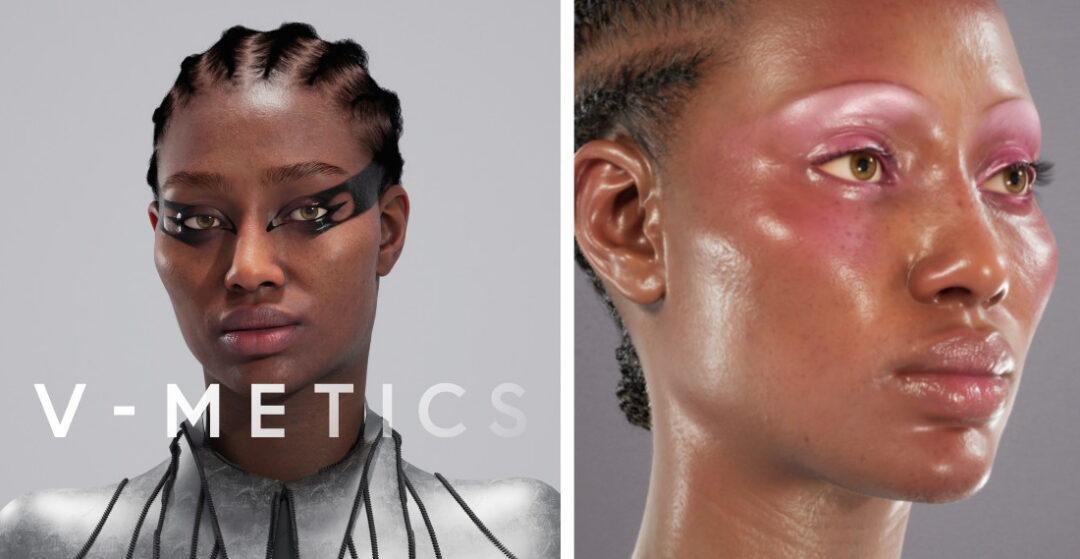
]]>A pioneer in merging the physical and the digital – which she often refers to as “phygital” – she’s making major waves in the beauty and tech industries with V-METICS, “an intuitive virtual cosmetics software that brings real artistry to the digital sphere for the first time.”
Who is Alex Box? What is V-METICS?
Dr. Alex Box is an artist and beauty industry legend. She headed up Creative Direction for “anti-conformist” beauty brand Illamasqua, has collaborated with Alexander McQueen, Frank Ocean, Lady Gaga, and many more, worked with Chanel, Esteé Lauder, and NARS, as well as tech companies like Epic Games and Microsoft, joined the British Beauty Council in 2023, and was recently named one of Vogue Business’ 100 Innovators for 2025 as a Beauty Disruptor.
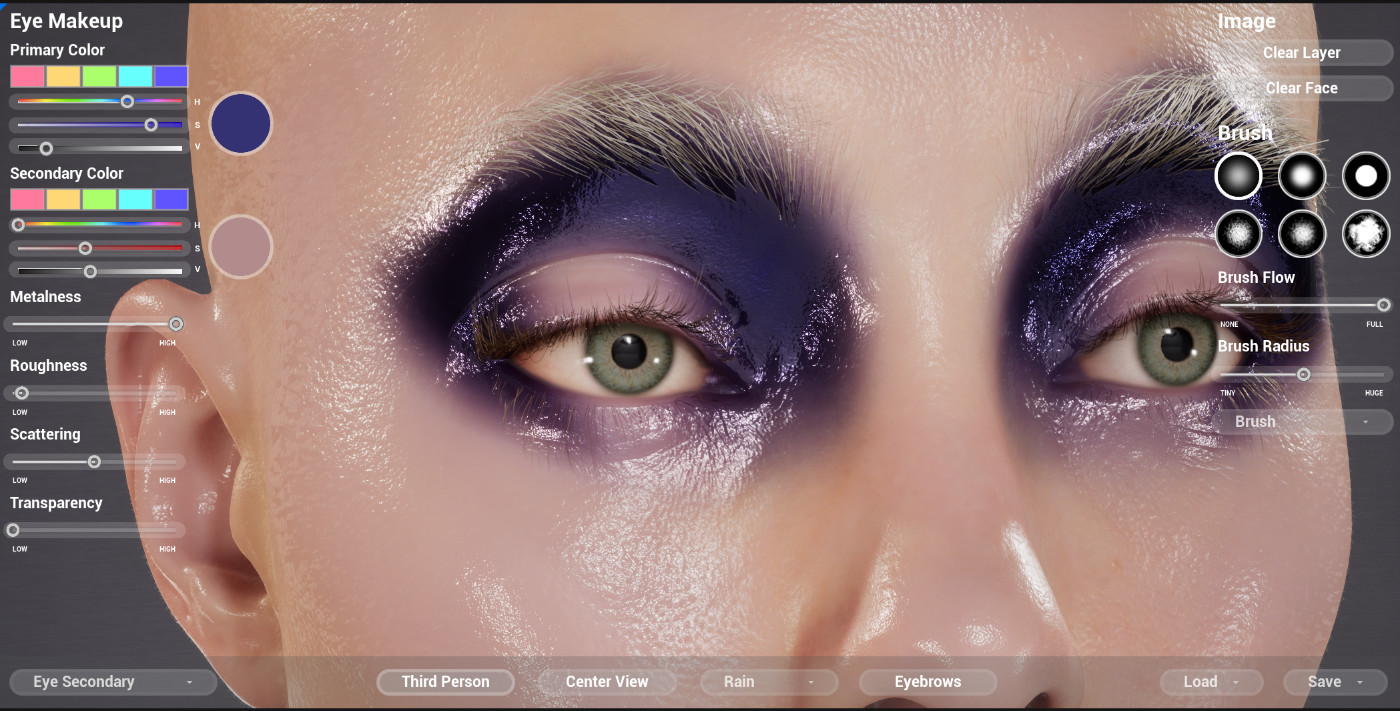
V-METICS is software that allows anyone to “apply real-world cosmetics to a digital human avatar in a 3D environment.” This is a major game-changer for the cosmetics industry, as it can allow rapid experimentation without real-world constraints such as time or the need to physically apply and remove makeup. It goes way beyond AI-generated looks, applications that auto-apply makeup, or simply clicking buttons and moving sliders, however.
With V-METICS, a series of potential looks can be explored quickly – but, because V-METICS “accurately simulates the real physics of materials and light applied to the skin,” it can utilize the power of Wacom precision to paint makeup intricately and intentionally, just like in real life. It harnesses the power of digital technology while keeping the essential human touch intact.
We spoke with Dr. Box about her background, her inspiration, and her work. That interview is below. Note: the following interview has been edited for length and clarity.
You were an early adopter with digital art and have been working with digital creative technology since the 90s. How were you first introduced to digital art, and what drew you to it?
I have always been curious about emerging techs possibilities to transform and transmogrify. Being born in the 70s and exposed to art and experimental music by my dad, listening to David Bowie and Brian Eno sonically shaped me. Anything seemed possible through art and technology.
How do you feel about art school? Would you recommend a young artist go to art school in 2026, or would they perhaps be better off teaching themselves?
Firstly, all further education should be free! I went to art school in 1991 and had a grant, which was an enormous privilege looking back. Kids now have so much anxiety, debt, and pressure before they even consider the arts. The art school era I inhabited was a time of friction, stumbling between the post 60s “starving artist as honorable” mantra trotted out by older lecturers, and the 90s YBA “loadsa money” mantra of Thatcher’s kids.
Confusing times, but I flourished, largely down to the three key elements the art school environment brings – time, space and context. That is what art school enables; the time to develop a deeper practice with critical reasoning in a social context of fellow young artists. It’s a biome, and that’s very hard to do alone.
For someone who has been working with digital art tech for decades, much of your work over the years has been very physical – costumes, prosthetics, makeup, even experiential exhibitions that are tied to a time and place and physicality. How have you approached the relationship between the physical and the digital over the years?
The relationship is symbiotic because they are all facets of my communication and discourse with the world, resulting in my art as the semiotics of that coexistence. I’m going to drop the word “PHYGITAL” here, as it’s a perfect descriptor of what my work has become, the physical and the digital combined.
I see digital as I see clay, makeup or dance, a communication tool of raw expression. I’ve always been excited by expanding that expression dimensionally, joining fields of experience and expertise together through the seamless language of creation. There is now less separation between physical and digital, and that prismatic existence needs to be reflected in the tools we use to create. The problem is that we are in an age of polarity where everything is being pushed to extremes, unification is what is needed to answer both knowledge and tacit skills.
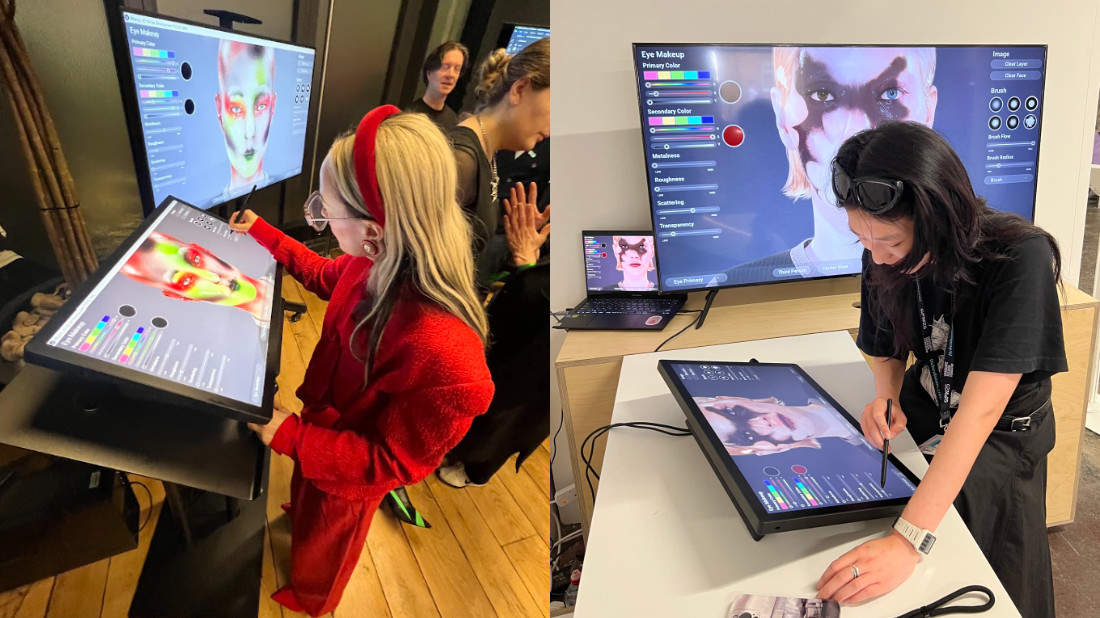
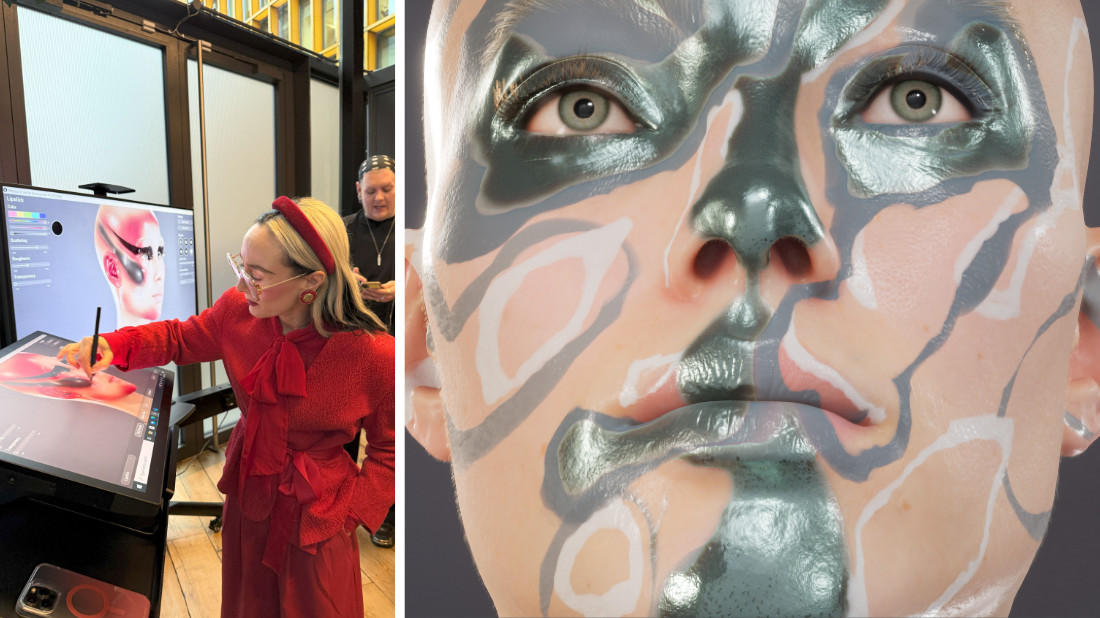
How have Wacom products facilitated your ability to bring the digital and the physical together?
V-METICS’ mantra is “preserving the human hand in a digital era,” and for an artist whose entire expression is through gesture and emotional application, Wacom creative pen tablets and displays provide that intuitive and seamless experience. Pairing our intuitive software tools with the Wacom Cintiq Pro has been a transformative experience. We have been out demoing to the education and artists community, seeing in real time how these tools can remove barriers to entry for traditionally trained artists and practitioners. This democratic approach has enabled new students and mature artists alike to jump into tech without hesitation.
You originally came to working with makeup almost by accident – by collaborating with a fashion designer on costuming and prosthetics. How did that happen, and how did you realize that you wanted to move into having a major emphasis on beauty and makeup in your work?
As a fine artist, my work was and is largely centered on the body and environment, movement and visual language. I have always naturally explored how to extend ,distort and transform the body which led to me experiment with prosthetics and cosmetics to support the desired effects and achieve the desired narratives. My early work was in performance and body transformation that drew parallels with artists like Rebecca Horn, Cindy Sherman and Matthew Barney. I examined the beauty and fashion world as motif and metaphor, and this drew attention from the ‘actual’ fashion world.
My first show drew designers and fashionistas interested to see the discourse of identity and fashion from this young installation artists perspective. A fellow artist introduced me to a brilliant young fashion designer named Philip Delamore, who was exploring similar themes at the cross section of art and identity, and he asked me to collaborate on an experimental fashion performance. The show at Milch Gallery in London was the first time someone called me a ‘makeup artist .’ Utilizing this ‘living canvas’ enabled me to break down many barriers and communicate emotion and complex narratives much more widely and democratically than I could in conventional fine art practice.
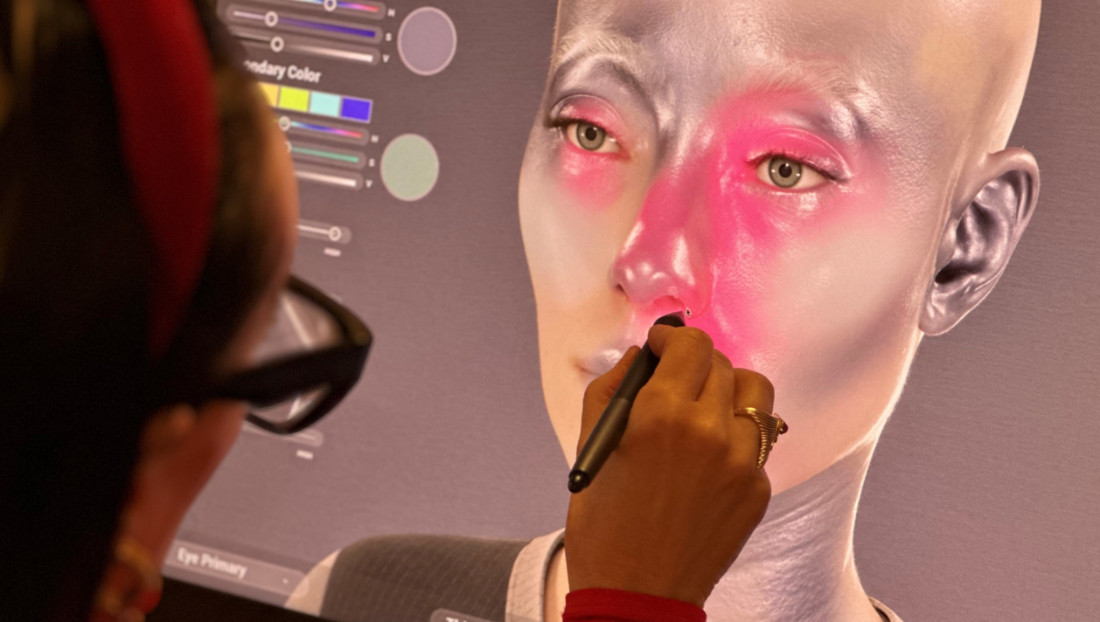
You’ve spoken a lot about the relationship between makeup, fashion, identity, and self-expression, and have been called a “beauty futurist.” What’s on the horizon with respect to the beauty industry? How does what V-METICS is doing play a role?
What’s on the horizon is beauty moving beyond a physical product to something that shapes identity and self-expression in new and emerging spaces. The future of beauty is intentional, collaborative, and creator-led. It’s about forging a new language between creators, brands, and digital marketplaces. One built on transparency, shared value, and real participation. It’s about tools like the ones we are developing at V-METICS that educate and train the next generation, while setting new industry standards for how appearance is captured, rendered, and trusted.
Assets won’t live in silos anymore; they’ll move fluidly across platforms and industries, carrying authorship and meaning with them. Creators and brands will unlock entirely new IP and licensing models, and digital-only product releases will become a means to reduce waste, lowering risk and environmental impact.
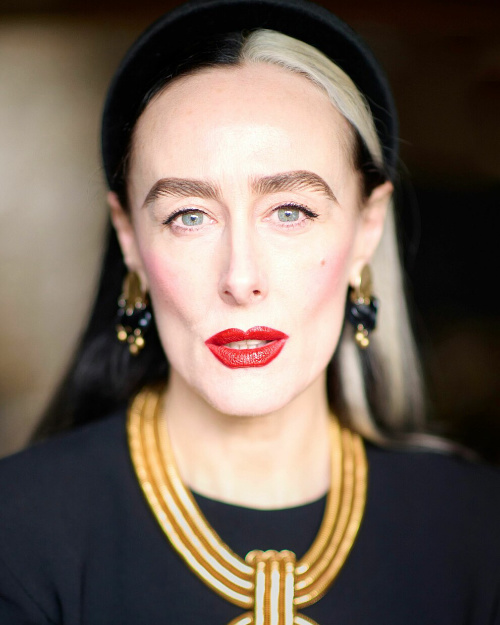
About the artist
Dr. Alex Box is a visionary artist and pioneer of “Beauty Futurism,” redefining creativity in make-up, beauty and identity. Blending art, science and technology, she is a leader in the discussion of how technology transforms identity in both digital and physical worlds.
As CEO of V-METICS, Dr. Alex Box is now transforming the virtual landscape with V-METICS, the first intuitive virtual cosmetics brand.
Follow her work on Instagram or check out V-METICS.com.
Anachronism in Action: I’m Supposed to Draw What?
When I set out last October to give a sketching demo on my brand new Wacom tablet, I didn’t know what Köln’s audience had in store for me. It had been a while since I last spoke at the SAE Alumni conference, and I wanted to address a topic that is often at the center of my work as a storyboard artist: “How do we cram three characters into a shot, and still make it read at a quick glance?” I came prepared with THREE topics to guide us safely to our goal … and then the audience threw me a curve ball!
Watch the video above to see the drawing process – and how the audience plunged me deep into anachronism! I was filmed unscripted and live on stage at the Palladium in Cologne, Germany, during the SAE Alumni Conference in October 2025. Tools used were the Wacom MovinkPad Pro 14, the built-in sketching app Wacom Canvas, and CLIP STUDIO PAINT EX. Well, and a few years of experience drawing professionally for games like Horizon Forbidden West, Avatar: Frontiers of Pandora or Tomb Raider: Legacy of Atlantis. But let’s dive right in!
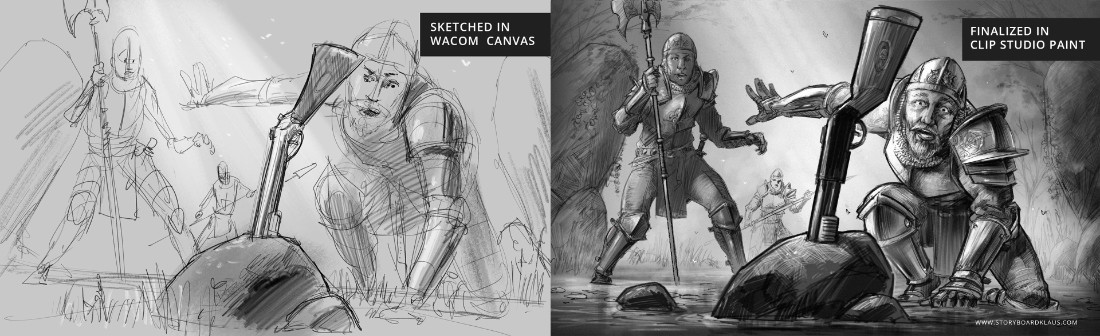
What do Pythagoras, the Pope, and a Storyboard Artist Have in Common?
Answer: They all think the number THREE is magical!
I can only speak for the latter, but let me break it down for you what this “divine digit” can mean for you in the context of setting up a complex shot that nicely guides the viewer through the image without overwhelming them. Here are the three main techniques to keep in mind. Beginners have to learn them, professionals have to live them:
- Rule of Thirds,
- Family of Three, and
- Three planes of depth.
Please note that, ideally, you think of these already as you are sketching. If you tackle them only in the rendering phase of the drawing, you will come to notice that you wasted a lot of time and energy during sketching – and no professional artist has time for that!
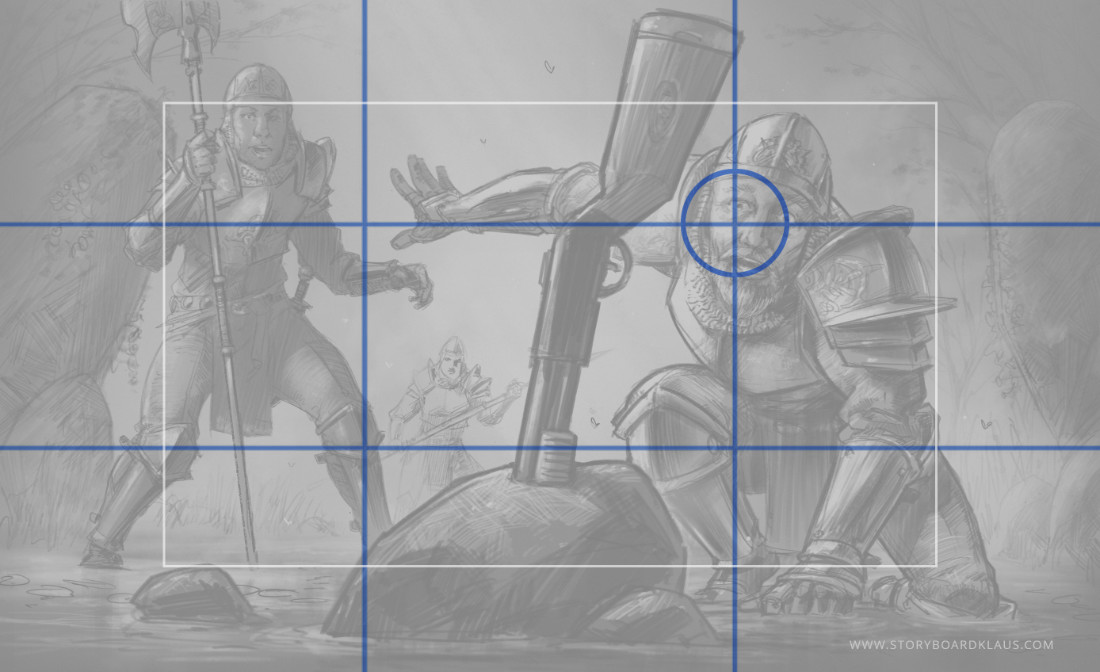
Rule of Thirds: Meet me at the Crossroads!
The Rule of Thirds directs us to draw lines (in the above illustration, they are blue) to separate a frame into thirds and place important storytelling elements where the lines cross. There is nothing magical about these points, however. What is important is keeping everything central to the narrative in a virtual “live area” (the white outline above) and guiding the beholder’s eye into the composition without letting it escape. Having major storytelling elements on the edge of the frame would be detrimental to that.
As you can see, I placed the main character’s face on one of the crossing points (the blue circle). Now, how important is the knee of the knight with the halberd on the left, you ask? It’s not important at all. It’s only relevant that the character’s face is not too high so he doesn’t lead our gaze out of the picture; that knee ending up on the other cross point is just due to the circumstance of the posing.
The shotgun is placed centrally in the middle, cementing it as the main element (I spoke more on that topic in the video above). The shotgun is also most important because there is only ONE of it. And this brings us to our next point.

2) Family of Three: Repeat, Resize, Rearrange
We hate repeating ourselves, that’s why smart people never do it in the same way. This technique is as simple as it is effective: Always include elements that you repeat in big, medium, and small versions. Indeed it doesn’t always have to be three, because nature doesn’t repeat itself with intent like that. How many different sized rocks can you spot? Could I have done a better job and vary it more? Perhaps I could even have included rock elements in the near foreground to give the camera a nice frame to peep through. Is this necessary however, or does this composition already work as is? That’s where your personal taste comes in. No drawing tool will make these decisions for you, but that’s exactly why we are fans of specific artists – we like their taste!
Notice how the knights are shown, varying in size but also in pose. They are indeed the core of the storytelling in this image. Their poses are going from holding their weapon ready with both hands (the one farthest away from us), to freeing a hand to potentially grasp at the central object (the knight on the left), to kneeling down and establishing contact with the ground with one hand while using the other to keep his comrade back (the knight nearest to us).
The main knight has obviously dropped his staff weapon already (as it’s not visible in the frame), thus giving him more opportunity to act. This diversity in pose gives us a form of sequential storytelling; an illusion of movement, all in one single shot. What it also does is give us what is called a scale cue. Assuming human beings of similar age are also of similar size we can deduct that the smallest knight is also the furthest away from the camera. I have also employed another technique to help with creating depth, and it’s the following.
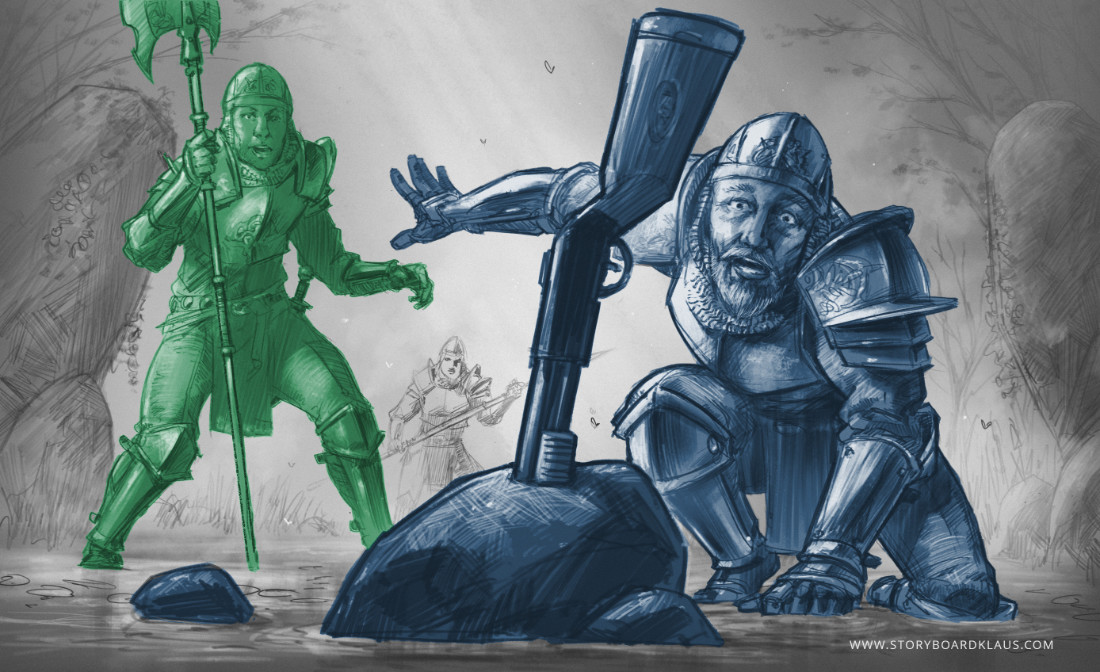
3) Three Planes of Depth: Values, Detail, Color
I am aware we don’t have color in this one; blue and green are just to identify planes of depth. Storyboard artists rarely use color, but if you check out our recording of the live demo, you will notice me addressing what is called stage lighting in this context, i.e. the purposeful changing of the light’s color depended on how far from the observer we are. The big point here however, is that depth is more important than almost anything else. Techniques like overlap and scaling – see above – are great for creating depth, but so are value and detail.
Notice how the main subject of our image is the knight up front getting a close up look at the shotgun (blue). We use the darkest areas and biggest amount of highlights for everything on this plane. We draw the most texture on the uniform, show ornaments on the pauldrons (armor), and give the face the most rendering; we create the most volume and employ strong outlines on this main character and his object of desire thereby making them pop to the front of the stage.
Compare this to our second knight character (green, the middle plane). No black areas, less highlights, thinner line work and no separating outline. The overall shape is just a medium grey flat area, something I haven’t even done for the third one. The third and smallest knight is very washed out, and his face is so rudimental that we can’t even discern eyeball from eyebrow. He becomes one with the background plane. It’s very easy to zoom in on a digital drawing tool in order to draw all that detail; not giving in to this takes restraint. And that was actually my last point for today.
Stop While You Can!
I started out as a comic book artist for Heavy Metal Magazine 20 years ago, so I am very prone to over-rendering, i.e. “drawing details where we know they are, but our eyes normally wouldn’t actually perceive them.” That said, details in comic books can work slightly differently than in storyboarding, and I’m happy to talk about that another time.
Case in point, I’ve just started on a comic book short story for publication later in 2026, which is easy because the Wacom MovinkPad line comes with a free trial license for Clip Studio Paint, the preferred drawing app for Mangaka and comic artists around the globe.
I hope I could inspire you to pick up the pencil or stylus yourself and give it a shot (no pun intended)! Looking forward to catching you on another digital excursion or at a real-life game, art, or animation event soon!
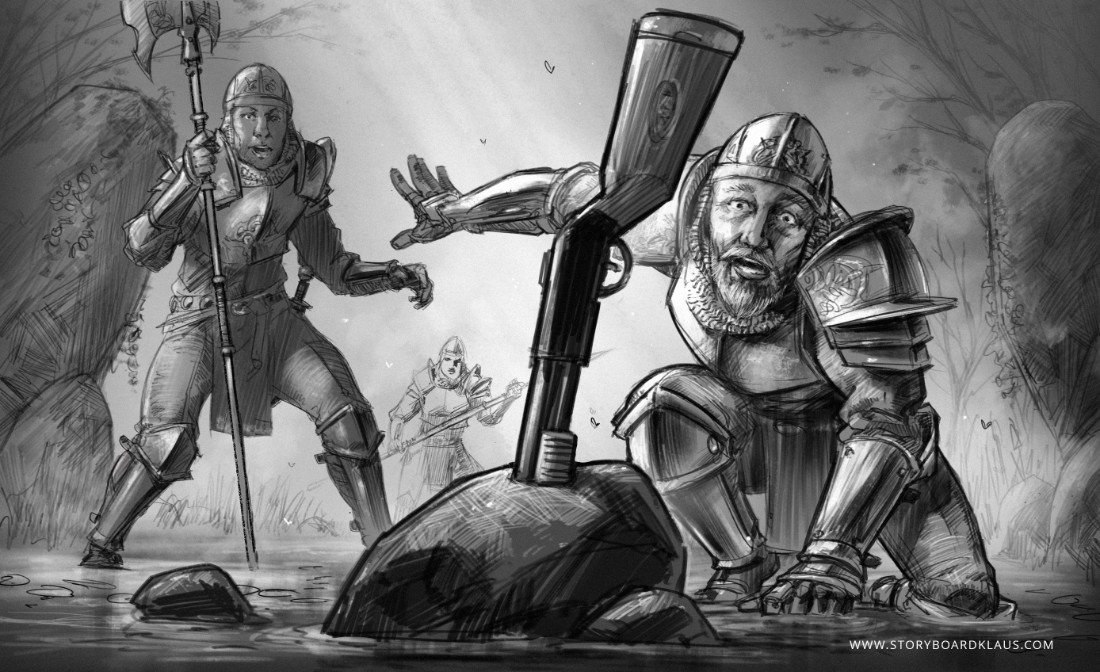

Klaus Scherwinski is a veteran storyboard artist who contributed to games like Tomb Raider: Legacy of Atlantis, Avatar: Frontiers of Pandora, Horizon Forbidden West, and many other projects. When he doesn’t give master classes on visual storytelling he is very busy creating concept art, comic books, illustrations and indeed storyboards for clients around the world.
Follow his work at his website, Instagram, or ArtStation.
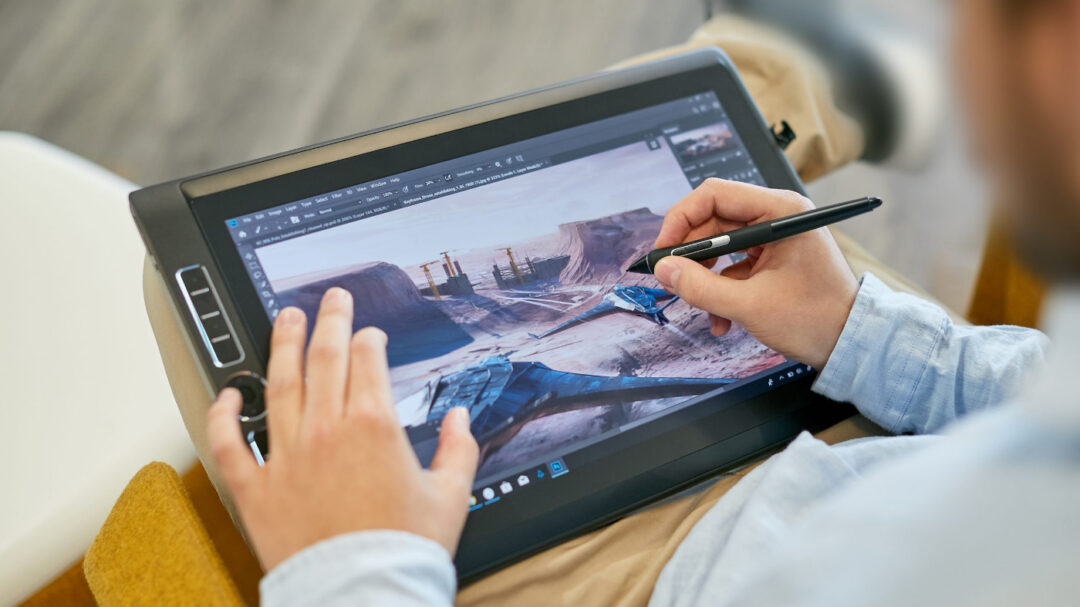
What was the Wacom MobileStudio Pro?
If you’re a young person or new to Wacom, you might not even be aware of the Wacom MobileStudio Pro! Produced from 2012-2019, MobileStudio Pro was a standalone portable pen display that could run full desktop Windows software. It was essentially a high-end laptop computer, but with a touch- and pen-sensitive Wacom display, in a “slate” configuration – no folding!
Over its life, it came in a variety of sizes and models, with a variety of different specifications. But its intention was to be a professional level, full-featured mobile pen display computer so that professional artists, designers, and creators could bring their studio setup wherever they went. It was very powerful – but also very large, very heavy, and – according to some – very expensive.
The latest version of MobileStudio Pro was released in 2019. Because it was the last model released, with the most modern specifications and features, I will use it for purposes of comparison for the rest of this article.

What is Wacom MovinkPad?
The Wacom MovinkPad 11 and MovinkPad Pro 14 are Android-based portable drawing pads released in 2025. Like MobileStudio Pro, they are all-in-one devices that do not have to be connected to a computer to function. Unlike MobileStudio Pro, Wacom MovinkPads run on the Android operating system, meaning they can run mobile versions of many creative software applications, including pre-installed Wacom software such as Wacom Canvas and other drawing apps like Clip Studio Paint and IbisPaint. They are extremely thin and light, and are considered by many to be very affordable.
Wacom MovinkPad 11 is an entry-level portable drawing pad, while both MovinkPad Pro 14 and MobileStudio Pro were intended for more advanced users – so for the rest of this article, I will focus on MovinkPad Pro 14 for the purposes of comparison.

Why did Wacom make the MovinkPad instead of another MobileStudio Pro?
Over the last 10 years, mobile software capabilities have improved by leaps and bounds, leading many software manufacturers to produce Android-compatible versions of their software. Wacom created an Android version of the MobileStudio Pro years ago called the Cintiq Companion Hybrid, but it wasn’t as successful partially because the Android software environment wasn’t as robust as it is now.
At the same time, computer technology improves so rapidly that many Windows-based PCs become outdated very quickly. With current technology, however, a mobile-first device doesn’t suffer as much from this issue from both a hardware and a software perspective.
Finally, the progress made by Wacom in its manufacturing meant that creating a truly thin, light, and robust portable display tablet was finally possible at an affordable price point.
All of this together led Wacom to create the Wacom MovinkPad line: a high-end yet affordable portable display tablet line based on the flexible, robust Android operating system.
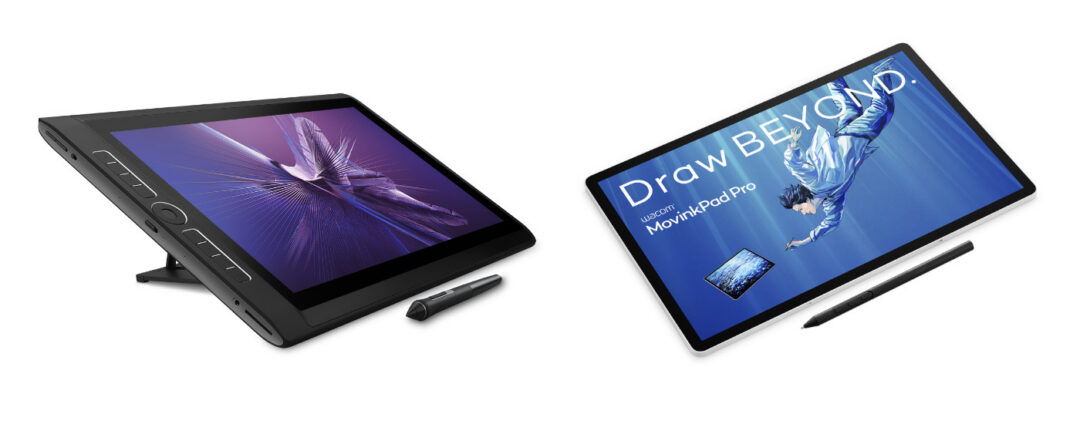
What are the most important differences between MovinkPad and MobileStudio Pro?
The table below highlights the primary differences between MobileStudio Pro and MovinkPad Pro 14:
| MobileStudio Pro 16 (2019) | MovinkPad Pro 14 (2025) | |
| Operating system | Windows | Android |
| Software | Windows desktop software | Google Play mobile software |
| Size | 16” | 14” |
| Display type | LED | OLED |
| Display active area | 13.6” x 7.6” | 11.9” x 7.4” |
| Display resolution | 4K (3840 x 2160) | 3K (2880 x 1800) |
| Display glass | Anti-glare textured glass | Premium Textured Glass (anti-glare, anti-fingerprint, anti-reflection) |
| Color depth | 8bit | 10bit |
| Color coverage | 85% Adobe RGB | 100% SRGB, 100% DCI-P3 |
| Display contrast ratio | 850:1 | 100,000:1 |
| Brightness | 250-310 cd/m2 | 400-900 cd/m2 |
| Weight | 4.7lbs | 1.6lbs |
| Thickness | 21mm | 6mm |
| Included software | Bamboo Paper, Artec 3D | Wacom Canvas, Wacom Shelf, Clip Studio Paint, ibisPaint, ArtWod, Magma, Wacom Lab, and more |
| Pen display mode | Included | Beta feature w/ Wacom Lab |
| Included stylus | Pro Pen 2 | Pro Pen 3 |
| Included memory / storage | 8GB memory / 512GB storage | 12GB memory / 256GB storage |
| Upgradable? | Upgradable memory & SSD storage w/ “Backdoor” feature | MicroSD slot for upgradable storage |
| SRP at launch | $3,499.95 | $899.95 |
The most significant difference for most users is the operating system: MobileStudio Pro was a Windows-based computer, and MovinkPad Pro 14 is an Android-based mobile device. While the MobileStudio Pro could run full desktop Windows software, MovinkPad can run any application available in the Google Play store.
Another major difference is the size, weight, and form factor: MovinkPad Pro 14 is much slimmer, lighter, and more portable than MobileStudio Pro was. It has a thinner bezel, so even though the 14” MovinkPad Pro is quite a bit smaller overall, the active area of screen size is nearly as large as that on the 16” MobileStudio Pro.
In terms of technical specifications, MobileStudio Pro was a very high-end device for its time. It had a 4K display, and the MovinkPad Pro 14 has a 3K display – but in every other sense the MovinkPad Pro is an upgrade. It has an OLED display, for deeper blacks, a higher contrast ratio, more color depth, and has a much wider range of color accuracy. All of this is true even though the MovinkPad Pro 14 weighs much less and is much thinner.
A final difference is that the MobileStudio Pro was intended for professionals who needed an all-in-one portable studio setup. It had the highest-end components and could be used as a primary, start-to-finish device on which professionals could complete studio-quality work.
While MovinkPad Pro 14 uses the top-of-the-line Wacom Pro Pen 3, has a high-resolution screen and a fast processor, and can use a host of great Android versions of creative software applications, it isn’t quite as capable as a dedicated high-end pen display like Wacom Cintiq Pro. This is reflected in the price – the MovinkPad Pro 14 at launch retails for approximately one-quarter of the price that the MobileStudio Pro did in 2019.
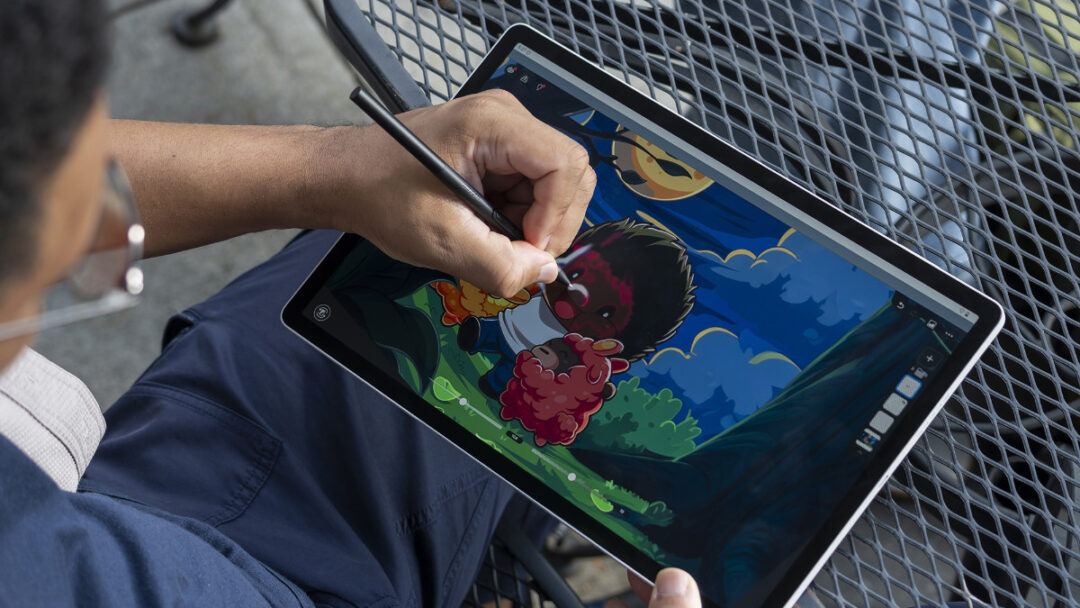
The final word: should I upgrade from MobileStudio Pro?
If you’re a current MobileStudio Pro user looking for a modern upgrade, the MovinkPad Pro 14 might be a good fit for you, especially if your preferred software is available on Android.
If your preferred software is not available on Android, however, or you’re a professional who needs top-of-the-line performance for extremely large canvases or 3D work, then harnessing the power of your computer is likely necessary. A Wacom Cintiq or Cintiq Pro are great pen display options if portability isn’t a major need.
The best way to streamline your setup for portability, though, while getting the highest performance, is with the Wacom Movink 13 pen display. It has a Full HD, OLED display, comes with Wacom Pro Pen 3, is extremely thin and light, and connects to most laptop computers with only a single USB-C cable.
Frequently Asked Questions
Is the MovinkPad Pro the new MobileStudio Pro?
What was the Wacom MobileStudio Pro?
What is Wacom MovinkPad?
Why did Wacom make the MovinkPad instead of another MobileStudio Pro?
This, combined with the progress made by Wacom in its manufacturing over recent years, meant that creating a truly thin, light, and robust portable display tablet was finally possible at an affordable price point. All of this together led Wacom to create the Wacom MovinkPad line: a high-end yet affordable portable display tablet line based on the flexible, robust Android operating system.
What is the difference between Wacom Movink and Wacom MovinkPad?
What are the most important differences between MovinkPad and MobileStudio Pro?
Another major difference is the size, weight, and form factor: MovinkPad Pro 14 is much slimmer, lighter, and more portable than MobileStudio Pro was. It has a thinner bezel, so even though the 14” MovinkPad Pro is quite a bit smaller overall, the active area of screen size is nearly as large as that on the 16” MobileStudio Pro.
In terms of technical specifications, MobileStudio Pro was a very high-end device for its time. It had a 4K display, and the MovinkPad Pro 14 has a 3K display – but in every other sense the MovinkPad Pro is an upgrade. It has an OLED display, for deeper blacks, a higher contrast ratio, more color depth, and has a much wider range of color accuracy. All of this is true even though the MovinkPad Pro 14 weighs much less and is much thinner.
Finally, the last time it was released, Wacom MobileStudio Pro retailed for $3,499 USD, while Wacom MovinkPad Pro retails for much less at $899 USD.
We wanted to know more about Chelsea’s background, inspiration, and how she transforms her drawings into felt sculptures. We also thought that, as a busy artist, she might appreciate the portable potential of the Wacom MovinkPad Pro 14 all-in-one drawing pad. She did, and made a video showing the behind-the-scenes process of going from digital illustration, created on the Wacom tablet, to adorable felt creation. We also spoke with her about her background, process, and any advice she has for young artists. The interview and video are below! Note: the following interview has been lightly edited for length and clarity.
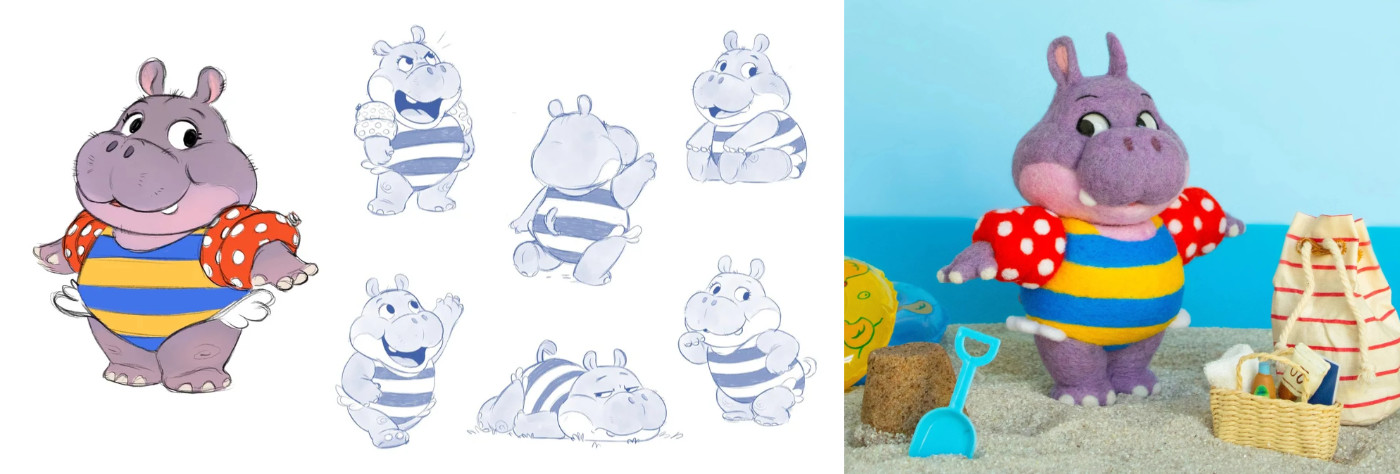
You’ve said that you were considered the “artist kid” as early as elementary school. But how did you get there? Were your artistic passions nurtured early on?
My mom is an artist, so art was part of my life from a very young age. She taught me foundational skills, and I grew up watching her draw and work with clay. I thought it was the coolest thing and wanted to do the same. Both of my parents were very supportive, and that encouragement made a huge difference!
A lot of young creatives consider art school; you decided to get an art degree at a traditional university. How did you make that decision? Would you advise a young artist to go to art school in 2026 – or is doing an art degree at a four-year school, or perhaps even self-teaching, a better idea in your opinion?
College was always part of my plan, and at the time it felt like the clearest path to building professional-level skills. I valued the structure, feedback, and built-in creative community. Today, there are more ways to learn than ever, and a self-directed artist can absolutely develop strong skills without a traditional degree. What matters most is discipline, consistency, and actually putting in the work to improve. A degree can help, but it cannot replace initiative.
You focus a lot on animals in your work. Is that a remnant of your early interest in science and biology? What is it about animals that inspires you?
I’ve loved animals for as long as I can remember. I was always checking out animal books from the library and sketching from encyclopedias at home, so that interest has always been there. I also care deeply about animals and conservation, so it’s more than just a drawing subject for me. They’re endlessly inspiring as an artist; their shapes, personalities, and behaviors spark ideas, and I love that art can help people notice and appreciate them more.

Your work is incredibly clean, with precise line work and color blending, in a somewhat traditional cartoon aesthetic. How did you develop your style? What advice might you have for young artists who are trying to develop their own Style?
My style has taken years to develop, and it’s still evolving. It grew out of consistent drawing, studying artists I admire, and gradually gaining clarity about what I want my art to feel like. For young artists, my advice is this: study what you genuinely love, experiment freely, and over time your style will start to feel like your own.
You’ve gotten your hands on the Wacom MovinkPad Pro 14 recently. How has your experience been so far? How has it added to and/or improved your digital art workflow?
I’ve really enjoyed the MovinkPad Pro 14. One of the best parts is its flexibility – I can use it at my desk, on the couch, or even at the zoo, which makes it easy to keep drawing wherever inspiration strikes. I’m also excited that it can function as a pen display, making it even more versatile. I like that the pen feels light and natural, the screen has a great drawing feel, and the size strikes a perfect balance – portable, but still large enough to work comfortably.
In addition to your digital work, you’ve been working on extremely cute needle felt sculptures. They are as meticulous and adorable as your illustrations. How did you go about pivoting in such a different, but complementary direction? From digital to truly physical, in-your-hands work like these sculptures?
I’ve always loved sculpting, so working in a physical medium feels very natural to me. Even as a kid, I made oven-bake clay pieces and sold them to friends and family. When I discovered needle felting, it felt like a natural extension of my character design work. I loved the idea of taking something that started as a drawing and turning it into something you can physically hold. That transformation still feels incredibly satisfying, and it has become a distinctive way to make my work stand out. Plus, the texture is unmatched!
You’ve talked about how you believe young artists should think more about the business side of art. Why is this so important for young artists, and what are a few of the most important things they should look into if they’re thinking about a future creative career?
I think it’s more important than ever for artists to understand the business side of their work, because talent alone isn’t enough to build a sustainable career. The industry is competitive, many roles are project-based, and artists have to be proactive. Young artists should learn the basics of marketing, networking, contracts, and financial management. Understanding how to price your work, negotiate respectfully, communicate clearly, and build long-term relationships is just as important as improving your craft. You don’t need to become a business expert, but you do need to treat your art like a business if you want it to support you!

About the artist
Chelsea Trousdale is a character designer and illustrator known for bringing original work to life through drawing and needle-felt sculpture, helping redefine modern, character-driven needle felting. Her work includes projects with DreamWorks TV, Epic!, and Moon Active. Her original creations are at the center of a growing brand, with needle felting as one of its signature forms.
Follow her work on her website or on Instagram, Facebook, YouTube, or LinkedIn.
Amazing stroke performance isn’t all – it’s also customizable through different grip and button configurations, multiple nib options, and an adjustable weight so it can be perfectly calibrated to your exact specifications.
Different Pro Pen 3 models
A couple different models of Pro Pen 3 have been released. the Pro Pen 3 that comes with Wacom Cintiq Pro 27 and Wacom Intuos Pro includes the full customization kit, including button plates, internal adjustable weight, and grip options. But the Pro Pen 3 that comes with Wacom Movink 13, Wacom MovinkPad 11, Wacom Cintiq, and Wacom MovinkPad Pro 14 is a special, slimmed-down Pro Pen 3 built for portability and efficiency – it comes with integrated nib storage rather than the full customization kit.
Wacom Pro Pen 3 Customization Kit now available
If you purchased a device that came with a slimmed-down Wacom Pro Pen 3, you can now purchase the customization kit separately, so you can fully customize your Pro Pen 3! The Customization Kit includes a straight grip, flare grip, tall side switch insert with no buttons, tall side switch insert with buttons, short side switch insert with no buttons, short side switch insert with buttons, and balance weight.
The Pro Pen 3 Customization Kit is now available at the Wacom eStore. Click here to learn more or to purchase.
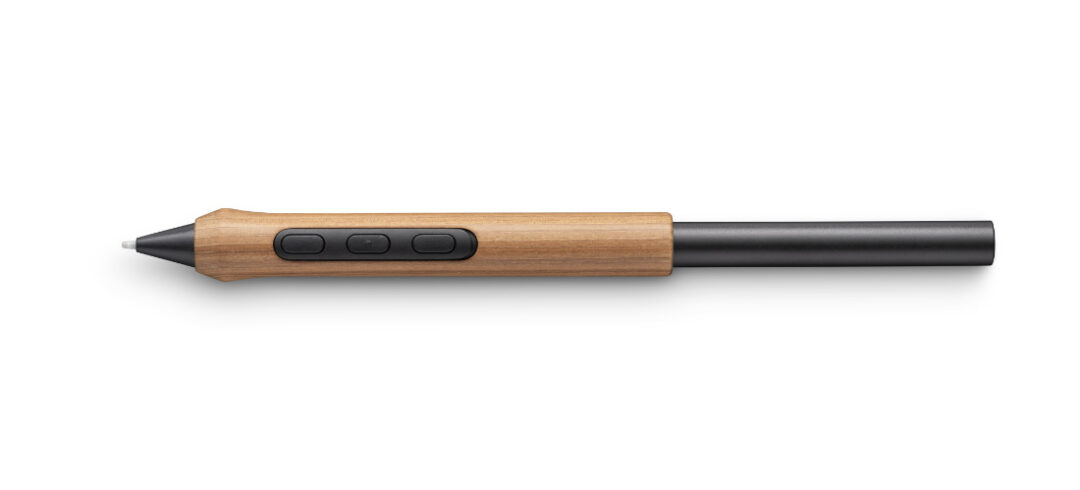
Another option: Wacom Pro Pen 3 Wood Grip
There’s also another way to add a bit of distinctive style to your workflow: the Wacom Pro Pen 3 Wood Grip. Each grip is crafted with grain patterns that elevate your Pro Pen 3 to a sophisticated tool. Click here to learn more or to purchase.
Frequently Asked Questions
What is Wacom Pro Pen 3?
Which Wacom devices is Wacom Pro Pen 3 compatible with?
Which Wacom devices come with the slim Pro Pen 3, and which come with the standard Pro Pen 3?
What are the differences between the slim Wacom Pro Pen 3 and standard Wacom Pro Pen 3?
What is included with the Wacom Pro Pen 3 Customization Kit?
What is the Wacom Pro Pen 3 Wood Grip?
Ever since I was a child, I’ve been naturally drawn to art. I was constantly coming up with different worlds and stories, drawing every chance I got. I carried a sketchpad and pencil with me everywhere, and by high school, most people didn’t even know my real name; they just called me “Art Kid” or “Art Girl.” In class, I could never just sit quietly, I had to be drawing! I’ve always loved creating original, fun characters and adding strange, colorful motifs to my art. While pursuing a creative path can be challenging, I believe that with consistent effort and dedication, I can turn my passion into reality one day.
My background and inspirations
I grew up deeply immersed in cartoons. They were all I watched, drew, and thought about. When I got older and became more well-versed online, I discovered a whole world of independent animators. I always assumed the only way to produce a show or become an animator was to attend an expensive art school, work at a major studio for years, and maybe one day have the chance to pitch a concept. It was inspiring to see small creators cut out the middleman and produce projects independently with small teams, crowdfunding through enthusiastic audiences.
I think both paths are equally important and commendable, but recently the world has opened up so much for animators, leading to more opportunities in the future. My art takes a lot of inspiration from the online content I consumed as a child. I loved YouTube, because I could watch cartoons that mainstream television wouldn’t air. I was immersed early on in a community full of creativity and fresh ideas. I liked how unsanitized some of the animation was.
That introduction to online animation was an amazing part of my life and encouraged me to break out of conventional animation norms. That’s why I gravitate toward bright, saturated colors, bold patterns, varied textures, and chicken-scratch line art. One of my dreams has always been to find the right audience for my art. If other creators can do it, so can I! I just need work, effort, and creativity.
How I’m pursuing my creative dream
My first step was starting a YouTube channel. I celebrated when I reached 50 followers, and as of this writing I just reached over 9,000! On my YouTube channel I post animations, updates on school and classwork, fan art of my favorite characters, and peeks into my sketchbook. What surprised me most about starting YouTube is that people didn’t just connect with my artwork, but with me as a person. I constantly receive comments saying my art brings them comfort and that they enjoy talking with me during livestreams. It’s very flattering to be a small creator and have dozens of people say I’m their favorite artist and that they tune in to every video.
Building community on YouTube
YouTube has allowed me to connect with other artists online. This unique perspective into the online art world has taught me the importance of coexistence. There will always be an artist who’s better than you, especially when you’re still small and independent. I’ve learned not to let this discourage me; instead I’m trying to see it as a goal and a standard to work toward and working to improve yourself. I make art for my audience and to make people happy.
I once saw a wonderful analogy: if you bring a cake to a potluck, and somebody else does too, the guests won’t be upset. They’ll think, “Awesome! There are two cakes at this party!” At the end of the day, there is room for everyone’s cake on the table.
Finding educational opportunties
My journey led me to a conference at my school showcasing Silicon Valley Career Technical Education, a trade school where one of the listed courses was animation. I immediately signed up for a shadow day, and soon after, the course was in my schedule for the following year. SVCTE offers one year of animation coursework, and I saw it as a valuable supplement before going to college to pursue my art career.
I still attend my regular high school every afternoon after SVCTE ends. Because I travel between two campuses, I wake up at 5 a.m., hop on a bus with my fellow animation students, and we arrive to start our day at 7 a.m.!
What I’m learning at SVCTE
At SVCTE, I am learning the fundamentals of animation through hands-on, flexible projects. When I joined the class, I had absolutely no knowledge of animation. The only animation I had done before was a three-frame loop of one of my characters the summer prior. Now I have a sizable portfolio of animations and character designs, and I am developing my own short film for the final project. My teacher, Eric Whitman, has been in the industry for decades and was the Animation Director at Flip Your Lid Studios in the 2000s.
Building community
I still remember an early lesson in class. Everyone was new and a little shy. I only knew one other person: my busmate from my home school. Our teacher was explaining what makes a good character, and told us that all great characters share relatability. A character must not only look interesting but also have feelings: a spark of life.
As I was heading back to my desk, I saw a boy who looked like he was struggling. We started talking, and he explained he was trying to design an alien superhero. I squeezed into his desk space, and we sat elbow to elbow sketching and brainstorming. Soon another student joined, then another, until about five of us were crowded into a tiny space, passing pencils, sketching, and talking over each other. It was one of the first times I truly felt like I belonged in a creative community. I truly believe I found my people at this school! There’s a saying: “It takes a village.” I found my village that day, and my purpose felt clearer than ever: I want to do this as a career. I want to be surrounded by like-minded people who share the same dream of making the world a little more colorful.
SVCTE has been an incredible opportunity, allowing me to meet young innovators and future professionals in the animation industry. The class has helped me hone my skills and grow as an artist.
Technology access
SVCTE’s animation course has used Wacom products for years, including pen tablets and Pro Pens. Because of Wacom technology’s versatility and intuitive design, I’ve been able to focus on learning animation without worrying about complicated setup. I enjoyed using Wacom’s pen tablets so much that I bought a smaller one for personal use outside of class. Wacom was recently kind enough to send me a Wacom One 14 display tablet to try, and I absolutely loved it. The tablet is lightweight, has a nice matte finish that reduces glare, and works great connected to my MacBook. I’ve used Wacom tools to create some of my favorite animations, including my first character lip-sync and a point-and-click flash game.
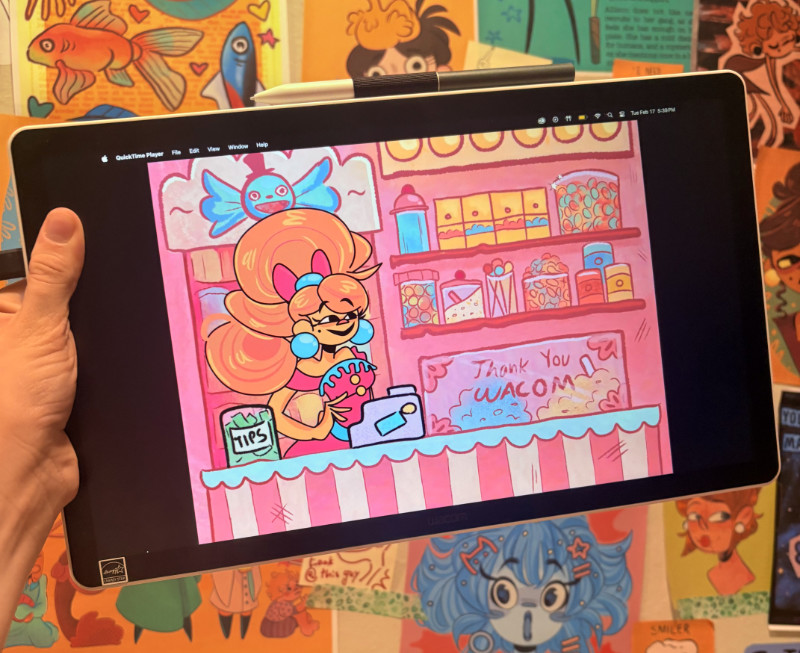
Advice for other young artists pursuing a creative career
If I could give advice to a young artist, it would be not to give up. I know that sounds cliché, but it’s true. When I started, I was a rookie. I struggled with drawing, had no social media following, and no animation experience. I knew I wanted an art career but had no idea where to start, and I doubted whether I had the talent. I felt silly telling people about my dream when I had nothing to show for it. So, I created something to show – I started a YouTube channel and posted every day for nine months straight!
There will always be people who doubt what you do, but their disbelief will never outweigh the effort you put into what you love. I researched programs like SVCTE. I carried a sketchbook everywhere and filled pages daily. I entered contests: even if I didn’t win, I could say I tried. I put in the effort, and I had the privilege of watching my progress grow over time. The day you plant the seed is not the day you eat the fruit, as the saying goes.
My dream for the future
In ten years’ time, my dream is to be working for an independent animation studio that produces cartoons for the internet. Realistically, I would be happy working at any studio, independent or mainstream, as long as I get to create for a living and make people happy with my art. I am nowhere close to achieving my dreams; I’m just getting started. My next steps are college and further professional training. I didn’t give up, and my hard work has led me somewhere wonderful so far!
I believe that dreams come true through belief, hard work, and dedication. Wherever I end up in the future, I know I’ll still be creating, and that alone makes me excited for what’s ahead.
About the artist
Sonora Rose Ilse is a young artist and animator known as Cowgirl Nanners on YouTube. She is a 17-year-old, self-taught NorCal artist currently attending a SVCTE, a trade school, for animation part-time while also attending classes as a high school junior.
Follow Cowgirl_Nanners on YouTube.
Wacom Bridge
Wacom has developed an innovative technology solution that radically improves working with professional pen tablets and pen displays on supported remote desktop connections.
Inkline, a feature of Wacom Bridge, delivers an average 65% reduction in latency, and its performance is significantly less affected by network ping time compared to other market solutions.
NI SP
NI SP is a leading Remote Desktop VDI and HPC software distributor headquartered in Germany. NI SP provides expert consulting, deployment, and support across a wide range of services, including:
- Remote Desktop solutions with DCV
- HPC EF Portal deployments
- Cloud adoption strategies
- System performance optimization
- Pre- and post-processing workflows
With decades of experience, NI SP’s consultants have supported organizations across industries such as Automotive, Aerospace, Oil & Gas, VFX and Media & Entertainment and more.
Key Benefits of the Wacom Bridge x DCV Integration
Creative and technical professionals working in VFX, engineering, and design often rely on GPU-intensive applications running in the cloud. However, without high-performance pen responsiveness, remote workflows can feel sluggish and disconnected, disrupting productivity and creative flow. This Wacom Bridge x DCV integration closes that gap.
By combining NI SP’s deep expertise in Remote Desktop and HPC environments with Wacom Bridge’s low-latency pen technology, users get:
- Significantly reduced latency
- Consistent performance across networks
- True remote work for creatives
- Optimized AWS-based infrastructure
- Enterprise-grade scalability
As remote and hybrid models continue to shape the future of work, organizations must ensure their infrastructure supports both flexibility and performance. The partnership between NI SP and Wacom Bridge delivers a powerful solution for teams that demand a high-performance computing and precision input, no matter where they are located.
NI SP will offer Wacom Bridge licenses globally available as a standalone solution or bundled with AmazonDCV. Click here to learn more: NI SP Software Shop | NI SP Software
]]>For Yi Chen Hock, known online as chen_dll, it was engineering and electronics – she never even considered going to art school! It’s hard to believe given the technical expertise in her dynamic illustrations, with their muted holographic color palettes and depth of emotion, but Hock got a degree in engineering and now works as a “technical artist” at tech giant Meta – a career that doesn’t really involve illustration at all.
We spoke with Hock about her background and creative journey, what a “technical artist” even is, how she developed her unique aesthetic, why humor is so important to her work, and what she thinks about the new Wacom MovinkPad 11, which she took on a recent trip to Japan. Note: the interview below has been edited slightly for length and clarity.
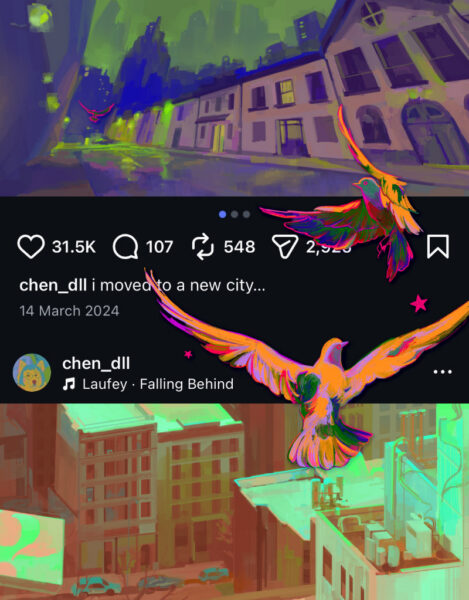
As a young person, did you think art would be your career? You ended up pursuing an engineering degree, rather than going to art school, for example – but now seem to have combined your interests in your current position as a technical artist. How did you arrive where you are now?
From an early age, I discovered that I had an affinity for art, and a strong desire to improve my art skills independently. It was a pretty lonely journey, since I did not have many artist friends who shared a similar passion until I moved to New York for my current tech art job in March 2024.
I’ve actually never considered a career as an artist, or even thought about going to art school. This is partially because I wasn’t surrounded by any artist friends, and I was often told that pursuing art typically led to lesser career prospects. As I also developed an interest in electronics and indie game development, I naturally gravitated towards pursuing an engineering degree.
Keeping up with my art progress while studying engineering felt like I was constantly moving between two completely different worlds. But the key thing that I felt also related the two disciplines was that they both had strong roots in design, and I realised that I could also be creative in the engineering field. In my final year I was able to design my own Master’s thesis project to be more art-oriented: I built a machine-learning-based gesture-controlled VR drawing system.
I didn’t know that technical art was a career path until I discovered the job title one day during my Meta software engineering internship in 2022. It immediately piqued my interest, and I set up several meetings with technical artists in the company to learn more about what it was about. I was then noticed by a tech art manager, who later referred me for my current technical artist role at Meta. My VR thesis project, passion for art, and most importantly my proactiveness in reaching out helped me to land this role.
What exactly is a technical artist? What kind of person might want to pursue this kind of career?
A common misconception that I often get with my job title as a “technical artist” is that people assume I draw for work, especially since I make a lot of illustrations. But all my drawings are actually personal work, and my day-to-day job is much closer to software engineering or game development!
A technical artist is a hybrid role between art and engineering, and often we bridge artists and technology by making tools for artists or building pipelines needed to get their work into production. The exact responsibilities of a technical artist can vary by project and may be specialized, for example in pipeline work – which is what I mainly do – rigging and animation, or shader development.
I was drawn to technical art because I wanted to be able to work in a field closer to art than just doing traditional software engineering, and I think someone who’s both technically-minded and likes to work closely with artists would enjoy this role, too.
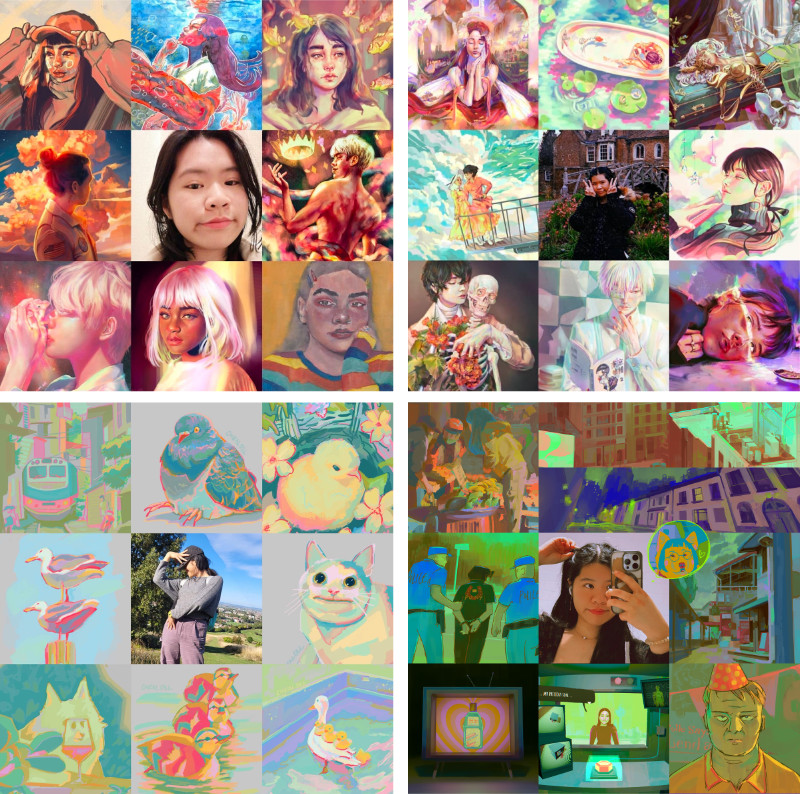
Your personal artwork has a unique color palette and aesthetic that’s difficult to describe – your use of muted neons and metallic colors creates a dreamlike, almost holographic quality. How did you come to develop your particular style?
Thank you! I’m a huge fan of iridescent and holographic colors, so it makes me happy to hear that I am able to convey that quality through my artwork. Thinking about how I can push colors more in my artwork and exploring new color palettes is always at the top of my mind when I’m drawing. I’m super inspired by artists like rei_17, namendart and Slawek Fedorczuk, who have very unique and “unconventional” color choices in their work, and I wanted to also develop my own distinct approach to color that’s uniquely mine and instantly recognizable.
The journey to get there has been a slow evolution over time of countless explorations, mainly driven by me identifying “gaps” in my artwork. When my art used to be higher contrast and used more orange, I pushed myself to use softer, more pastel colors. Then when I felt like I had lost touch with understanding how to use darker colors, I challenged myself to bring contrast back into my artwork while keeping that prismatic quality that I had discovered in my pastel artworks.
After I completed a short art mentorship with Slawek in early 2024, I developed the darker, more neon colors I use in my most recent works.
Another clear feature of your personal work, the art products you make, and your social media presence is an irreverent sense of humor, whether you’re surreptitiously editing another artist’s work to look like handsome Squidward, designing t-shirts about how to throw a fish, or pretending to keep your Wacom MovinkPad 11 in the fridge. Why is humor important to your practice? How do you balance taking your art “seriously” and keeping things fun?
Beyond just making art, there’s also art in its presentation, especially for social media. I believe combining humor and art makes my work more engaging, and it’s also my way of injecting more personality into my work. It’s super important for me to have fun while making art, and making things that other people enjoy and find funny makes me very happy!
What does it mean to keep art “serious?” I think this would depend on the artist’s goals. A friend of mine who works in the industry as an artist treats her Instagram more like a portfolio, and said that she’d be hesitant to post the kind of content I enjoy making – like my Squidward art. I wouldn’t know how much my more “unserious” work may be deemed unprofessional in that realm, but that also doesn’t matter to me anyway, because I don’t intend to use my art to pursue an industry art job anytime soon. I’m more interested in paving a path as an independent artist so I can do it however I want, and also have fun with it!
You recently took the Wacom MovinkPad 11 on a trip. How was the experience?
I took my Wacom MovinkPad 11 all-in-one drawing pad with me while I was in Hokkaido recently, and drew along the way. It’s super lightweight and portable, and it’s pretty slim so it fits in my bag easily. I tried the built-in Wacom Canvas app, and it was convenient for sketching on-the-go. I did some sketches on the bus on the way to the ski resort. Later in the evening, I made a more colorful illustration in an izakaya in Otaru.
I really like the feel of the tablet; it’s the same feel as drawing on a small version of the Wacom Cintiq – but totally standalone. The MovinkPad case lets me prop up the tablet to a comfortable viewing angle, although it only has one angle. The battery life was really good; I only charged it once the day before and it lasted me through the two-hour evening drawing session with plenty of charge to spare. Also, the three buttons on the pen allow me to color-pick and pan my drawing, and the extra nibs stored inside the end of the pen are convenient! The pen is battery-free and has a super slim form factor, which I like a lot and prefer for portability.
I would recommend this tablet for travel – it’s definitely designed for drawing-first, and since it’s an Android tablet you can also install other useful apps that you may need on it as well!
Outside of your primary job, you do a lot of other things – illustration, apparel design, crochet, animation, game design, and more. Do you have one thing that you consider to be your primary artistic discipline, and why? How do you balance so many different interests?
I’d say my primary art discipline is still illustration, but fundamentally I just enjoy the process of being creative, no matter the medium. I love the process of learning new things! Most of my projects force me to pick up something that I haven’t done before, adding to the arsenal of skills I can draw from in future projects.
For me, it’s not necessarily about finding a balance of interests, as I feel like I don’t keep up with any single one super regularly – I’m OK with being a “jack of all trades, master of none,” perhaps? I’d like to eventually shift towards bigger-scoped mixed-media projects, where I can indulge in more of what I love beyond just illustration, and have that become an integral part of my identity as an artist.
Do you have any advice for young or beginning artists who are trying to figure out their path – whether to go to school or for what major, balancing different interests, developing as an artist, etc.?
A while back, I had the opportunity to chat with Goro Fujita, a very accomplished art director. Something he said while sharing his own journey stuck with me: “It’s always easy to connect the dots backwards, but not forwards.”
In my case, I pursued art because I enjoyed it; I learned game development because I thought it was cool, all without a clear idea of what I’d do with any of it. I didn’t know what options could come up for me in the future. It can feel uncertain, maybe even directionless, if you think too hard about “What am I doing this for?” But I think you should just keep doing things for yourself if you like it. You never know when a future opportunity might require that random skill you picked up years ago – and if the stars align, it could turn into something you really love!
Got anything cool on the horizon that you’d like to share?
I’ve been getting more into cinematography recently! And embarking on increasingly ambitious projects … Last year, I crocheted 22 chickens for all my friends and gave them away at my 25th birthday party. I put them all in “blind boxes” and got my friends to guess whose chicken belonged to whom in a fun social activity that I designed. I’m in the midst of turning it into a high-effort YouTube video, but that may still be in the works for a while yet, depending on what other side-quests come up for me. Beyond that, I aspire to make more short games this year, work on more story-based projects, and make more funny videos!
About the artist
Yi Chen Hock is an artist who is known for her colorful and vibrant illustrations. She currently works as a technical artist at Meta, and in her spare time she also likes game development, crocheting, and making funny videos.
Follow her work on Instagram, YouTube, Tik Tok, Bluesky, ArtStation, or LinkedIn.
This collaboration delivers seamless, high-performance experience for creative and design professionals who rely on Wacom pen displays and pen tablets while working on remote or cloud-based workstations. With Wacom Bridge integrated into the Arch Platform, users retain full Wacom driver functionality, including customized settings, while benefiting from reduced latency, seamless switching between local and remote desktops, and Wacom Inkline. The result is a truly “local-like” feeling, even when connecting to a virtual workstation from anywhere in the world.
By combining Arch’s cloud workstation infrastructure with Wacom’s industry-leading pen technology, creative professionals can work without lag, maintaining the precision, responsiveness and accuracy they expect, no matter where they are located.
Key Benefits of the Arch Platform X Wacom Bridge Integration:
- Unparalleled Creative Freedom: Creative professionals can achieve native Wacom input performance while accessing Arch Platform-hosted workstations from virtually any location, enabling flexible workflows and seamless collaboration across distributed teams.
- Enhanced Performance and Responsiveness: Wacom Bridge’s optimized remote driver protocol minimizes latency and maximizes pen accuracy, delivering a natural, fluid drawing experience even over long distances.
- Streamlined Workflows: The seamless integration simplifies setup and management of remote creative environments, including support for roaming profiles, so users focus on creating instead of troubleshooting.
- Scalability and Flexibility: Arch Platform’s performance right-sizing and scalability allow teams to allocate resources appropriately, protect valuable assets, and adapt to changing project needs, all while maintaining Wacom’s industry-leading pen experience.
- Cost Efficiency: Users can avoid over provisioning by paying only for the compute resources they need, accessing high-performance cloud workstations from nearly any end-point computer attached to a Wacom device.
Click here to Learn More: Wacom Bridge – Streamlining Remote Desktop for Professionals with Technology Solutions
]]>Fair point. A MacBook Air is great for coffee shops. Not so great for running Houdini simulations or training AI models.
The obvious answer is cloud workstations. Spin up a beefy Windows machine on AWS with a serious GPU, connect remotely, done. Except… if you’ve ever tried to use a Wacom tablet over a remote desktop connection, you know the pain. That slight delay between your pen stroke and the line appearing on screen? It’s maddening. It breaks the whole flow.
We run Remāngu, a platform that orchestrates cloud workstations for creative and technical teams. And honestly, the tablet latency issue was one of our biggest headaches until Wacom Bridge.
What Actually Changed
Wacom Bridge is a piece of technology that makes your local Wacom tablet behave as if it’s physically connected to the remote machine. Not “almost like” – actually like. The pen data gets transmitted separately from the video stream, which cuts out most of the lag.
There’s also this feature called Inkline that draws a temporary local line the moment your pen touches the surface. Your brain sees immediate feedback, while the actual stroke catches up milliseconds later. Sounds like a hack, but it works surprisingly well.
We integrated this into our Remāngu workstations running on AWS. The setup takes about two minutes. You log into your Remāngu workstation, Wacom Bridge activates automatically through Amazon DCV, and that’s it. Your Cintiq or Intuos Pro works exactly as it would on a local machine.
Why This Matters for Creative Teams
For VFX artists: You can run Houdini on a cloud workstation with 80GB GPU VRAM while sitting at home with your MacBook and Wacom tablet. Your studio doesn’t need to ship you expensive hardware. You don’t need to be in the office.
For game artists: Substance Painter, ZBrush, Blender – all of these benefit from GPU acceleration. Running them on cloud workstations means your local machine doesn’t matter anymore. A three-year-old laptop becomes a thin client to a workstation that would cost $8,000 to buy.
For AI/ML workflows: ComfyUI, Stable Diffusion, custom training pipelines. These eat GPUs for breakfast. With cloud workstations, you scale up when you need power and scale down when you don’t. No more rendering overnight because your local machine can’t handle the load.
For Mac users specifically: A lot of professional creative software either runs better on Windows or is Windows-only. Cloud workstations let you run those Windows apps from your Mac without dual-booting, without Parallels, without compromise.
The Boring (But Important) Stuff
Studios like cloud workstations for reasons beyond raw performance:
- Security: Project files never leave the cloud. Artists can work from anywhere without carrying sensitive assets on their laptops.
- Maintenance: IT updates one golden image instead of fifty individual machines.
- Scalability: Need ten more workstations for a project crunch? Done in an hour. Project ends? Scale back down.
- Cost: Pay for compute when you use it. No hardware depreciation.
The tablet latency problem was the last real blocker for many creative workflows going remote. Wacom Bridge removes it.
See It In Action
We put together a short demo showing the whole flow, from login to drawing lag-free in under a minute:
Try It Yourself
If you want to test this setup, Remāngu offers cloud workstations with Wacom Bridge pre-configured. Use code UNREAL100 at signup for a free trial – just click here. Works with Wacom Cintiq Pro, Intuos Pro, Movink 13, and most other professional Wacom devices. Both Windows and Mac clients supported.
Remāngu is a cloud workstation platform built for creative and technical teams. We handle the infrastructure so you can focus on the work.
]]>Airi is currently a Senior Concept Artist at Riot Games, but she has worked in a variety of fields for a variety of companies from Riot to Netflix, Pixar, Activision, Warner Brothers Animation, and more. But she also makes time for drawing fanart and sometimes sketching in public places, which she thoroughly recommends. With that in mind, we wanted to see what she thought of the Wacom MovinkPad Pro 14, Wacom’s latest Android-based portable drawing pad, the perfect digital sketchbook for staying creative while you’re out and about. That video is embedded below.
We also interviewed her about her background and inspiration, her thoughts on art school, why she teaches a Schoolism class, and advice she has for young artists. That interview is below. Note: the following interview has been lightly edited for length and clarity.
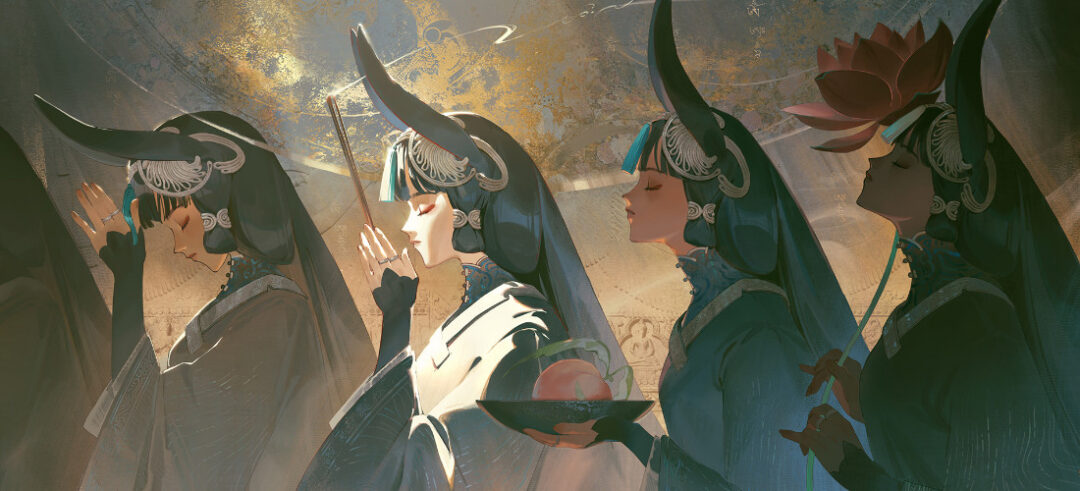
How did you discover your passion for art? Were you a creative kid?
I’ve been drawing for as long as I can remember. When my parents watched TV when I was around three or four, I’d draw alongside them. I’m not sure if I was a creative kid, though. I think a creative kid is someone who does abstract pottery, and paper maché, and makes portraits out of shoelace aglets. I just have always had an overactive imagination and my one emotional outlet is drawing!
You’ve said that your influences include anime, cartoons, and video games, and that these were your interests growing up – why do they continue to inspire you today?
As a kid, I liked these things because they were fun, beautiful, and had wonderful stories and characters that I could relate with. But now, as an adult I actually admire it so much more! Now that I know how they are made, I know that anime and games are miracles of an entire team working together. It’s a mixture of money, talent, logistics, production, and communication to create one of the biggest art forms. It feels like the biggest team sport ever, except the game can be a lifelong pursuit, absolutely amazing, and it just keeps getting prettier and prettier every year.
What has inspired your art on a technical, stylistic level? The color palettes you use and how you wield contrasting colors, the dynamism of your poses and the action and movement you capture, and the painterly, traditional feel of your illustrations are very unique.
Why, thank you! I grew up being trained classically as an oil painter and watercolor painter, so those foundations have never left me. In high school, I idolized famous painters like Zorn and Sargent, and did endless master studies. But at the same time, I love anime and super modern interpretations. I think I naturally found a way to merge these two loves. The same with my culture: I was born overseas in China, and then brought to America, and I think my art style naturally has an East meets West flavor.
You teach a Schoolism class, and have mentioned that you learned a lot from Schoolism early on, but you also went to art school. How do you feel about art school in 2026, especially compared to self-teaching? Would you recommend art school to a young person today?
I think self-teaching is amazing, especially when you don’t have the resources to actually meet someone in person from the industry, which is why I took Schoolism in high school. It was the only way for me to see that concept art was a genuine field. However, art school gives something that self-teaching cannot, which is community and like-minded individuals.
It’s kind of like an incubator, where your skill is multiplied because everyone around you is also grinding away. It’s honestly a magical experience. I know many people hate art school, but I loved going to art school, and if it wasn’t so expensive – and full of endless amounts of assignments – I’d want to go back. My suggestion for anyone is to try it, and you can always quit after a year if you despise it or if it does not make financial sense.
Speaking of Schoolism, you often teach others – both with your Schoolism class and your YouTube channel, on which you publish extremely high-quality art advice videos. Why is this an interest of yours?
Part of it is because I can’t shut up! But another part of it is because I sometimes feel angry about the advice/teachings I’ve seen, that are outdated, no longer helpful, or have an awful mindset. It’s honestly a lot of work to put out these videos, especially on top of a full-time job. But it’s fueled by this feeling of ,“If no one else will do it, I will.” I always publish these with myself in mind: what would I want to see in the world? How would I want to be taught? I am not a savant or a genius. They definitely exist, but I know I got everything through sheer hard work. So I want to teach in a way anyone can understand, no talent needed!
In one video, you encourage artists to “go sketch in public.” How has the Wacom MovinkPad Pro 14 affected your sketching habits?
Well, one thing that’s for sure is that I can finally sketch in low-light areas now! It used to be impossible to draw outside at night, and the MovinkPad Pro 14 helps alleviate that. I took it with me to Taiwan, and I would doodle on long taxi rides. It also helps alleviate desk space so I don’t need to grab my entire giant bag of tools.
You’ve been a Wacom user for a long time. Why do you choose Wacom products?
I genuinely think they have the smoothest interface, and also, the most chic appearance – that matters a lot to me, actually! The pen-to-screen experience is never hindered by anything and feels so natural. I still remember my first Intuos tablet when I was in middle school, I used it so much I wore all the nibs into little knives!
In a recent video, you discuss your love of fanart and defend it as a worthwhile pursuit. Do you ever struggle to find time to work on personal projects?
Oh, absolutely. That is exactly the struggle I am going through right now! Because I love my job, and I put in extra heart into anything I love, I find my heart going “Help, I’m dying!” When I try to work more outside of work. So, I’m trying to find balance. This is an active pursuit for me right now!
Because I grew up with the IP that I am currently working on, it actually feels like I am drawing fanart for my job, which is a great feeling. I actually had a lot more time for personal work at previous companies when I was less invested in the IP. The heart is sadly a finite resource… or maybe it’s time, not the heart?
What advice do you have for a young artist who’s thinking about pursuing a creative career?
Like all careers, this is a job, not a hobby. A job means having adequate skills for the trade, exposing yourself to a competitive market, having to do things you will dislike. And like any job, there’s a lot of administrative work attached to it that has nothing to do with the creative work! Things like emails, making presentation slide decks, having meetings, tech issues, insurance, contracts, etc. Everything has a bright side, and a dark side. For art, the dark side is instability, high competition over jobs, and years of studying your craft. You have to love the bright side enough to not let the dark side affect you. If you’re able to do this, there is nothing better in the world – and nothing else I would ever rather do!

About the artist
Airi Pan is a concept designer, illustrator, and creative director for games, animation, film, and more. Currently, she is a Senior Concept Artist at Riot Games, but previous clients include Netflix, Pixar, Activision, Warner Brothers Animation, and many others. To her, concept design and illustration aren’t merely about creating artwork; they are about understanding the final product, and how artwork helps serve something bigger than the design itself.
Follow her work on Instagram.
A longtime Wacom user, we wanted to know what he thought about Wacom’s latest, the Wacom MovinkPad portable drawing pads. Because they use the Android operating system, they’re truly portable, meaning it’s easy to bring sketches and illustrations to show friends, to a client meeting, or to work wherever your creative inspiration brings you.
To give the MovinkPad 11 a try and in honor of Black History Month – and to open up a dialogue about different approaches to logo design – he created the comic below. What do you think? Is a modern, minimalist logo a better option? Or a character-based illustration? Get in the comments on Instagram to share your thoughts. Enjoy!
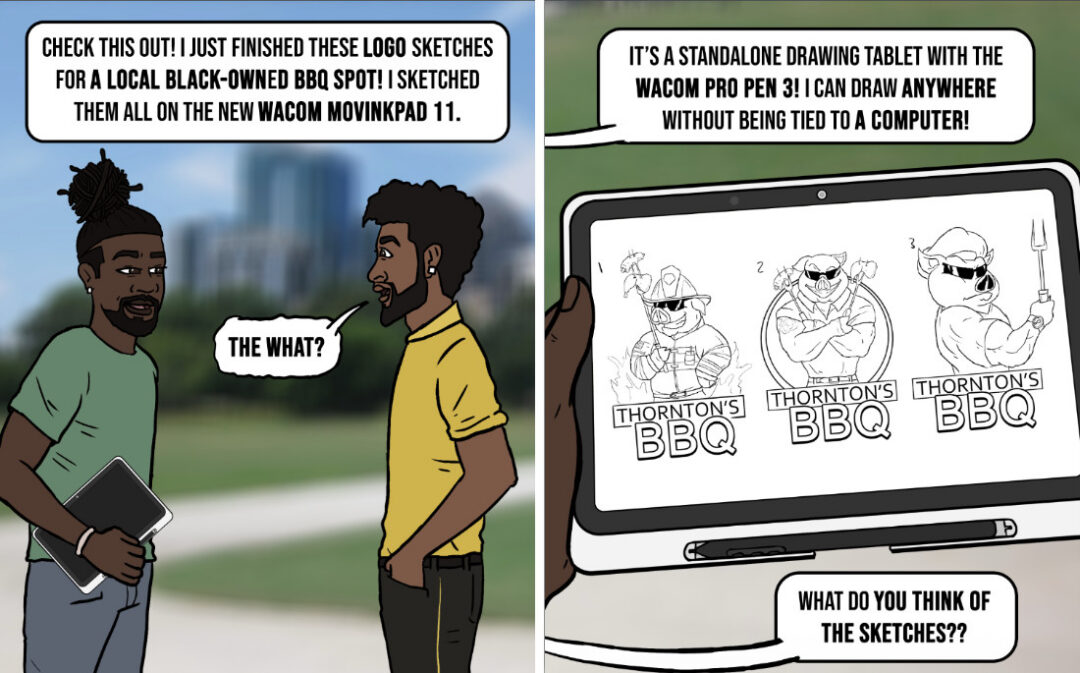
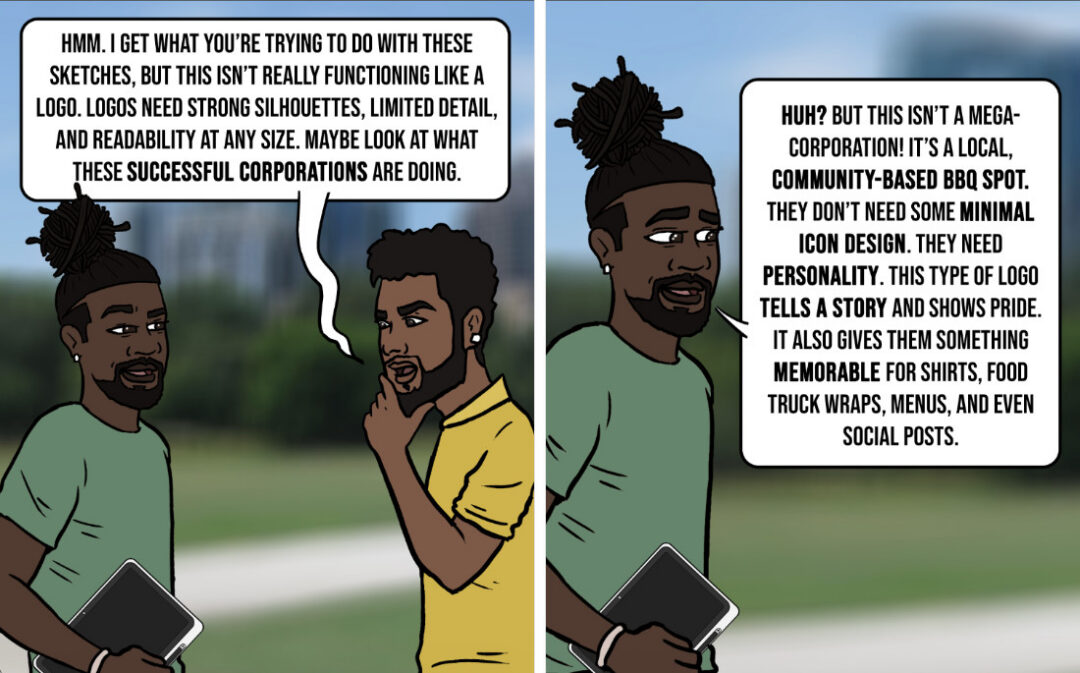

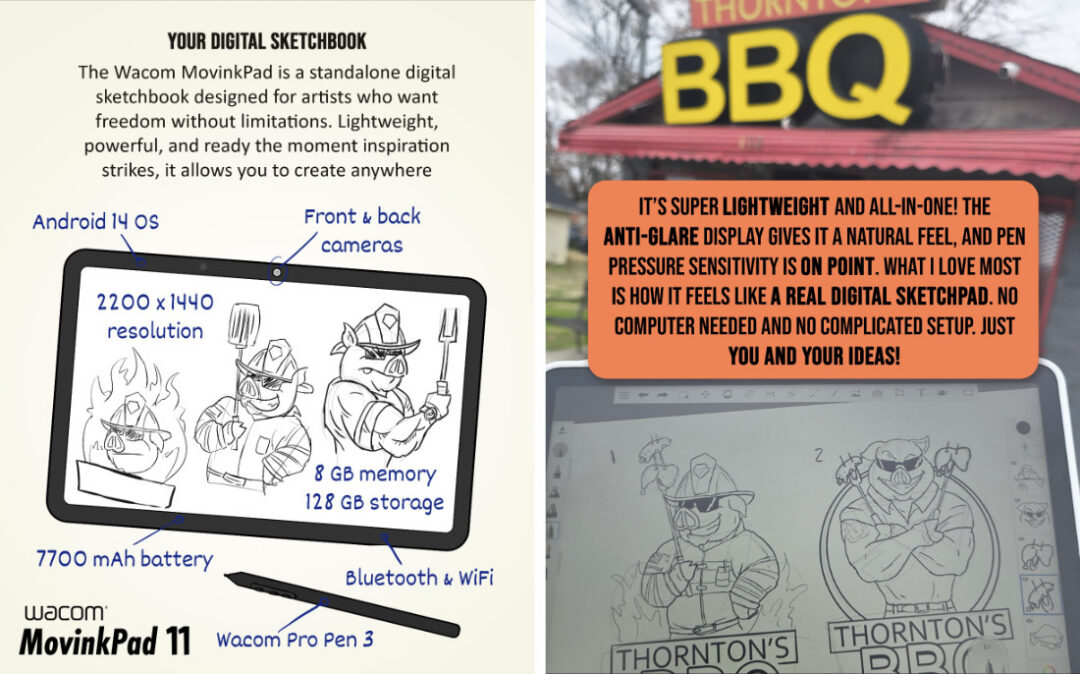

About the artist
Davian Chester is a creative from Columbus, Georgia. He is best known as the creator of Real Toons, a comic series that points out the absurdity of stereotypes and biases in the Black community. Davian is also known for getting Google to create an official Juneteenth Google Doodle. Since then, Davian has continued to make social statements with his art. By Illustrating the Black experience, his work brings awareness and conversation. He is currently a regular contributor to Cartoon Movement and the Miami Times. Follow his work on Instagram.